
What you’ll learn:
Essential guide: Post-production workflow

Changing habits are driving video and audio content to new heights. Video content, and audio content consumption are indeed boosting in popularity.
But is your post production workflow getting the best results possible? Here's how to streamline your post-production workflow and optimize your video content so your video can reach its full potential.
When it comes to creating video and audio content, there are three key phases. Post production is the third and final stage of video creation and it follows on from the first stage, pre-production and the second stage, production. Here’s a closer look at each phase.
Pre-production is the planning phase. It includes every step of work that occurs before a film is shot.
What’s involved: Scripting, Storyboarding, Shot List, Hiring, Casting, Costume & Makeup Creation, Set Building, Financing and Insurance, Location Scouting.
TIP: Having a strong concept is an essential component of a video. Unfortunately is often an overlooked step in the production process.
Production is the phase where you call on the documents you created during the pre-production phase to coordinate the shoot and elevate your results.
What’s involved: Filming, On-location Sound Recording, Reshoots.
TIP: The quality of footage you get in production can't be corrected in post-production, so make sure the footage from production is the highest quality you can get!
Is typically the stage after production when the filming is wrapped and the editing of the visual and audio materials begins.
What’s involved: Editing, Colour Grading & Correction, Visual Effects & Animation, Sound Recording, Foley Recording, Script Sound Recording, Sound Mixing & Editing, Soundtrack & Music.
TIP: Using a post-production editing software gives you a flexible, more intuitive and fast way to edit video, enabling you to take your creativity to the next level.
Post production workflow might vary according to whether you’re creating a video or audio project. Here’s a summary at each main stage which we will get deepen later on by following the post production workflow of VEGAS Pro Post (our Software) outlined below. VEGAS Pro Post gives you the tools you need in order to follow the same steps.
One first essential step starts with making a good plan. For most professional productions, the plan takes the form of a well-crafted script along with detailed storyboards. Its fundamental to organize and prepare the various files from the production phase so you can plan the story you aim to tell, while maintaining a logical flow and consistency to it.
Right from the start, keep your media organized – a good, efficient video editor relies on effective media management. You should watch and organize all of the clips, trim away unusable footage, and provide as many great options as possible.
Once you’ve decided on the files you want to use for your video, import them into your project. Then, you can sort the footage into folders or “bins” which can be organized the way which works best for you.
After the clips have been organized, it’s time to create the rough cut. The goal of a rough cut is to make the best possible version of the director’s original intentions. Here are simple rules for a rough cut:
- You must use all of the coverage, including at least once instance of each angle, all designed camera moves, and planned shots like rack focus’s and dolly shots.
- You must not remove any script lines or scenes.
- You must not change the order of any lines or scenes.
The first cut is the rough cut that is accepted by the editor, the director and the producer. Selection and sequence are basically fixed, although changes can still be made.
The fine cut no longer focuses on the entire film, but on the details of each and every cut. The fine cut emphasises and strengthens the rhythms and structures identified in the first cut.
You can turn a mediocre video into a remarkeble one by utilizing color correction and grading. Simply put, color correction is about fixing problems in exposure, contrast, white balance, and overall color to produce a natural, baseline image which matches the eye’s view. Color grading is where you make your artistic choices, set your mood, and let color and contrast help establish your world and tell your story.
Now that you have your polished edit, it’s time to add corrections, enhancements and visual effects.
With design computer-generated visual effects you are able to achieve effects that aren’t always feasible in real life. Visual effects can range from digital animation, implementing a green screen background or making something blow up!
Adding the final visual effects to a video in the post production stage, whether it’s something as subtle as colour rendition, image correction and compression, or more noticeable technical visual effects tweaking - represents a critical final step for any film.
With your visual edits and effects now in place, it’s much easier to add in music and other sound effects and synchronize it to your video. Here a few important points to consider:
- Clean up any sound that needs it, using noise filters and other audio tools to remove as much unwanted background noise as possible
- Then you can add enhancements like sound effects, voiceovers, music, and everything else which makes a great video experience.
- Prepare the final mix. Now that your file has been edited and adjusted, it’s time to finalize the mix and export it to your preferred file formats.
Now it’s time to add titles and credits at the beginning and end of your video, and any other text you may need. Don’t forget that you have the chance to make titles really creative and interesting!
Post production includes all stages of production occurring after shooting or recording individual program segments. First and foremost, it’s important to place a huge emphasis on a logical, accessible way organization throughout the post production phase. You can choose to follow lots of traditional organization methods, or, alternatively, develop your own strategy.
Here’s how you can organize your assets in a better way:
- Create a separate folder for each scene’s footage and audio.
- If necessary create subcategories for footage, audio, and images.
- Make sure that the clips are properly named. It would help if you ideally named them with the scene number or the shot number.
To ease your workflow is essential to create project templates for each project type. This way you avoid creating a new project template every time and starting from scratch - saving energy, time and resources to your creative abilities.
Some of the benefits:
- You will recognize your organizational methods.
- You will know how to split your media and easily sort it as media type.
- You won't have to start from scratch every time since you can replicate the template for an identical project type.
- It allows you to focus on your creativity instead of spending time setting up a framework.
- In a nutshell, it increases efficiency, helping you meet deadlines and budget constraints, and also keeps everyone on the same page.
It’s important for you to choose the software you need, and stick with it, avoiding team members to run into compatibility issues because they used different tools. This tactic can help drive efficiency and reduce downtime.
VEGAS Pro Post it's a top-end, cutting edge video editing and post-production content creation software that includes four professional editing products in one suite (VEGAS Pro, VEGAS Effects, VEGAS Image, and SOUND FORGE). Give it a try for free!
During post production, you’re often working against a fast-approaching deadline So is crucial to have the ability to adapt quickly to unexpected changes.
Adopt the NLE approach will give you an upper hand so that you can adapt quickly without complication.
Non-linear editing removed all of the limitations of linear editing – including the complete elimination of dubs – and added countless advantages. By copying files to the hard disk, it is also possible to make various corrections to the material.
Some of the benefits:
- Flexible Editing: it allows you to develop a workflow style which best suits you and how your creative mind works.
- Non-Destructive: original media files are never changed, replaced, or deleted
- Freedom to Make Mistakes: make easy to move clips and segments around, and even copy and paste clips or complete segments from one place to another.
- Easy Re-Editing/Replacement of Media: move, re-edit, delete, or restore whole segments with ease. Save multiple versions of your sequence for later reference.
Tip: Find out more about Non-Linear Editing (NLE) and its advantages
Take in your original media files and creating a new transcode for them during NLE (non-linear editing). The advantage you’ll get from this is that these files are easier to process and handle than the original files.
Tip: Every video editing software handles this process a bit differently so that you might have to do a bit of searching.
Take your original files, create low-resolution proxies for them, and use them instead for editing. What we’re suggesting instead is to create the rough-cut using proxy files and finalize that. That would take you much less time, and once you have the rough cut, you can switch back to the original high-resolution files for other corrections and/or enhancements.
This way, you save time, don’t risk slowing or damaging your system, and streamline the workflow even more.

You’re ready to take your video productions up a notch and produce professional-level work. Here’s a guide to help you edit like the pros, with insights on how VEGAS Pro Post gives you the tools you need for professional editing and post production.
While every production is different, and your needs will vary from project to project, professionals follow certain basic steps, and VEGAS Pro Post gives you the tools you need in order to follow the same steps.
- Complete package for top-end users looking for powerful, integrated video and audio post-production
- Four pro-level products in a single bundle (VEGAS Pro, VEGAS Effects, VEGAS Image, and SOUND FORGE)
- VEGAS Pro- Professional video editing with powerful pro-level tools
- VEGAS Effects- VFX solution with full HDR, 2D, 3D, & 360 environments
- VEGAS Image- Powerful RAW & standard image editing
- SOUND FORGE Audio Studio- Professional video sound editing and mastering

One of the most important steps in professional editing is making a good plan. Plan the story you want to tell, and also how you’re going to tell it in a consistent way.
Good, engaging videos tell stories. A story helps gets what you want to say across to the viewers in a logical, relatable way which holds their interest, with a beginning, middle, and an end. You should figure out the story before you ever shoot, put it together as a script, and refer to the script as you edit, but whether you have a script or not, now is the time to come up with a plan for how to tell the story.
Make sure you plan out how you’re going to use elements like transitions, colors, musical cues, titles and fonts; use them consistently. For example, maybe use certain kinds of color correction with certain kinds of footage, like keeping interviews in full color and then cutting to video of what the interviewee is discussing in black and white or some other stylized color. Plan your transitions so that you use them the same way throughout the video.

Edits begin with media import. Right from the start, keep your media organized – a good, efficient video editor relies on effective media management.
Most professional video productions keep shot logs during production, noting what was shot and marking shots and takes as good and usable, so work from that when you have one. Import according to what you need and how you plan to use it. Take what you need, and arrange your media into bins, which can be organized the way which works best for you: by media type, by scene, by common elements, or whatever makes sense for your production and your editing style.

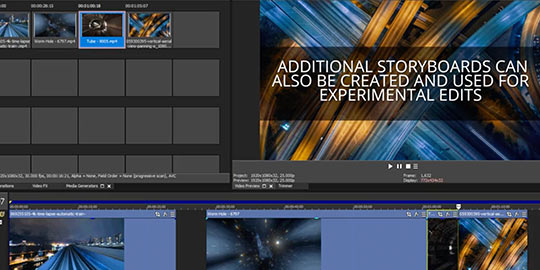
Storyboards offer a great way to pre-trim and arrange your media into the sequence you want before you work on the timeline. Take advantage of a freer workspace where you can rearrange your media as easily as photos on a desk. Preview clips or the entire sequence right from the Project Media window. When you’re ready for detailed editing, your clips are already pre-trimmed and pre-arranged on the timeline.
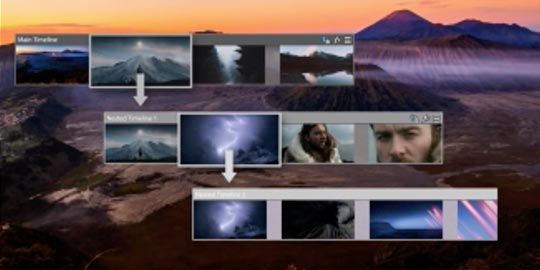
VEGAS Pro is non-linear, so you don’t have to edit your project in sequence from beginning to end. If you decide to work on scenes or sections separately, nested timelines make it simple to work on individual scenes and then bring your entire project together. A great way to keep your timeline tidy and efficient, you can place your scenes on the main timeline as single timeline clip events, but you can still go back into the scene to change things if needed.
Now it’s time for fine edits. Here’s where you get down to the details of trimming your clips to just the right timing for your scenes. Brevity is often key; get into your scene, make your point, and get out. Your audience may lose interest if a scene takes too long to get its point across.


Used effectively, animated transitions like wipes or flashes can add some visual interest to your videos, but don’t overdo it. Always use them sparingly, and when you do, use them logically and consistently. Use them to emphasize important points in your video or to move between, for example, interview segments and b-roll, but avoid making them too flashy or distracting, or you may exhaust your viewers.

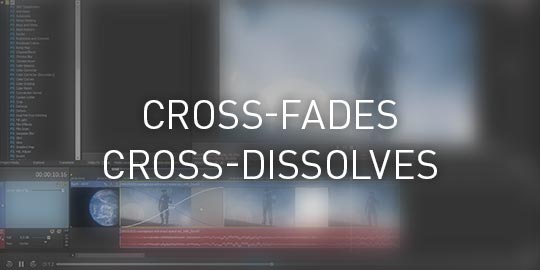
VEGAS Pro features automatic crossfades. Just overlap two events on the timeline and you instantly create a crossfade, also known as a cross-dissolve. No need to drag handles or retrim events; the ends of your timeline events remain the same and the overlap becomes a crossfade. If you want to add one of the huge selection of GPU-accelerated animated transitions, all you have to do is drag and drop it into the crossfade.
VEGAS Pro also offers GPU timeline acceleration, allowing for faster, smoother playback of AVC and HEVC video. This enables you to edit in real time even with many layers and added effects.

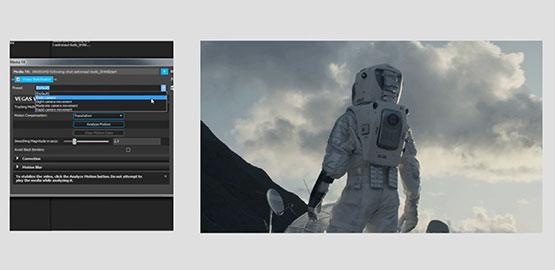
VEGAS Pro offers a world-class Video Stabilization plugin that enables you to quickly and easily turn shaky footage you thought you couldn’t use into glass-smooth video, with dozens of settings and tools for detailed control when you need it.
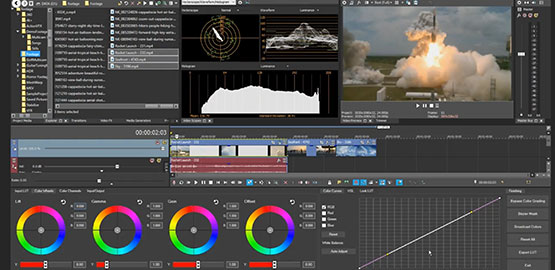
The unified Color Grading panel in VEGAS Pro puts many powerful color correction tools right at your fingertips in a single window, so you can do all of your color work without having to open up multiple sets of effects and controls. It's optimized for HDR and can work in the ACES 1.1 color space -- and with accurate professional video scopes, also optimized for HDR.
For powerful, advanced color correction, VEGAS Effects and VEGAS Image give you even more tools for color correction and grading. Both include dozens of robust image filters and effects.
Use color curves to correct brightness and black levels, and use color correction tools to bring your colors into proper balance and saturation. Use video scopes while correcting. Don’t trust your eyes alone.
Next, use color grading creatively to establish moods or differentiate elements in your video. For instance, use true colors for interview segments, and then move to a colored tint or more extreme color look for re-enactments or dramatizations. Be creative, but be consistent.
When applying looks, take advantage of VEGAS Pro tools like savable color presets or exportable LUTs, which you can then easily apply to multiple clips. VEGAS Image also offers complete LUT support.
Pros leverage text and titles to elevate their videos, but don’t get too flashy or colorful; that can look amateurish. Make a logical, consistent plan for the types of fonts you’ll use and how you’ll use them throughout the video. Use preview guides like grids and text-safe areas to keep them in good, visible, consistent locations in the image, and use effects like drop shadows to make the text stand out from the background and more readable.
VEGAS Pro offers multiple professional title plugins, giving you quick and easy professional text and titles, while VEGAS Effects puts Hollywood-level 3D titling with lighting, shadows, and environment maps at your fingertips.
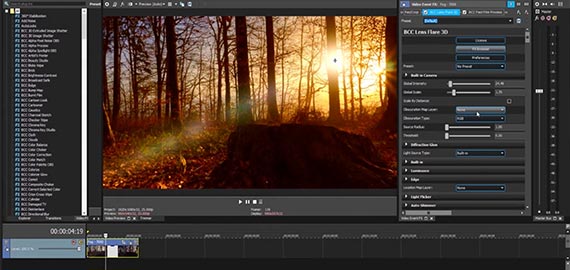
Pros usually add VFX like compositing or CGI elements after all the other visual work.
With amazing features like planar motion tracking, mesh warp distortion correction, optical flow slow motion, powerful, professional chromakey, and much, much more, VEGAS Pro offers a full suite of FX capability with no need ever to leave your timeline. But for astounding, advanced compositing and VFX, VEGAS Effects broadens your toolset with over 800 effects and filters, particle and muzzle flash generators, 3D model rendering, and so much more. VEGAS Image gives you more powerful compositing and chromakey tools for your project's still images. VEGAS Pro Post is your VFX powerhouse.

Take the power to forge your own reality. Manipulate the animation with audio clips for unlimited creative possibilities.


Use your audio meters to get even, consistent volume. You can’t just trust your ears for this, especially if you’re editing scenes separately the normal range for dialogue is about -20 to -12 dB, and you need your meters to make sure you’re hitting that range.
Clean up any unwanted sounds, and always fade into and out of sounds to avoid digital clicks and other unwanted artifacts. Use crossfades for smooth transitions between sound clips.
While you can use audio tools like equalization (EQ) to fix problems like hiss, other audio problems like background noise or echo can’t easily be fixed. You want to be sure you record good, clean audio the first time instead of relying on “fixing it in post.”

Then add your music and sound effects, keeping their volumes consistent with a well-balanced sound field.
VEGAS Pro offers world-class, unmatched audio tools that give you a full digital audio workstation right on your main project timeline. With an audio control panel modeled after physical mixing stations and an incredible suite of audio FX, there’s no need to move to outside software or even a special “audio-only” mode. VEGAS Pro seamlessly integrates audio into the main video timeline for the fastest, most powerful audio editing anywhere.

Export your video according to your needs. Web streaming, DVD or Blu-ray, broadcast, or other methods of display all have different requirements, but always export at as high a bit rate as you can.VEGAS Pro lets you take control of your export through extremely customizable render templates which enable you to dial in exactly what you need. Whether it’s for streaming, optical disc, or even broadcast, VEGAS Pro has the tools to render to even the most exacting standards.

What's the difference between VEGAS Pro and VEGAS Pro Suite?