
What you’ll learn:
Using L-cuts and J-cuts in video editing
L and J-cuts are powerful and simple techniques that add layers of depth and immersion to your film. These two cuts may be simple but incorporating them into your editing will improve it, and create more compelling video and films.
Use these cuts to make conversations in your films smoother and more natural, and create cohesive transitions from scene to scene. Ultimately mastering these techniques enables you to push your films and editing to a new level.
How do J and L-cuts impact the audience? How to use them to engage and influence any audience? Learn about editing techniques of L-cuts and J-cuts, how they're used, and how to create them in your own projects.
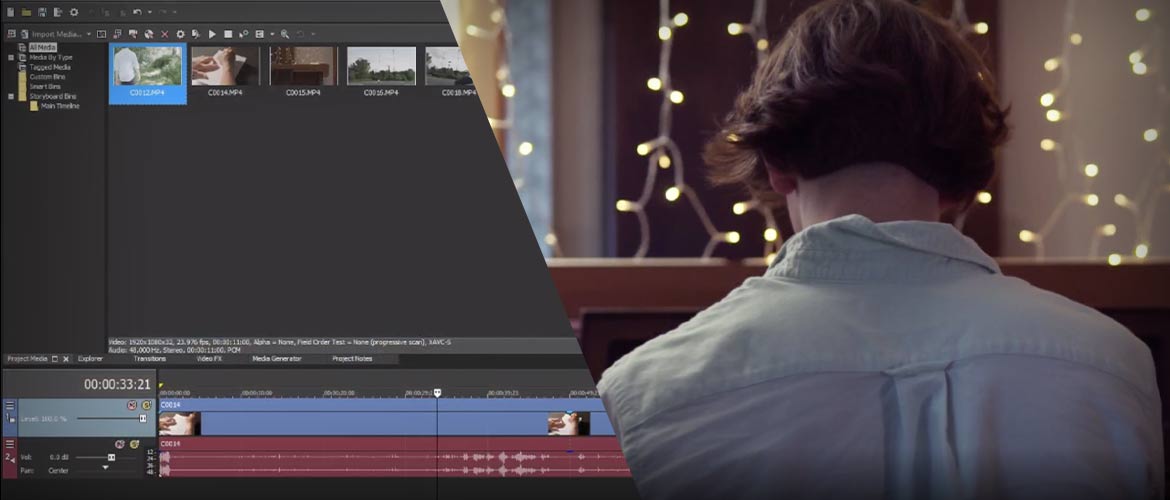
When movies added sound, not only did the experience of watching movies change, editors developed new techniques to work with sound and help tell stories in dynamic and engaging new ways. Some of the earliest techniques developed were L-cuts and J-cuts. With L-cuts and J-cuts, editors add interest and even tension to dialogue scenes, taking advantage of the ability of sound to feed the audience dialog instead of needing a text card to deliver it. Editors were free to focus the visual attention wherever they wanted while the audience hears the dialog.
Useful Tips: Essential Video Transitions
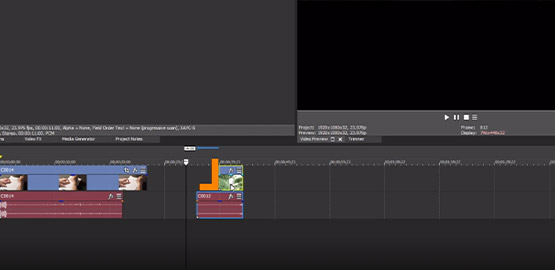
These cuts get their names from the way the footage appears on the editing timeline – audio starting before the video resembles a J, and audio extending out past the video resembles an L.
VEGAS Pro makes creating L-cuts and J-cuts simple and easy. In this tutorial, we’ll teach you how.
We’ll go through these steps:
STEP 1: CREATE AN L-CUT
STEP 2: CUT ANOTHER EVENT INTO THE L-CUT
STEP 3: CREATE A J-CUT
STEP 4: CUT ANOTHER EVENT INTO THE J-CUT
And when we’re done, you’ll know how easy and quick it is to make L-cuts and J-cuts in VEGAS!
Put simply, it’s kind of boring to watch people have a conversation and cut back and forth between them as they say their lines. L-cuts and J-cuts break up the conversation and let you engage the audience by showing them characters reacting to dialog instead of just saying it. Instead of always cutting right on dialog, you hold on a character while the next character starts talking (J-cut), or cut away from the character who’s speaking before they’re done and cut to the other character listening and reacting (L-cut).
With practice, you’ll learn to love L-cuts and J-cuts for the creative interest they add to dialog scenes or even other kinds of scenes. The point is, you don’t always have to show the sound synced up with the visuals, and imaginative, creative cutting can go a long, long way toward elevating your storytelling and really engaging your audience.
Useful TIps: Creative Ways to Deal with Jump Cut
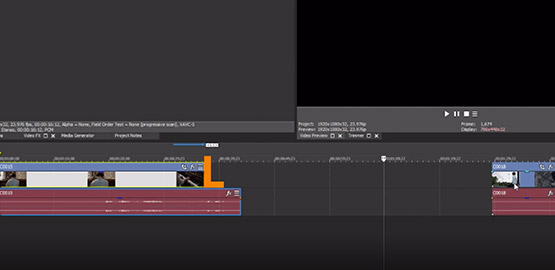
To create an L-cut, trim the right edge of the video event without touching the audio event.
✓ Hold the Shift key as you drag the edge of the video event to the left. Holding Shift overrides the event group and enables you to trim only the video event. Now, because the video cuts away before the audio, you have an L-cut. Note that as we said, the video and audio events now resemble a letter L.
✓ Add another video event to the timeline, after the first video event. Snap the left edge of that event to the right edge of the first video event. This creates a hard cut between the video events, but it also creates an audio crossfade between the audio events.
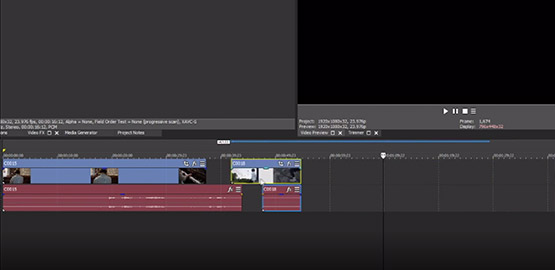
✓ Hold the Shift key and then trim the second audio event to the right. Once you have some space between the left edge of the audio event and the left edge of the video event, release the Shift key. This allows you to snap the edge of the audio event against the right edge of the original audio event.
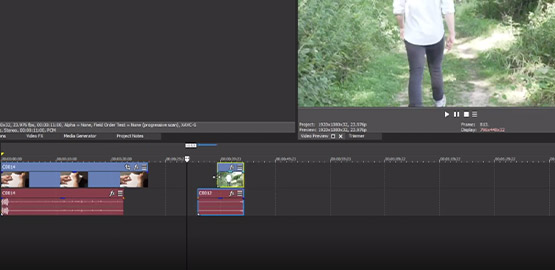
Add another video to the timeline, before the first video event.
✓ Like before, drag the right edge of the new video event to the original video event and snap it up against the left edge of the video event.
Again, this creates a crossfade between the audio events, so hold Shift and drag the right edge of the new audio event. Release Shift when you’ve got some space between the right edge of the audio event and the right edge of the video event. Trim the audio event to the left until it snaps against the left edge of the original audio event.
L-cuts and J-cuts are easy to create and make your video more dynamic and interesting. Try using L-cuts and J-cuts today! When you have mastered the L & J-Cuts, try also Match Cut for an elegant transition effect.


What's the difference between VEGAS Pro and VEGAS Pro Suite?