
What you’ll learn:
Discover powerful compositing tools
Compositing is combining any two or more images into one. So, even something simple as putting titles over an image is compositing. Usually, when you think of compositing, you think of far more complex effects, but essentially, any combination of images is a composite. VEGAS Pro offers an astonishing array of compositing tools and features which let you combine and blend images together in nearly infinite ways. It would be impossible to cover them all in a single article, so let’s look at some of the lesser-known, but incredibly powerful, compositing features found in VEGAS Pro.
We’ll look at:
Compositing Modes
Track Motion
Compositing Parent/Child Tracks
3D Compositing
Read on to find out more!
Compositing modes, or “blend” modes as they’re referred to in some other software, represent various mathematical formulas for blending the pixels of two images together. Different formulas produce different results.
✓ Drag an image or video media to the timeline. Drag another image to a track above it and place it directly above the first event.
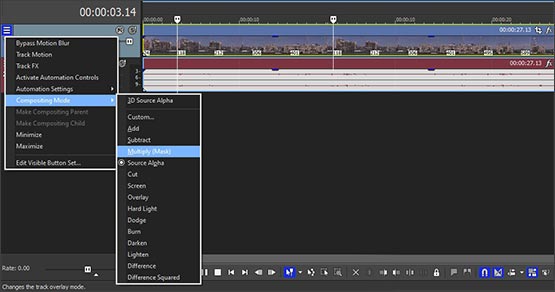
✓ In the upper track header, click Compositing Mode, or choose it from the track hamburger menu if the button isn’t visible. A context menu appears listing all of the available compositing modes.
The modes all work in different ways. Some of them use very complex math to arrive at their results, too complex to get into here. Experiment with them to see what they all do and if any of them work for your purposes.
The default compositing mode is Source Alpha, which represents no blending at all.
One of the modes, Multiply (Mask), is useful for making masks out of black and white images, such as white text on a black background. Unlike the Luminance Mask, Multiply (Mask) mode doesn’t remove the black portion of the image and leave the white. Instead, it multiplies the values of the pixels in the image below by the values in the image contained in the track. So, a black and white image has two values – 0 for black, and 1 for white.
The values of the pixels in the lower picture multiplied by 0 are always zero, so the resulting blended pixels are all black. But the values of the pixels in the lower picture multiplied by the 1 of the white in the text results in no change to the pixel values, because any number multiplied by one is the original number. That means the blended pixels remain the same as the original pixels in the lower image. The upshot is that the text ends up filled with the lower image, while the black background remains black. This is a great way to create custom text filled with imagery of your choosing instead of just a solid color.
Track Motion is a powerful way to make animated composites. With Track Motion, you can resize, move, and rotate the contents of a track, making it easy to create picture in picture composites or make extremely complex animations. You can even do it in 3D space, but we’ll talk more about that later in the article.
To create a simple picture in picture composite,
✓ drag an image you want to use as a background to the timeline. Drag the image you want to make the picture-in-picture from and place it on a track directly above the first image. In the Video Preview window, at this point, you see only the upper image.
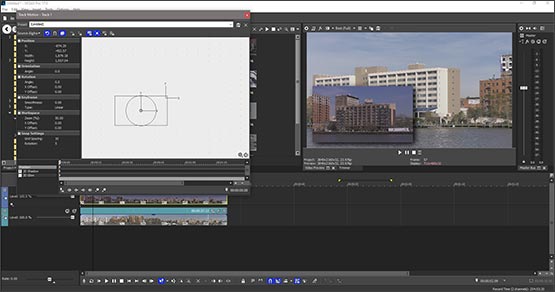
✓ On the upper track, click Track Motion, or choose Track Motion from the track hamburger menu if the button isn’t visible. The Track Motion window opens. In the large white pane, there’s a rectangle, representing the image frame of your track.
✓ Drag the rectangle in any direction, and the image will slide in that direction in the Video Preview window, revealing the image underneath.
At this point, the upper image is the same size as the background image, so to make a true picture-in-picture, you must reduce its size.
✓ Grab a corner of the rectangle and drag it inward to reduce the size of the image frame. The image grows smaller in the preview.
✓ Now, move the rectangle until the picture-in-picture image is in the location you want against the background image. Resize if desired.
✓ Activate 2D Shadow or 2D Glow in the animation timeline at the bottom of the Track Motion window to give the image some separation from the background. Adjust as desired.
You can use keyframes in the Position lane of the animation timeline to move your picture in picture around in the composite image. The picture in picture example is a very basic one, but the potential of what you can do with track motion is virtually unlimited, especially if you’re using compositing Parent/Child tracks, as we’ll discuss in a moment.
Sometimes, really advanced compositing requires that layers on separate tracks act together as a unit. For example, if you composite a few images together and then want to move them around the screen as one using Track Motion, you don’t have to move each image on its own with separate Track Motion. You can instead make the uppermost track a parent track, and then make the tracks below it child tracks.
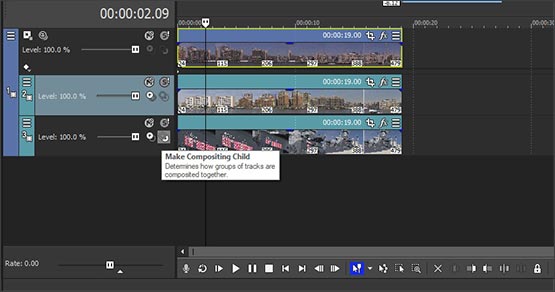
Group a set of tracks together on the timeline, with the track you want to be the parent track at the top.
✓ On each track below, click Make Compositing Child, or choose it from the hamburger menu if the button isn’t visible. A new Parent Motion button appears to the far left of the parent track header. Click it, and the Parent Track Motion window appears, but this time, the box is a square and not the shape of the video.
✓ Move the box around, and the contents of the parent track plus the contents of the child tracks all move together. Reduce or enlarge the size of the box, and all of the contents reduce or enlarge as one.
Parent/Child Tracks also make a difference when using compositing modes. In our Multiply (Mask) example above, we were able to make the image below show through the text. But if we want to take that text filled in with the image and then place that text over another image, then we have to make a compositing child track.
✓ Create the text mask as in our Multiply (Mask) example above. This time, drag and drop the Luminance Mask effect preset onto the text image. Nothing happens, because the combined result of the compositing mode still means the pixel values are 0, or black, not transparency.
✓ Now, in the header of the track containing the image, click Make Composite Child. The black area of the text now becomes transparent.
✓ Place another image under both the text and the original image, and that new image now shows through, and the text filled out with the image is overlaid on the bottom image. If you want the text to cast a drop shadow, click the Parent Motion button and enable the 2D Shadow in the Parent Track Motion controls. Adjust the shadow as desired.
Parent/Child Track relationships aren’t limited to single tracks or single parent tracks or child tracks. You can make parent tracks into child tracks of new parent tracks, or make a new track into a compositing child of an existing child track. You can build very complex Parent/Child Track structures to create powerful compositing schemes.
Perhaps the most powerful Parent/Child Track relationships are to be found in 3D compositing. Until now, we’ve been discussing Track Motion in its 2D applications. But 3D Track Motion offers incredible power for extremely complex compositing. You can create 3D objects, such as cubes, using your video or still images. Using Parent/Child relationships, you can spin the cube or even roll it like dice.
✓ Let’s look at a simple example. Drag a video to the timeline. Drag another video to a track above it and place it directly above the first video.
✓ Click Track Motion on the upper track. The Track Motion controls open.
✓ In the upper left corner, click Source Alpha. Choose 3D Source Alpha from the menu. Now, in the white pane, the control box becomes a thin 3D rectangle. Three smaller white panes appear above it, each showing the 3D rectangle from a different perspective. In the rotation circle, it looks like a cross appears, but these two crossed lines are actually two more rotation circles, representing the X and Y axes in 3D space.
✓ Grab the vertical line of the cross and pull it downward. The rectangle tips forward, and you can now see that the control circle is actually a sphere. In the Video Preview window, you’ll see that your top image also tipped forward in 3D space, revealing the image beneath.
The image below is still in 2D space, though, so the entire upper image is still visible.
✓ Click the Track Motion button on the lower track. In the Track Motion window, choose 3D Source Alpha for that track as well. Now, the lower image is also in 3D space, in its default position. In the Video Preview window, note that the bottom half of the upper image has disappeared. That’s because it’s now behind the lower image in 3D space.
✓ Click the Track Motion button on the upper track to return to the controls for the upper track. Right-click the rectangle and choose Restore Box from the context menu. The rectangle returns to its original position, and the image returns to normal in the Video Preview window, with the lower image no longer visible.
✓ Under Rotation, type 90 into the Y value. Note that in the main white pane, the rectangle is now tall and narrow and that the rectangles have changed perspective in all of the other panes. The rectangle has turned 90 degrees and you are viewing its edge.
In the Video Preview window, the upper image seems to have disappeared and only the lower image is visible. That’s because the image has no thickness in 3D space, and with the edge is pointed at you, you can’t see it any longer.
✓ On the lower track header, click Make Compositing Child or choose it from the hamburger menu if the button isn’t visible. The tracks are now together in a Parent/Child relationship and the Parent Motion button appears on the upper track’s header. Click it.
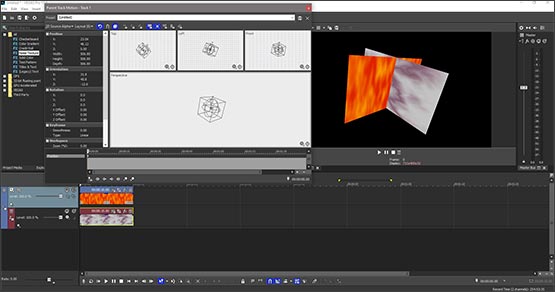
✓ The Parent Track Motion window opens. Set it to 3D Source Alpha, and the control square becomes a 3D cube. The control circle now has the little cross as well. Grab the horizontal line of the cross and pull it to the right. In the Video Preview window, the two images spin to the right together in an X shape. Keep pulling the circle to the right, and the two images spin all the way around.
✓ Grab a corner of the control cube and drag it inward to reduce its size, allowing you to see the entire 3D structure in the Video Preview window. Drag the circle again and watch it spin. Now, grab the other circles and spin them, and the structure spins on the other axes.
You can add many more tracks with images, text, or any other visual media on them and make complex structures which you can animate however you like. You could, for example, create a virtual house and “fly” through it. The possibilities are endless, limited only by your imagination.


What's the difference between VEGAS Pro Edit, VEGAS Pro Suite and VEGAS Pro Post?