What you’ll learn:
Create complex masks with bézier masking (motion tracking)
The powerful Bézier Masking OFX plugin in VEGAS Pro makes creating video masks, including masks of complex shapes, easy! Cut out individual objects in your video with incredible precision and insert them into other videos for amazing, seamless composites, or apply other visual effects only to the objects you define in your video. Because it’s an OFX plugin, you have great flexibility, and you can use it all levels of effects.
In this in-depth tutorial, we’ll take you through the following process:
STEP 1: Choose Your Video Clips
STEP 2: Add the Bézier Masking OFX Effect
STEP 3: Work With Bézier Masking in the Video Preview Window
STEP 4: The Bézier Masking Controls
STEP 5: Edit Mode
STEP 6: Create Your Mask
STEP 7: Fine-Tune Your Mask
STEP 8: Finish Your Mask
STEP 9: Use a Mask to Apply FX to Objects in Your Image
Read on to learn how to unlock the power of Bézier Masking in VEGAS Pro!
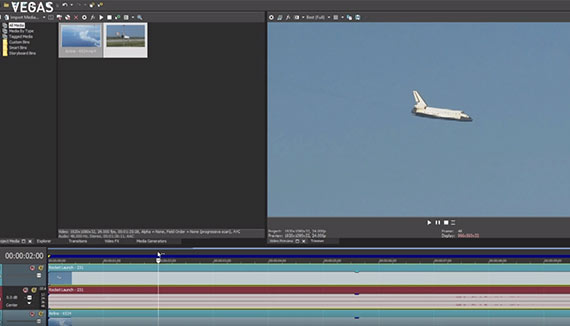
Let’s add a clip with a very noticeable object in it to the timeline. In our example, we’re using a video clip of the Space Shuttle orbiter landing – it doesn’t get much more eye-catching than that!
✓ Drag the clip from the Explorer window or the Project Media window and drop it on the timeline.
Next, find another, very different video clip.
✓ Drag it to the timeline below the first video event. A new track will be created. Position the video event directly under the original event.
You won’t be able to see the second clip in the Video Preview window because the first video is overlaid on top of it like one photo sitting on another photo in a stack. To see the lower clip, we’ll add a mask.
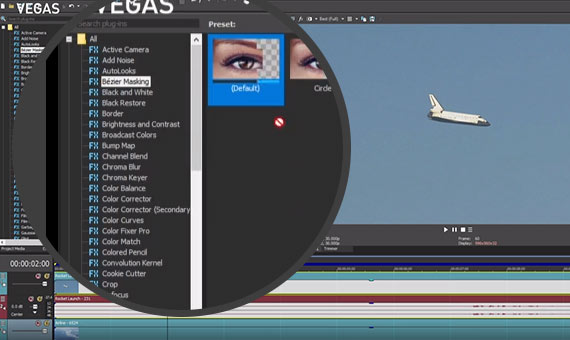
✓ In the Video FX window, click Bézier Masking.
✓ Drag the Default preset thumbnail and drop it on the upper video event.
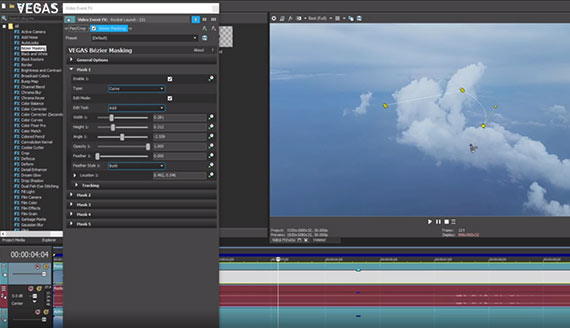
✓ The Video Event FX window opens, and the Bézier Masking controls appear. Now, in the Video Preview window, only a center rectangle of the upper video is still visible. The mask has cut out everything else in the image, revealing the video image from the track below.
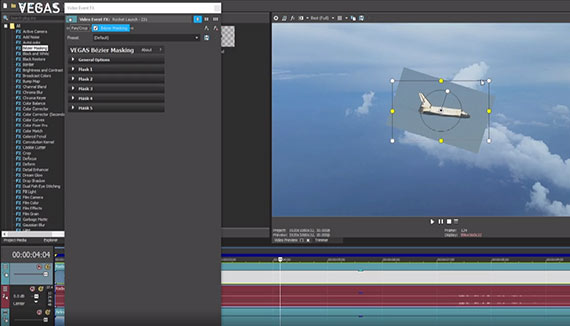
The rectangle containing the visible portion of the video has white control points at the corners, yellow control points at the centers of each edge, and a control circle in the center. You’ll use these points to control the location, shape, size, and rotation of the mask.
✓ Drag any white corner point to change the size of the rectangle while preserving its aspect ratio. Drag any yellow edge point to change the width or height of the rectangle independently of each other.
✓ Move the mouse cursor to a location inside the rectangle, but not on the circle. The cursor changes to a hand. Click, hold, and drag to move the rectangle. The image doesn’t move with the rectangle; you’re changing the location of the mask, not moving the image itself, so as you do, different parts of the video image show through the mask. If you move the rectangle away from your noticeable object, in this case the Shuttle orbiter, you will no longer see it.
✓ Drag the white dot on the circle, the rotation handle, to change the angle of the mask rectangle. The white and yellow control points don’t change, so you are always able to change the size of the rectangle even if you’ve moved the corner of the mask area outside the visible preview window.
You can always enter exact numbers for these location or rotation values in the Bézier Masking controls in the Video Event FX window.
In the Bézier Masking controls, you’ll find a set of unexpanded control groups. The top group, General Options, controls the entire effect.
✓ You’ll find controls for up to five separate masks. Currently, you’re only using one mask, but you can use up to five in the same effect.
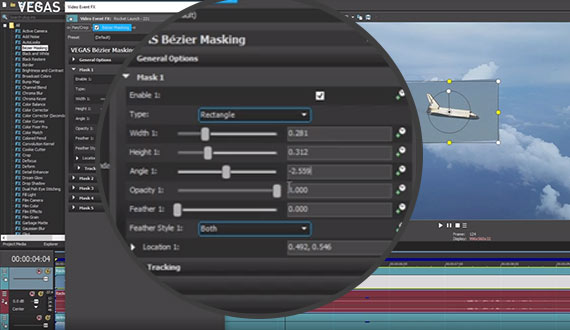
✓ Click the triangle next to Mask 1 to open its parameter controls. Note that the Enable 1 box is checked, indicating that Mask 1 is active. In VEGAS Pro, if you expand the controls for Masks 2-5, you will find that the Enable boxes for them are unchecked. Click the Enable box in any Mask control to activate that mask.
✓ In the Type drop-down menu, click different options to change the shape of the mask. Underneath the Type menu, you’ll find sliders to change the width, height, and angle of the mask, which we just used the control points in the Video Preview window to change. The Opacity slider controls the opacity of image inside the mask area, so you can isolate an area of your image and make it semi-transparent if you want to. The Feather slider softens the edges of the mask.
✓ Click the triangle next to Location to expand the Location controls. A box appears with a dot inside it. Move the dot to change the location of the mask, or type in an exact location in the Location 1 box.
Underneath the Location controls, you’ll find the Tracking controls. You can use the Bézier Masking effect to track moving objects in your image and apply effects to those objects, or to pin other images and videos to objects in your video. We’ll cover Tracking in another tutorial!
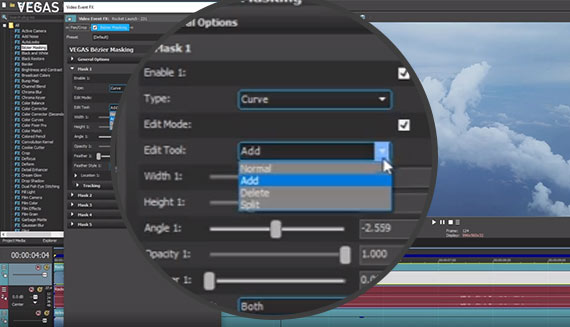
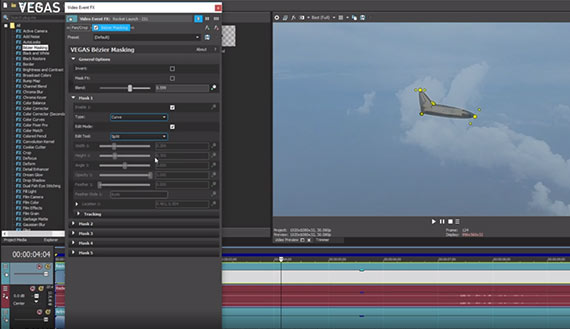
✓ In the Mask 1 controls, select Curve in the Type drop-down menu. Two new controls now appear beneath the Type menu: the Edit Mode selection box and the Edit Tool drop-down menu. Your mask disappears in the Video Preview window, but that’s OK – you will now define your own custom mask.
The Edit Mode box is already checked, so you are in Edit Mode. The Edit Tool is set to Add, so you are ready to add points and define your custom mask.
Move your mouse cursor to the Video Preview window and it changes to a pen.
✓ Click anywhere in the preview to create a point. Add another point, and a dotted line appears between the points, defining the border of the mask. The points you’ve created are corner points, and they create sharp angles.
✓ Click another point, but this time drag your mouse before letting up on the click. This creates a curve point, and as you drag your mouse, you pull out a handle, called a Tangent, from the point. Each point has two Tangents.
✓ Click and drag the Tangents to refine the shape of your curve between the new point and the previous point.
You can create as many points as you want, both curve points and corner points. You can thus create a mask of any shape, no matter how complex. To finalize and close the mask, click the first point you created.
While still in Edit Mode, you won’t see your video inside the mask.
✓ Click the Edit Mode box to deselect it, and the video shows up in the mask as usual.
The real power of Bézier Masking lies in creating complex masks around any object or shape in your video. But when we went through the steps above, we couldn’t see the video while we created the mask. For this demonstration, we’d like to create a tight mask around the Shuttle orbiter, but we need to see it to create a precise mask.
✓ Click the triangle next to General Options in the Video Event FX window.
✓ Slide the Blend slider to the right so that the value climbs from 0.000 toward 1.000. The closer to 1.000 you get, the more opaque the video becomes. At 1.000, the video is entirely opaque and you can no longer see the video on the track underneath. Set the Blend value as high as you need it to effectively work with the object you want to mask. Often, a value of around 0.500 works well, allowing you to see both your object and the video on the track below.
✓ Click the Edit Mode checkbox to return to edit mode. Your mask outline with the control points you defined appears.
✓ Set the Edit Tool to Normal, and instead of creating more points, you can now manipulate the points you already defined. Drag any points to wherever you need them and drag the Tangents to adjust your curves as needed.
✓ Double-click any corner point to turn it into a curve point. To turn a curve point into a corner point, drag one of its Tangent handles all the way into to sit directly on top of the curve point.
✓ If you need to create new points, choose Split in the Edit Tool menu. Click a point in one of the sides of your mask where you want to place the new point, and a new point is added at that location. To remove an unwanted point, choose Delete from the Edit Tool menu, then click the point you want to remove.
Once you’ve created the exact mask you want,
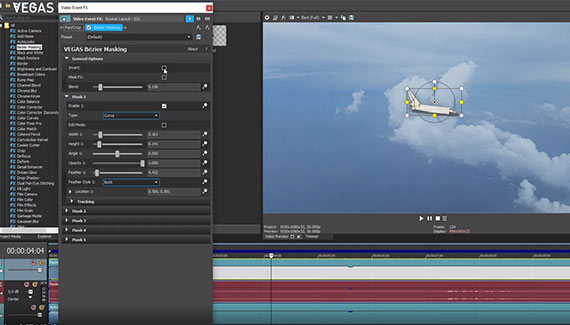
✓ set the Blend slider back to 0.000. Click the Edit Mode box to deselect it. Now, only the portion of the upper video within the mask you defined is visible, in this case, the Shuttle orbiter itself.
In VEGAS Pro, if you want to use the mask as a cutout, so the rest of the video image is visible and only the mask area is removed,
✓ click the Invert checkbox under General Options.
You can also use the Bézier Masking effect to apply other effects only to specific objects in the video, such as pixelating a face or really brightening up a car taillight.
✓ First, define your mask around the object you want the effect applied to, such as a person’s face, as we demonstrated above. In the Video Event FX window, deactive the Bézier Masking effect in the effects chain.
✓ Next, find the desired effect in the Video FX window. In this case, choose Pixelate. Drag a preset and drop it on the video.
✓ In the Video Event FX window, move the Pixelate effect to a location before the Bézier Masking effect in the effects chain. Next, adjust the effect as desired. At this point, it affects the entire video image.
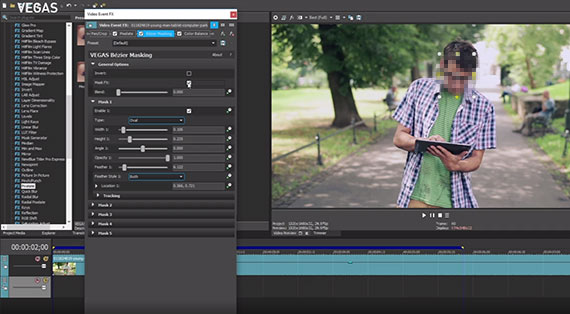
✓ Activate the Bézier Masking effect in the effects chain. In the Video Preview window, all you will now see is the object you defined the mask around, with the Pixelate effect applied.
✓ Go to the Bézier Masking effects controls. Under Mask 1, you may want to apply a feather so that the effect has a softer edge.
✓ Then, under General Options, click the Mask FX checkbox. Now, the entire image reappears, but the area inside the mask is still pixelated.
You can apply any effects to any objects in your image this way, and in VEGAS Pro, you can apply up to five masks per every Bézier Masking effect you add to the video. Combined with motion tracking, which we’ll cover in another tutorial, you can apply effects which follow moving objects, so if you pixelate a face, the pixelization will follow even as the person moves.
Bézier Masking is an extremely powerful compositing tool, letting you create stunning, moving composite images worthy of the pros without ever leaving the VEGAS timeline. The only limit is your imagination. Experiment and see what you can do!


What's the difference between VEGAS Pro and VEGAS Pro Suite?