
What you’ll learn:
How nested timelines helps you keep organized
Modern video editing projects can be complex! One tool to help editors stay lean and organized is the nested timeline, with which an editor can block off sections of a project and work on them separately while maintaining a sleek, smooth, and organized master project. Work done on nested timelines updates automatically on the main timeline, so it’s easy to concentrate on individual scenes or segments while keeping the master program up to date!
VEGAS Pro offers a unique approach to nested timelines, one we think gives it a strategic edge over other editing programs.
In this tutorial, we’ll explore what nested timelines are and why to use them, and then go step-by-step through using nested timelines in VEGAS Pro:
STEP 1: Create a Nested Timeline
STEP 2: Switch Between Parent and Nested Timelines
STEP 3: Edit Your Nested Timelines
STEP 4: Collaboration with Nested Timelines
STEP 5: Archive a Project with Nested Timelines and Media Assets
Now, let’s take a deeper look into nested timelines, how to use them in VEGAS Pro,
and the advantages of VEGAS Pro’s approach!

Nested timelines are a great way to help keep your project organized and manageable. At their most basic, they let you separate out complex sequences or scenes from the master project and edit them separately, so that the master project is as streamlined and efficient as possible.
Using them, you can switch in and out of individual sections at will, letting you construct your master project your own way, or let different members of an editing team work on individual segments without disturbing the main timeline. They’re especially helpful in long-form projects, but have their uses in shorter programs, too.
Useful Tips: Why VEGAS Pro Lets You Edit So Fast
Many editing programs offer nested timelines, but VEGAS Pro takes a different approach to nested timelines than what you may have seen in other software. It’s important to understand these differences so you can make full use of the advantages they bring, which we’ll cover a bit later.
You can make a nested timeline out of any or all of the events in your current timeline. When you create nested timelines from timeline events, your current timeline becomes the master timeline, and the new timelines become the nested timelines. The nested timelines themselves become separate project files in their own right, which is where the advantages lie.
Start a new project.
✓ Add two video clips to the same track in the VEGAS Pro timeline. Arrange and edit your events however you like, but keep them on the same track for now.
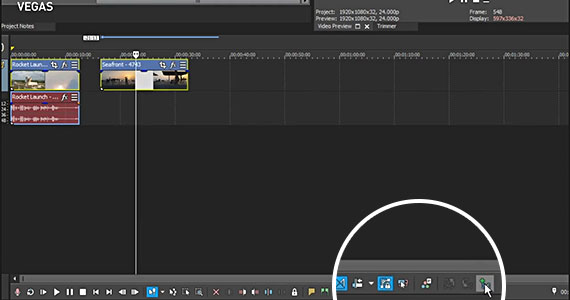
✓ Select the events you want for your nested timeline.
✓ Click the Create Nested Timeline button on the timeline toolbar. Note that you must have events selected for the Create Nested Timeline button to be active.
If you haven’t already saved your project, VEGAS Pro now prompts you to do so. The Save Parent Project As window opens. Give the project a name, choose your destination folder, and click Save.
The Save Nested Timeline As window opens. Here’s where VEGAS Pro approaches nested timelines differently. More than saving a nested timeline, you’ll save a whole new project file. This new project will be nested in the parent project, and you can move back and forth between then freely.
The File Name box is pre-populated with a file name based on the parent project name, with “Untitled Timeline” added. You can change the file name to anything you want, but it’s often best just to change “Untitled Timeline” in the name to a descriptive name of your choice, while leaving the reference to the parent project. It’s also often best to save the file in the same folder with the parent project. Click Save.
VEGAS Pro now moves to the nested timeline. You’ll see the events you selected for the nested timeline active on the timeline, just as they appeared on the parent timeline. First, though, let’s navigate back to the main timeline.
✓ Click the Open Parent Timeline button in the timeline toolbar.
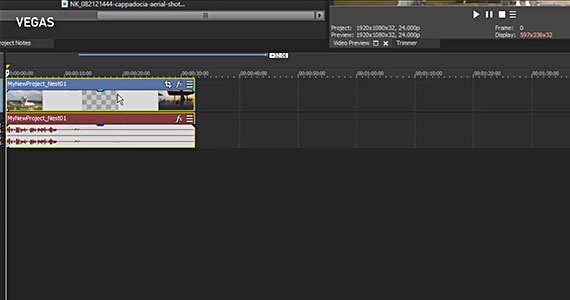
The parent timeline now opens. You’ll see that instead of the several edited events you originally had on the timeline and made your nested timeline from, there’s now only one event. That event contains your nested timeline, now treated as a single event on.
The nested timeline event will behave like any other event, and you can add effects or transitions or edit it like any other single event. You can’t edit the contents of the nested timeline directly from the parent timeline.
✓ Select the event containing the nested timeline and click the Open Nested Timeline button on the timeline toolbar, and VEGAS Pro opens the nested timeline. You can now edit your nested timeline.
Changes you make in the nested timeline will automatically be reflected in the nested timeline event on the parent timeline.
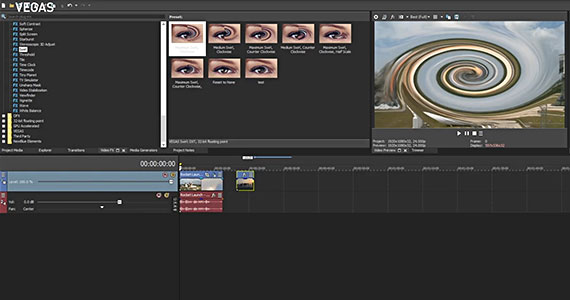
✓ To see an example of this, trim the right edge of the last clip in the nested timeline to the left to make it shorter. Now, choose an effect from the Video FX window which will be very noticeable. Drag an effect preset thumbnail and drop it on the first event in your nested timeline. Close the Event Video FX window.
✓ Click your first event, and you’ll see the effect added in the Video Preview window.
✓ Click your last event, the one you trimmed, and you’ll see that it’s displayed normally in the Video Preview window.
✓ Click the Open Parent Timeline button to return to the master timeline.
✓ Click the left edge of the nested timeline event, and you’ll see in the Video Preview window that the video now has the effect you added. You’ll also see that the event now has a loop point indicator. This is because you shortened the overall length of the nested timeline, but the event still takes up the same amount of time as before, so by default, VEGAS Pro loops the media back to the beginning. Trim the right edge of the event to the left until it snaps at the loop point. Your event is now at the correct length of the nested timeline.
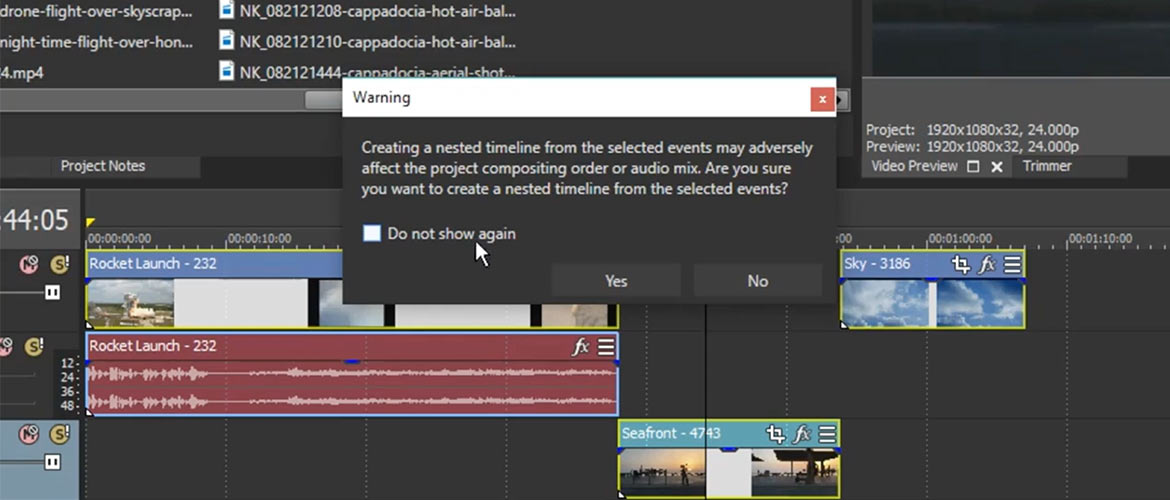
Start a new project. Add three clips to it.This time, put one of the clips on a separate track.
✓ Select all three events and click Create Nested Timeline. A Warning box opens informing you that creating a nested timeline from these events could adversely affect the project compositing order or audio mix, giving you unexpected and possibly negative results. This will happen any time you try to create a nested timeline out of events on different tracks. The risk is highest when events on different tracks overlap each other or if layers of video and audio effects are applied. But if there is no overlap or effects, there won’t be a problem.
✓ Name and save your parent timeline and nested timeline as before.
Once saved, you’ll be in the nested timeline again, as before, and you’ll see your three events.
✓ Click the Open Parent Timeline button. In the parent timeline, there’s only one event.
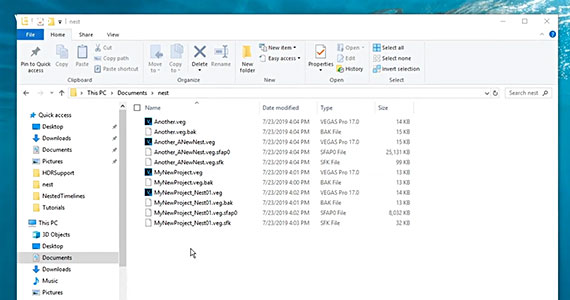
✓ Quit VEGAS Pro. In Windows Explorer, navigate to the folder containing your .veg project files. You’ll find .veg project files for your parent projects and also your nested timelines. You can share the nested timeline files without having to share the master project. This opens up collaboration possibilities not possible with nested timelines as used in other software.
If you have a different editor working on a specific section of a master project, you can create a nested timeline in the master project, and then share that .veg file with the editor while you continue working independently. The other editor works on the section, then saves the work to the same file, and passes it back to you. When you open the master project, the nested timeline events automatically update to reflect the other editor’s work. Taking advantage of this workflow, you can assign as many sections to other editors as you want, and everyone can work completely independently.
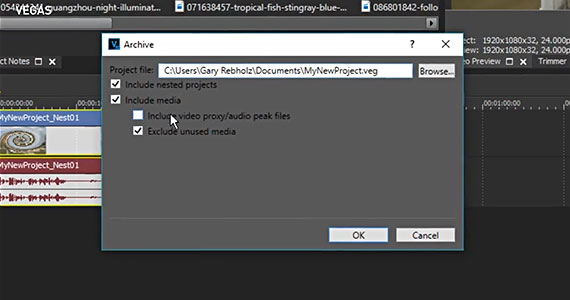
Open one of your master projects. You can easily archive this project and all of its assets, including the nested timelines, for long-term storage or transport to another computer.
✓ Go to File>Export>VEGAS Project Archive. The Archive dialog box opens. Make sure the Include Nested Projects and Include Media boxes are selected.
✓ Click Browse and navigate to the folder where you want to save the archived project. Type a file name into the Project File box. Click Save.
You can create as many nested timelines as you want in VEGAS Pro. The workflow advantages are obvious and endless –
try it today!


What's the difference between VEGAS Pro and VEGAS Pro Suite?