What you’ll learn:
What Is white balance and why is it needed?
The key to true and natural color in a video image is maintaining a proper white balance. The white balance tells a camera what true white should be, so the camera knows how to render not only white, but all the other colors in the image. If the white balance is off, then all the other colors will be off, too. Proper white balance is the basis for effective color correction and color grading, and also necessary for LUTs to work the way they’re supposed to.
White balance is normally a function of the camera while shooting, but sometimes the white balance in video footage needs attention in post, too. VEGAS Pro has a number of powerful tools which will let you dial in the perfect white balance.
In this tutorial, we’ll explore what a proper white balance is, what happens if it’s off, and how to fix it when it is.
We’ll take you through the following steps using tools in VEGAS Pro:
Step 1: Set Exposure
Step 2: White Balance FX
Step 3: Color Corrector
Step 4: Color Curves
Step 5: Secondary Color Corrector
Let’s start with an in-depth look at what exactly white balance is.

White balance refers to the proper rendering of white in a video image. To set white balance in a video camera, you fill the image with something which should be as close to pure white as possible, like a sheet of paper, and press the white balance button or whatever menu item activates the white balance. The camera then uses the white object as its reference for white and adjusts all the other colors accordingly.


To do it correctly, the white object should be lit by the primary light source of the image. Problems with white balance come from a mismatch between the color of a light source and what the camera expects. Even though your eyes typically see all light as white light, that’s a compensation your brain makes.
All light has a color temperature. Most key lighting for an image is reasonably close to white, but the light will still have a slight tint of color which will affect the color in the image considerably. Daylight, for example, has a high color temperature, and it is slightly blue. Indoor lighting fixtures typically have a much lower color temperature and are slightly orange. White balance problems come from the camera being set up to expect light of a particular color temperature, but the light used has a different color temperature.
Useful Tips: Brightening and Darkening Images — Fix Exposure
A camera set up to expect – white-balanced for – indoor, orange-tinted light shifts colors away from orange and toward blue. This has the effect of rendering white correctly, and all the other colors should fall into place. But if a camera is white-balanced for orange-tinted light and then is used outdoors, it’s still shifting white and all the colors toward blue. Outdoor light is tinted blue already, so the balance is upset, and everything in the image appears very blue. The same is true the other way around. A camera white-balanced for outdoor light, if used indoors with orange-tinted light, will render whites and other colors very orange.
It’s the job of the camera operator to set a proper white balance for every shot. If they do their job properly, then whites and colors will be properly set in the image. But sometimes the camera’s white balance is still slightly off through no one’s fault. When that happens, you have to deal with white balance in post.

While this step isn’t absolutely necessary, it’s a good idea to set proper exposure before you do your white balance. Setting exposure before you white balance makes your color closer to true, and in many cases, the white balance easier to manage.
✓ Click the video event you want to white balance to select it.
✓ Click the Color Grading button in the timeline toolbar.
The Color Grading panel opens, and the controls are active for the clip you’ve selected. If you didn’t select a clip, the controls will be greyed out and inaccessible until you select a clip.
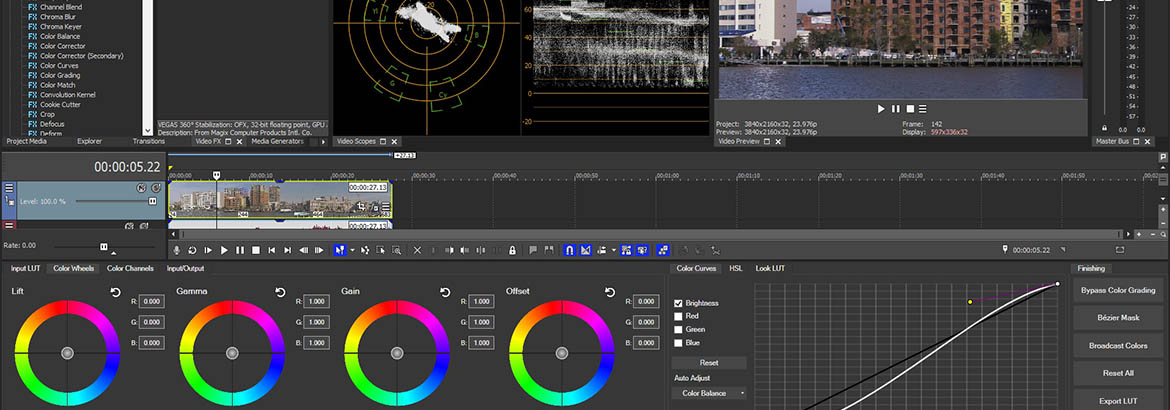
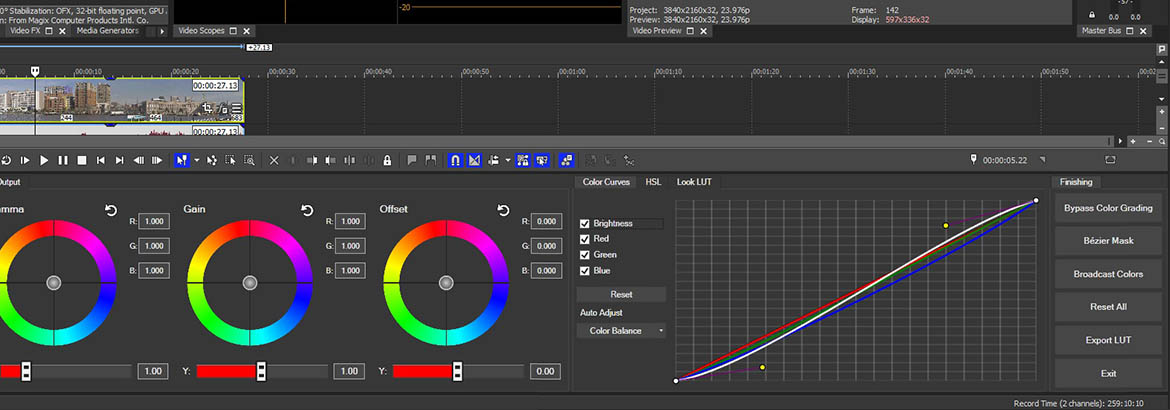
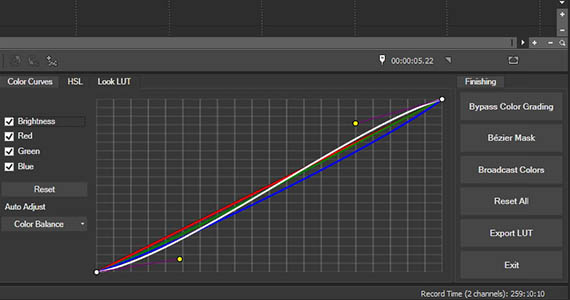
For the most precise exposure control, use the Color Curves. To the left of the color curve, make sure the Brightness box is checked, and then uncheck the Red, Green, and Blue boxes. This way, you’re only working on the brightness curve, a white line on the Color Curves graph.
✓ For proper exposure, use the Waveform monitor in the Video Scopes window. By default, the Video Scopes window opens with the Color Grading panel, but if you’ve changed the configuration and the Video Scopes window didn’t open, go to View>Window>Video Scopes to open it now.
On the Waveform monitor, you see a full representation of the brightness in your image from left to right. The brightness values on the monitor correspond to objects in the same location from left to right in the image. You see peaks near the top where you have brights and valleys near the bottom where you have darks. What you usually want is a good, robust image which fills out the entire Waveform. If your whites aren’t reaching the top and the Waveform is bunched at the bottom, your exposure is likely too dark. If you see a lot of bunching or flat lines at the top and not a lot near the bottom, your exposure is too bright.
With the Color Curve, adjust the top right of the curve to bring your white highlights as close to the top as possible without flattening them. Flattened whites mean blown out whites, and you will not see any detail. Similarly, adjust the bottom left of the curve so that your darkest shades rest on the bottom without flattening out.
Every image is different, so a proper exposure may vary, but in general, when you’ve achieved proper exposure, the entire Waveform should be filled out, with whites hitting at the top without flattening, and darks hitting at the bottom without flattening out.
When you’ve achieved proper exposure, you’re ready to white balance. VEGAS Pro offers several tools.
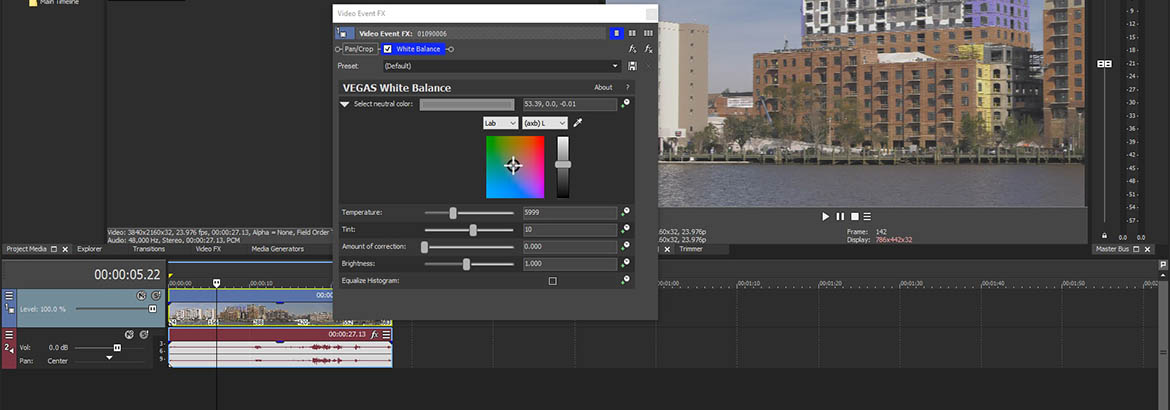
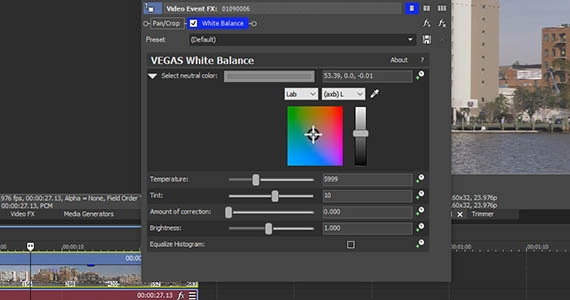
✓ In the Video FX window, click White Balance. Drag the preset thumbnail and drop it on your media event. The Video Event FX window opens and the White Balance FX controls appear.
✓ Click the eyedropper button. The mouse cursor turns into an eyedropper.
✓ Move your cursor to the Video Preview window. Find an area which should be a good, neutral white of mid-range brightness, like a sheet of paper or a mailbox. Click that area.
If all goes well, your white balance should now be set. If it still needs a little adjusting, move the Temperature slider slightly to the left or right. Also, adjust the Tint slider if necessary. Control the intensity of the effect with the Amount of Correction slider.
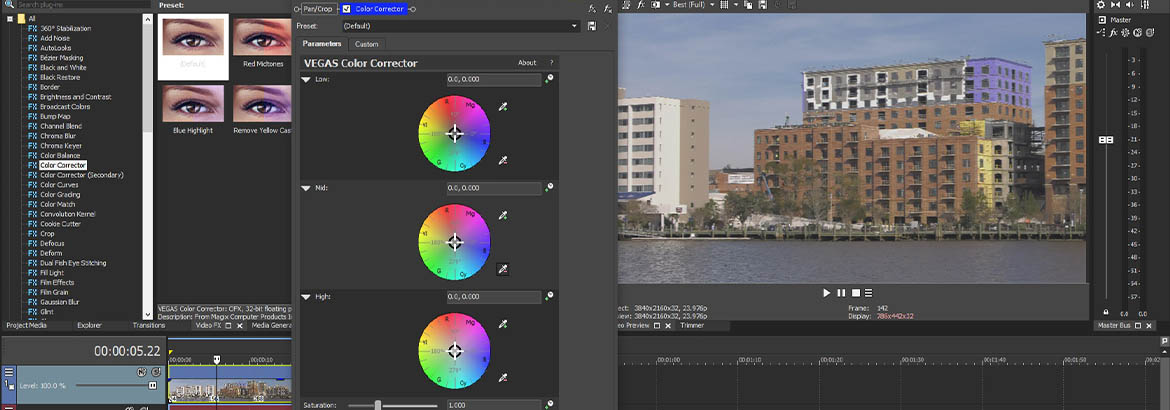
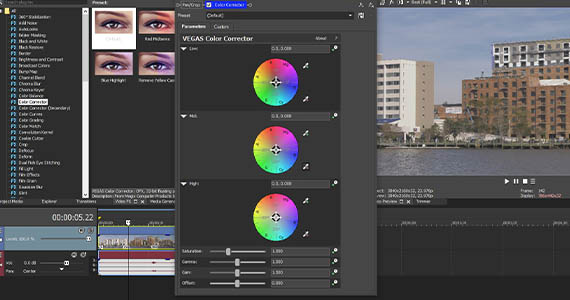
✓ In the Video Event FX window, delete or deactivate the White Balance effect. In the Video FX window, click Color Corrector. Drag the default preset thumbnail and drop it on the clip. The effect controls open in the Video Event FX window.
✓ Next to the Mid color wheel, click the eyedropper icon with the minus sign. The mouse cursor again changes to an eyedropper. Find the same area of mid-range white in your image. Move the cursor to that area and click.
Often, that will be enough to set your white balance, but you can also add further adjustments. Click the eyedropper with the minus sign next to the Low color wheel, then find an area in the image which should be a deep black. Click that area. Click the eyedropper with the minus sign next to the High color wheel, then find and click area of bright white in the image.
You used the color curves to set your exposure, but you can also use them for white balance adjustment. For the most part, improper white balance comes from there being too much blue or too much orange in the image, depending on your light source. Under certain fluorescent lights, improper white balance could also show too much green. Whichever it is, you can adjust colors individually with the color curves.
✓ In the Video Event FX window, delete or deactivate the Color Corrector effect. Go to the Color Curves in the Color Grading panel.
Often, adjusting the blue in the image will yield good white balance. Uncheck the Brightness box next to the Color Curves and check the Blue box. Now, only the blue line is visible in the Color Curves. If there is too much blue in the image, if the whites appear blue, lower the center of the curve until the mid-range whites appear white. You may also have to adjust the top and bottom of the blue curve to balance out bright whites and dark grays and blacks. If you lower the blue too much, the whites will take on a yellow tint.
If the whites in the image are yellow at the start, raise the middle of the blue curve until the yellow disappears from the white areas. Sometimes, though, the whites appear closer to orange, in which case you’ll need to lower the red curve.
✓ Click the Red box next to the Color Curves. The red line appears. Lower the middle of it to decrease the amount of red and thus change the tint closer to yellow, which can then be brought into balance with the blue curve. But when lowering the red, you might see a little green in the white. If so, click the Green box and lower the green curve slightly.
As always, every image is different, so white balancing with the Color Curves takes some patience and some practice. But you can achieve a very precise white balance with Color Curves, so your efforts will be rewarded.
Until now we’ve been taking a blanket approach to white balance, working on the entire image as a whole. That usually works when the lighting in the image was of a consistent color temperature, but sometimes that isn’t the case. For example, an interior shot might be primarily lit with indoor-balanced lighting, but daylight coming in from a window might light part of a background wall. If you white balance for the majority of the image lit with indoor-balanced light, the daylight against the wall may then appear very blue.
It may look nice to your eye. But if you want to correct it, go to the Video FX window.
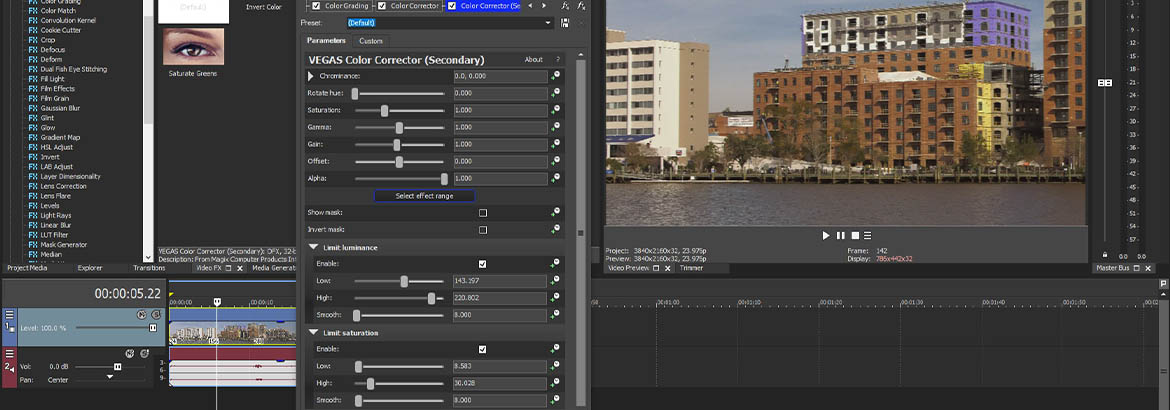
✓ Click Color Corrector (Secondary). Drag the default preset thumbnail and drop it on your video event. The effect controls open.
✓ Click Select Effect Range. The mouse cursor changes to an eyedropper pointing at a cross. Move the cursor to the blue area of your image in the Video Preview window.
✓ Click and drag along the blue to select as wide a shade range of the blue as possible, but don’t go outside the blue area.
In the effect controls, under Chrominance, adjust the Hue slider until the blue comes into proper balance. You may have to adjust the Limits sliders to capture the entire blue area and smooth it out for a seamless transition between the affected area and the rest of the image. You may also need to adjust the color saturation and brightness of the area. Use the sliders under Chrominance for these adjustments.


What's the difference between VEGAS Pro and VEGAS Pro Suite?