
What you’ll learn:
How to trim video clips effectively without quality loss
VEGAS Pro offers many tools for faster, more efficient, and extremely powerful editing workflows. In this tutorial, we’re going to explore one of the tools you may have overlooked – the Trimmer. With the Trimmer, you can preview and scrub through your media without adding it to the timeline or even to the project, pre-edit your media clips and insert them precisely into the timeline, and even create subclips which act as independent media clips.
To give you a solid understanding of the Trimmer, we’ll take you through these steps:
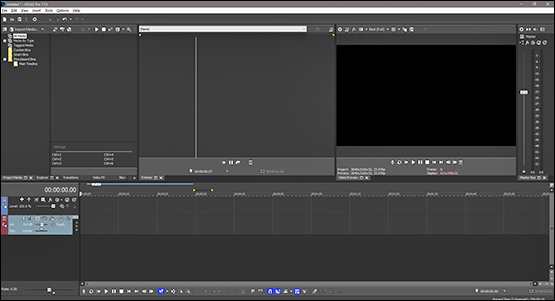
STEP 1: Open the Trimmer Window
STEP 2: Edit the Visible Button Set
STEP 3: Working with Media in the Trimmer
STEP 4: Create Subclips
STEP 5: Insert Trimmed Clips into the Timeline

The Trimmer traces its roots back to the days of analog video editing, where editors edited from videotape and back to videotape. They worked with two tape decks, the source deck and the record deck. They loaded tapes containing the video they wanted to edit into the source deck, and then through the editing process recorded their final edits bit by bit to the record deck. This is known as linear editing, because it was a very rigid and straightforward process. Each video clip was loaded and then recorded in the sequence of the final program, and editors couldn’t easily go back to an earlier part of the program to make changes.
Each deck fed to a monitor where the editor viewed the contents of the tapes. The source monitor showed them the clips they wanted to edit into the program, and the record monitor showed them the program so far. These professional decks allowed very precise playback of the tapes, and they could pause exactly on any frame. Editors would play the record deck to the point where they wanted to add a new clip, and that exact frame would be displayed on the record monitor. Then, they’d load the tape containing the video they wanted to pull a new clip from into the source deck and carefully find the exact frame where they wanted the new clip to begin. They could check against the record monitor to be sure their edit would be the exact fit they wanted.
When they found their first frame on the source deck, they’d mark an in point. Then, they’d play or scrub through the source tape until they came to the frame where they wanted the new clip to end. There, they’d mark an out point.
When they were ready, the system would rewind the source deck to the in point, start playback on the source deck and recording on the record deck simultaneously, and then play the source deck up to the out point, and finally stop both decks. The result was that the new clip was recorded frame for frame on the record deck, starting at the exact frame where the previous clip ended. The editor would then repeat the process for the entire program.
When non-linear editing first began on computers, editing programs mimicked this source/record process. They featured source monitors/windows in which to preview clips, and then the main preview window for the entire project. Editors could trim clips in their media pools in the source monitor, marking in points and out points, then send the trimmed clip to the timeline at the point they chose.
The Trimmer is the VEGAS Pro interpretation of the source monitor. While VEGAS offers many different and intuitive ways to trim clips and bring them into the timeline, the Trimmer still has some powerful functions you should familiarize yourself with. Let’s explore them now.
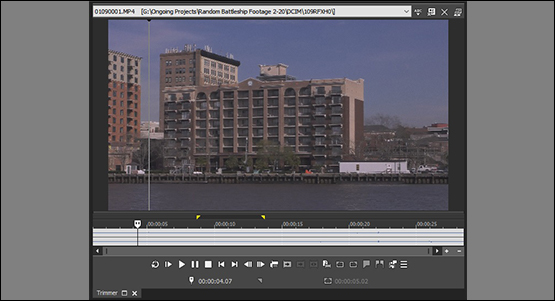
If you don’t have the Trimmer window open, go to View>Window>Trimmer. The Trimmer window opens. You can let it float free, move it to another monitor if you have multiple monitors, or you can dock it wherever you like in the VEGAS interface.
✓ In VEGAS Pro, if you go to View>Window Layouts>VEGAS 14 Default, a more classic layout of the VEGAS Pro interface opens which includes the Trimmer in a traditional location next to the Video Preview window. This layout is familiar to editors experienced with professional video editing software, and it’s also not a bad layout for exploring the capabilities of the Trimmer.
The Trimmer appears much like the Video Preview window, with a preview screen area and a set of playback buttons underneath. At default, the buttons are minimal, and some of the buttons for the functions we’re going to explore, so let’s add them.
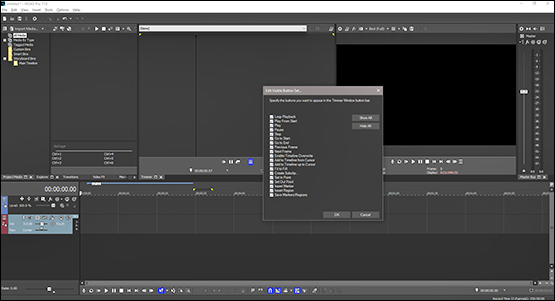
✓ Click the hamburger menu in the Trimmer window. A context menu of available functions appears. We could access any of the Trimmer functions from this menu, but doing it with buttons saves us the step of opening the menu every time, so choose Edit Visible Button Set. The Edit dialog window opens. You can pick and choose which buttons to make visible, but for now, just click Show All. Click OK.
All of the available buttons now appear under the preview area of the Trimmer window.
There are a few ways to load media clips into the Trimmer. The first way is incredibly useful, because you can preview and trim clips before you even add them to your project.
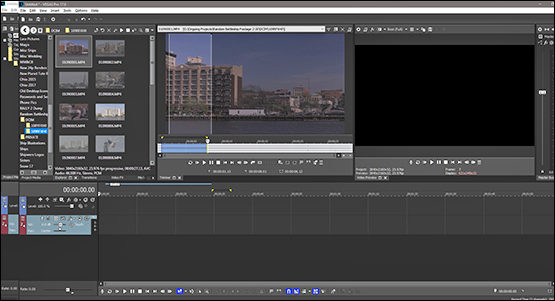
✓ In the Explorer window, or in Windows Explorer, navigate to the folder containing your media. Drag a video clip directly from the folder to the Trimmer and release. The video clip now appears in the Trimmer, but not in the Project Media window. This is a great way to check through your media before you decide which media you want to import.
✓ For media already in your project, drag a media clip from the Project Media window to the Trimmer, or right-click and choose Open in Trimmer.
When you open a clip in the Trimmer, it looks a lot like viewing your project in the Video Preview window, except the audio waveform is also visible under the clip. The Trimmer functions as a kind of hybrid of the Video Preview and the timeline. At the default view, the video image is large and the audio waveform is a narrow strip on a timeline below the video.
✓ Drag the top of the timeline up to enlarge it and the audio waveform. The video image reduces in size, but you can see more detail in the waveform.
✓ There are also frame markers along the timeline. Zoom in and out of the timeline using the up and down arrows on the keyboard or the mouse scroll wheel, just as you would the main timeline.
When you load a clip, there’s a white line along the left edge of the video preview. Scrub over the image with the mouse, and the white line follows as a scrub cursor over the video, which plays through as you scrub.
✓ When scrubbing through the video with your mouse, click and hold left. A white line appears at the point you clicked, marking your in point, and the scrub cursor becomes your out point. Between the white lines, the image is normal brightness indicating it’s within the selection area, but outside the lines, the image is darker.
Note also that the timeline cursor below follows your scrub cursor, and a loop region is being created on the timeline. The in point of the loop region corresponds with the leftward white line, and the out point follows your scrub cursor.
✓ Release the mouse button, and you’ve trimmed the clip, creating a selection between the white lines in the preview and the in/out points on the Trimmer timeline.
✓ You can also set in and out points manually. Set the timeline cursor to the desired starting frame & click the Set In Point button, or press I.
✓ Then move the cursor the desired last frame and click Set Out Point, or press O. Or, type in an exact in point and out point or directly type in a selection length.
✓ Press Play. The clip plays in the Trimmer window just like it would in the Video Preview window.
✓ If you have an external monitor, click the Trimmer On External Monitor button to view the Trimmer output on that screen.
Now that we’ve trimmed a clip, we have a few options. We can do any of this whether or not the media clip has already been imported into the project. If we do it with a media clip which isn’t yet in the project, it will be added to the project automatically and appear in the Project Media window.
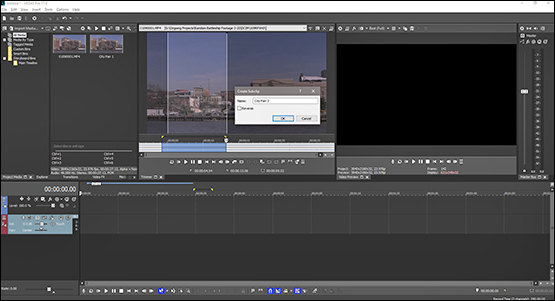
An incredibly useful function of the Trimmer is creating subclips. If you have a long media clip but only want to use small portions of it, creating subclips is an ideal way to save editing time and keep your project organized.
✓ We have already trimmed a clip, so click the Create Subclip button. The Create Subclip dialog opens, and you can give the subclip the name of your choice. Often it’s a good idea to give it a descriptive name so you know what the contents of the clip are, especially if you make multiple subclips of the same media. If you want the subclip to play in reverse, click Reverse. When you’re ready, click OK.
A new media clip appears in the Project Media window with the name you chose. It isn’t a whole new clip -- it’s a reference to the original clip, but in all other ways it acts like an independent clip.
✓ Drag the subclip to the timeline and play it. It only contains the portion of the clip between the in and out points you set. You can trim the clip further down if you want, and you can still trim the clip outward to the full extent of the original clip.
You can create as many subclips from your media as you want. Subclips have all the advantages of cutting and rendering new clips without any of the limitations. And it’s completely non-destructive, so your original clip is still fully intact.
The other major function of the Trimmer traces back to those days of linear editing and those early days of non-linear editing that we talked about above.
Many editors today start out dragging clips to the main timeline and trimming them there. It’s an intuitive approach and makes sense. But it’s not necessarily the most efficient, organized, or precise approach.
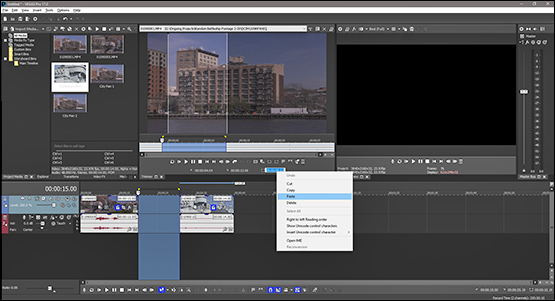
Suppose you have a timeline with a few clips already edited, and you want to add another. You could drop a new clip on the timeline and trim it there, then snap it to the end of the last clip.
✓ But a more precise approach might be to open the new clip in the Trimmer.
Use the timeline in the trimmer to find the exact frame where you want the clip to start and mark the in point. Then find the frame where you want the clip to end, and mark the out point. You can display the last frame of the clip on the main timeline in the Video Preview window for reference, just like with analog editing.
✓ Now, click the right edge of the last clip on the timeline to set the timeline cursor there, and to select the track.
✓ In the Trimmer, click Add to Timeline from Cursor. Your edited clip instantly appears on the timeline, snapped to the previous clip already there. Continue this process, called Three Point Editing, and you’ll develop a very efficient and organized editing style, with a clean timeline containing only the precise media you want.
Or, suppose you have a project where there’s a gap in the timeline, and you want a clip to fill that gap. Dragging an untrimmed clip to the timeline can be messy as you try to trim it to fit the gap.
✓ Instead, open the clip in the Trimmer. Select the frame for your in point and mark it.
✓ On the main timeline, double click the gap area to create a selection the size of the gap.
✓ In the bottom right corner of the VEGAS interface, double click the Selection Length, and then right-click and copy it.
✓ Now double click the Selection Length in the Trimmer, then right-click and paste. Press Enter. The Trimmer sets the out point at that exact length from the in point.
✓ Click the left edge of the gap on the timeline. In the Trimmer, click Add to Timeline from Cursor. Your clip, trimmed to the exact length of the gap, now fills in the gap precisely.
Professional editors have used these techniques for decades. Learn and practice them, and you’re on your way to becoming a very efficient, very organized editor.
There’s considerably more to explore in the Trimmer, but hopefully these tips inspire you to investigate the Trimmer fully.
It’s an incredibly powerful tool, and you should add using it to your skill set and workflow.


- 2-for-1 deal: Buy one and get one for free!
- Buy a VEGAS product today and get the new version of the same product for free!
- 2-for-1 deal: Buy one and get one for free!
- Buy a VEGAS product today and get the new version of the same product for free!

- 2-for-1 deal: Buy one and get one for free!
- Buy a VEGAS product today and get the new version of the same product for free!
- 2-for-1 deal: Buy one and get one for free!
- Buy a VEGAS product today and get the new version of the same product for free!
- 2-for-1 deal: Buy one and get one for free!
- Buy a VEGAS product today and get the new version of the same product for free!
- 2-for-1 deal: Buy one and get one for free!
- Buy a VEGAS product today and get the new version of the same product for free!
What's the difference between VEGAS Pro Edit, VEGAS Pro Suite and VEGAS Pro Post?