
Want to edit the latest high-resolution formats like 4K or 8K, but not sure if your computer system can handle it? Ultra-high-resolution footage takes a lot of processing power. On an older or budget system, even if you can get smooth full-framerate playback when playing a single file, if you add more streams, edits, or effects, you may quickly find your playback dropping to only a few frames per second, making it virtually impossible to work with. Worse yet, your software or system could crash under the load.
Don’t worry – there’s a way around it. With VEGAS Pro, you can generate proxy files of your footage that your computer can handle with ease and get you back to good playback rates even as you add edits, layers, and effects.
First, we’ll explore what proxies are and how you can use them to your advantage, especially if you’re using an older computer with a slower processor or GPU.
Then, we’ll follow these steps in VEGAS Pro:
STEP 1: Automatic Proxy Creation
STEP 2: Manual Proxy Creation
STEP 3: Using Proxies on the Timeline
STEP 4: Final Rendering
Read on to find out more about 4K and 8K editing with proxies in VEGAS Pro!

Proxies are lower-resolution video files intended for use on the timeline in place of the full-resolution 4K or 8K video files. They are frame-for-frame identical to the original files, just at a lower resolution and bitrate, so they are less taxing on the system and allow for real-time or closer to real-time playback, even with effects added. Using proxies, an older computer can give up to full-framerate timeline performance when it wouldn’t be able to if using the full-resolution original files.
So, you can edit, add effects and layers, and do everything you need to do on the timeline and not have to deal with choppy playback. When you’re finished editing and ready to render a full-quality video for delivery, VEGAS Pro then switches back to the original files for full-quality results.
You can enable VEGAS Pro to create proxies automatically when you add footage to your project.
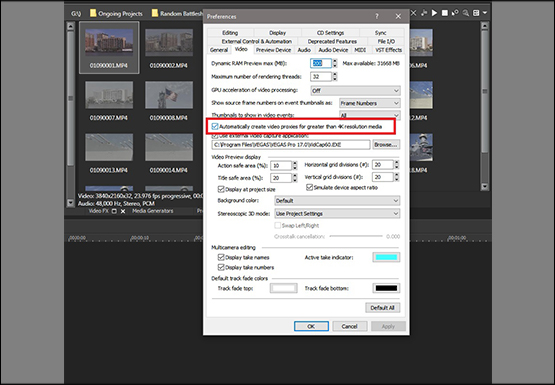
✓ Go to Options>Preferences.
✓ In the Preferences window, click the Video tab. About a third of the way down, find the checkbox for automatic proxy creation. In the latest build of VEGAS Pro 17 and VEGAS Pro 18, the option is to automatically create proxies for greater than 4K media, which will set VEGAS Pro to create proxies for video of resolutions greater than 4K up to 8K. In previous builds of VEGAS Pro including VEGAS Pro 16, the option is to automatically create proxies for Ultra HD (4K) media.
With the checkbox enabled, when you bring a media file of the affected resolution into VEGAS Pro, a green status bar appears at the bottom left of the VEGAS Pro window showing progress of the creation of the proxy, or proxies if you imported more than one media file.
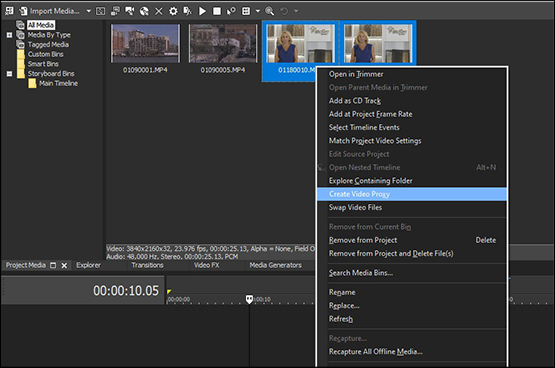
If you did not enable automatic proxy creation, or if you are using the latest build of VEGAS Pro 17 or 18 and want to create a proxy for 4K footage, you can create the proxies manually.
✓ Select the file or files you want to create proxies for in the Project Media window.
✓ Right-click and choose Create Video Proxy from the context menu.
A green status bar then appears at the bottom left of the VEGAS Pro window, again showing progress of the creation of the proxy or proxies.
Whether you created the proxy files automatically or manually, only your original files are displayed in the Project Media window. The proxies are tied to the original files and you can access them along with the original files on the timeline.
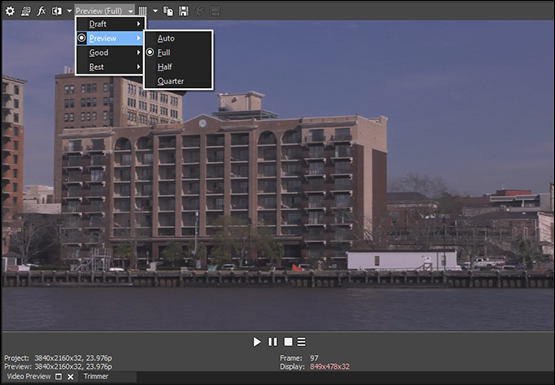
✓ If your media file is not already in the timeline, drag it to the timeline from the Project Media window.
✓ In the Video Preview window, click Preview Quality. To use the proxy file in place of the original file, choose Preview or Draft quality. If you set to the Preview Quality to Good or Best, you will work with the original file.
Using the proxies, you will experience much better playback performance. You will also see noticeably lower resolution. If you are doing critical color correction or effects work and need to view the original footage at top resolution, set the Preview Quality to Best (Full) to access the original full-resolution files. You will no longer get the best playback performance, but you can check your work and then switch back to Preview or Draft to again use the proxy for optimal playback.
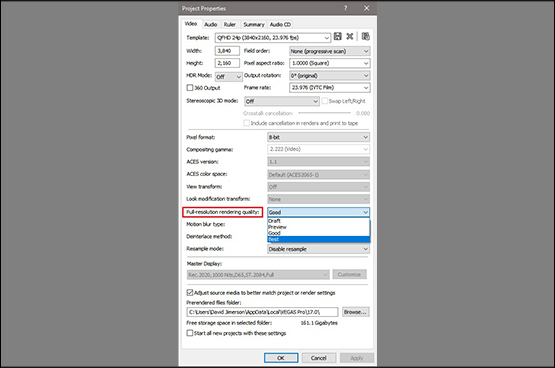
When rendering, the default Project settings for render templates use the Project Properties for render quality, so set the render quality in Project Properties to ensure that VEGAS Pro will use the full-resolution original file for rendering instead of the proxy file.
✓ Click Properties in the VEGAS Pro toolbar. In the Project Properties window, set the Full-Resolution Rendering Quality to Good or Best, preferably Best.
But to be safe, you can set the render quality manually in the render template.
✓ Click Render As. The Render As window opens. Choose your render format and template.
✓ Click Customize Template.
✓ Click the Project Tab.
✓ Click the drop-down menu next to Video Rendering Quality. Choose Best. Click OK.
✓ Click Render. VEGAS Pro renders your video at full resolution using the original 4K or 8K files.


What's the difference between VEGAS Pro and VEGAS Pro Suite?