What you’ll learn:
How to create and edit a multicamera project
Sometimes you want to shoot the same scene simultaneously with more than one camera, such as for a wedding, a school play, a concert, or some other live event, and combine the footage from all of the cameras into a single video. You might have two or three cameras shooting a wedding ceremony, or maybe you just want to make a compilation of multiple people’s footage from the same event. VEGAS Pro makes it easy to take footage of the same event from different cameras, sync it up, and then edit it all into a cohesive whole. In this tutorial, we’ll show you just how simple and fun it is!
We’ll follow these easy steps:
STEP 1: Import Your Video
STEP 2: Synchronize Your Footage
STEP 3: Create Multicamera Track
STEP 4: Enable Multicamera Editing
STEP 5: Choose Takes On The Fly
STEP 6: Adjust Your Edit
And when we’re through, you’ll be ready to edit your own multicamera projects in VEGAS Pro.
Read on to find out all about it!

✓ Start a new project.
✓ Import all three video files into your Project Media.
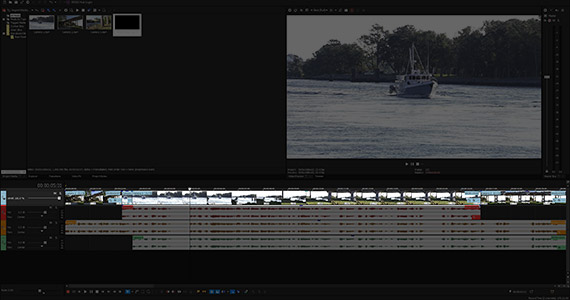
✓ Drag the first video to the timeline. A video and audio track are created automatically, and VEGAS asks if you would like the project properties to match the video. Click Yes.
✓ Drag the second video the timeline to a position underneath the first video. A new video and audio track appear automatically.
✓ Drag the third video to the timeline to a position underneath the second video. As with the other videos, a new video and audio track appear.
VEGAS has always made it easy to synchronize footage by audio, because you can zoom in on audio events and view the audio waveforms almost down the sample. What this means is you have a very detailed and precise view of your audio waveforms and can sync up audio by sight quickly and easily.
✓ Press the up arrow or scroll your mouse wheel to zoom in on the timeline, expanding the waveforms to a high level of detail. Take your first video, examine the waveform, then look for corresponding waveforms in the other videos.
✓ Move the videos back and forth on the timeline until you have an exact match between the waveforms.
✓ Play the project to confirm that the audio is lined up perfectly. When it is, you’ve synced the videos.
Now in VEGAS Pro, syncing the videos is even easier.
✓ Select all three media files.
✓ Go to Tools>Multicamera>Synchronize Audio to Align Events. VEGAS will then attempt to align the videos to the topmost, or reference, video. Once it’s finished, it will confirm synchronization or warn you that it was unable to align one or more of the tracks. But if the audio is clear in each instance, it should have no trouble aligning the footage.
✓ Choose the video with the best audio. Mute the other audio tracks. Now, rename the video tracks to something easy to understand, like Camera 1, Camera 2, and Camera 3.
✓ Hold CTRL and select each of the video tracks.
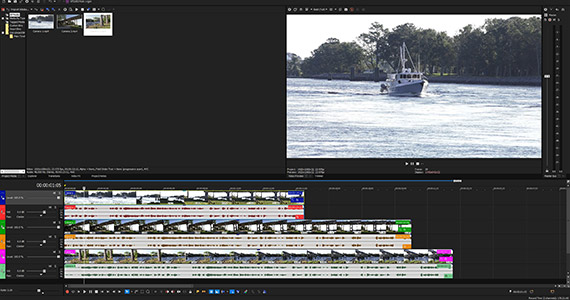
✓ Go to Tools>Multicamera>Create Multicamera Track. VEGAS then creates a single video track at the top of the timeline. The information on the video event tells you that the video for Camera 1 is visible, but it also indicates that it is take (1/3), telling you that the two other video streams are present in the track as alternate takes.
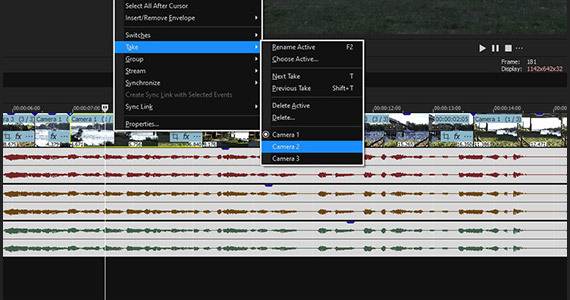
✓ Play the project, and only Camera 1 plays, but you can access the other takes.
✓ Right-click the video event and choose Take from the context menu. The cascading context menu lists Camera 1, Camera 2, and Camera 3. Choose Camera 2 or Camera 3, and the video from Camera 2 or Camera 3 takes precedence, and you can play through it. But for now, stay with Camera 1.
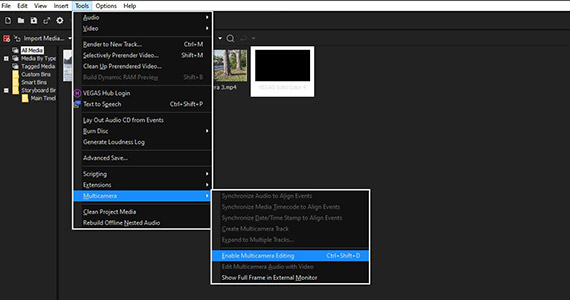
✓ Go to Tools>Multicamera>Enable Multicamera Editing.
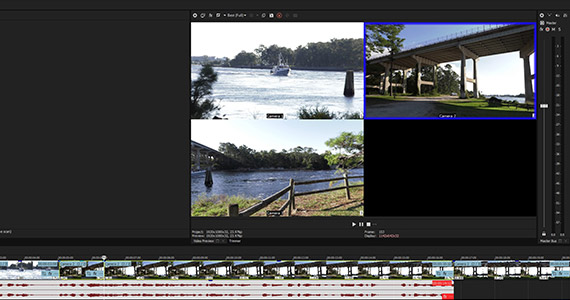
In the Video Preview window, your three different takes appear in an array, labeled as Camera 1, Camera 2, and Camera 3. In this initial state the take with precedence, Camera 1, is highlighted in blue.
Now you’re ready to cut between the difference takes.
Here’s the fun part! It’s almost like playing a video game.
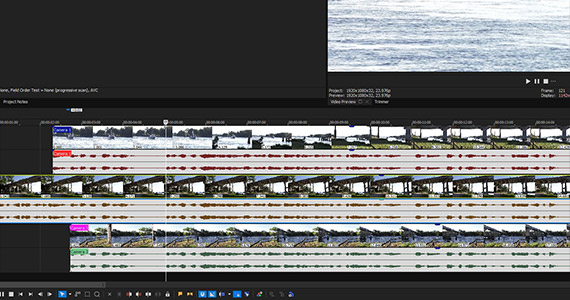
✓ Set your timeline cursor to the beginning of the clips. Press play. Watch the takes in your preview window. When you get to a point where you want to switch to Camera 2 or 3, simply click that take in the window. The blue highlight then changes to the take you chose.
✓ On the timeline, an edit point appears in the multicamera track, and the thumbnail in the video event shows that the take you chose now takes precedent. Switch back and forth as the video the plays, and each change is reflected on the timeline. Continue switching until you’re satisfied or until you’ve through the entire video.
VEGAS Pro also allows you to edit the multicamera audio with the video.
Now you’ve made a multicamera edit!
✓ Go to Tools>Multicamera and then uncheck Enable Multicamera Edit. The Video Preview window goes back to its normal view, and now you see only the take with precedence.
✓ Play through your video to see if you’re satisfied with the edit. If not, trim the video so the cuts are exactly what you want. If decide you want a different take than what you chose, right-click the video event, choose Take, and then choose the take you want.


What's the difference between VEGAS Pro and VEGAS Pro Suite?