What you’ll learn:
How to remove backgrounds from images with three keying effects (Keying, Masks, and Mattes)
You probably know that movies and TV run on blue screen or green screen effects, whether it’s for blockbuster feature films with astounding visual sequences, or something as simple as standing in front of a weather map in a report from your local TV station. The idea behind it is pretty simple – remove the background from behind a subject and replace it with something else, like a different city, outer space, or whatever your imagination comes up with.
Chroma Key is the process of removing a solid-colored background from an image, called that because removing the color (chroma) and leaving only the subject is sort of like looking through a keyhole, or so they thought back when it got its name. But there are other types of mattes and masks which can separate a subject from its background. We’ll look at a few of the most common tools and techniques offered in VEGAS Pro.
In this tutorial, we’ll take you through three keying effects in VEGAS Pro:
EFFECT 1: Chroma Keyer
EFFECT 2: Garbage Matte
EFFECT 3: Luminance Mask
When we’re done, you’ll be on your way to compositing on your own effects sequences, with your imagination the only limit.
Read on to find out more!
When it comes to keying and masks, sometimes terms end up somewhat interchangeable. What is Chroma Keying? For the sake of clarity, a key is a process for removing a background based on a property such as color. A mask and a matte are more or less the same thing, a tool which covers a physical area to block part of the image, like a stencil. In the old days of film effects, the mask or matte would physically cover part of the film so only the object you want is recorded within the frame. This allowed for multiple images to be recorded in the same frame of film, and post-production composites were born.
When you key, you create a mask or a matte, which the keying effect applies in the background. Don’t worry about it too much; it’s just good to be familiar with the terms as you follow along.
✓ Drag a clip with a subject shot against a green screen background to the timeline.
✓ In the Media Generators window, click Noise Texture. Drag the Puffy Clouds preset thumbnail to the timeline, under the green screen video event. A new video track appears. Place the new video event directly under the original video event. Trim the new event to match the length of the green screen event.
At this point, you can only see the original green screen clip in the Video Preview window, because layers are ordered top to bottom, with upper layers visible first. To see the puffy clouds image underneath, you must remove the green screen background.
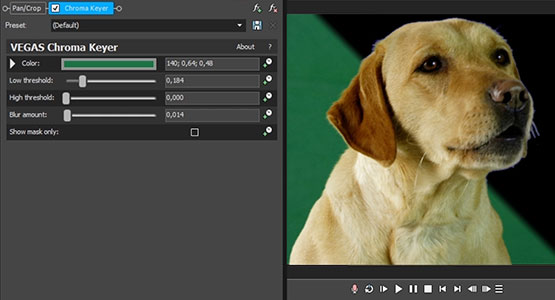
✓ In the Video FX window, click Chroma Keyer. Drag the Green Screen preset thumbnail and drop it on the green screen video event.
The Video Event FX window opens with the Chroma Keyer controls visible. The green background also disappears from the image in the Video Preview window, revealing the puffy clouds in the background.
Most likely, you’ll still see parts of the background which didn’t key out fully, and possibly parts of the subject you want to keep which have become partially transparent. The green color of the preset probably didn’t match the green screen color exactly.
In the Video Event FX window, find the effects chain at the top.
✓ Click the checkbox in the Chroma Keyer effect to deactivate it. In the Video Preview window, the green screen background returns.
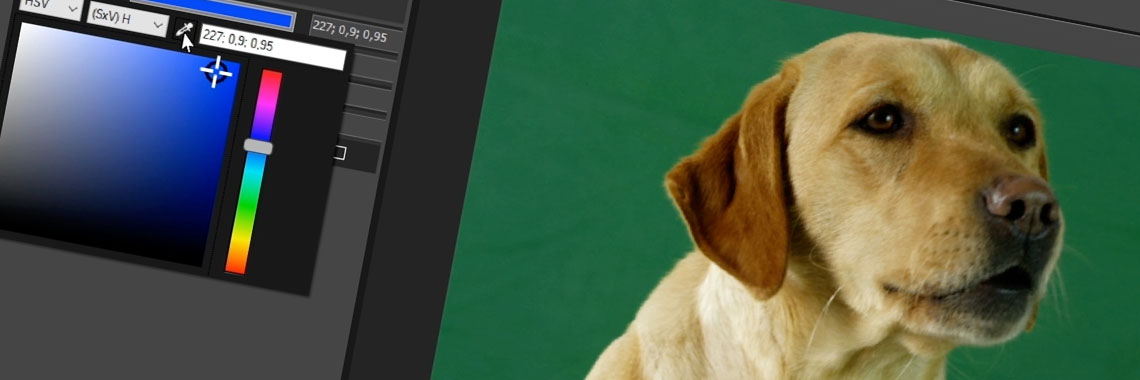
✓ In the Chroma Keyer controls, click the triangle next to Color. A small box indicating the current color appears. Click the eyedropper button. The cursor changes to an eyedropper.
✓ Move the cursor to the Video Preview window. Click a spot near the edge of your subject, then hold and drag the cursor away from the subject. A small box appears and grows larger as you drag. The green screen background probably isn’t perfectly uniform in color, so drag out the box to capture a range of the background color.
✓ In the Video Event FX window, click the Chroma Keyer checkbox to reactivate the effect. In the Video Preview window, the green background disappears again, but this time, hopefully more of the background becomes fully transparent and everything is cleaner.
It probably still will not be a perfect key, so make some adjustments.
✓ Mute the track containing the puffy clouds background. Click the Show Mask Only checkbox. In the Video Preview window, the image changes to silhouettes in black and white. The white portion is your subject, while the black portion is the background you keyed out. Gray areas are semi-transparent. What you want, ideally, is a clean matte line around your subject, which should be solid white, and the greenscreen background completely black. If it’s not, then fine-tune the mask.
✓ Adjust the Low Threshold and High Threshold sliders to perfect the mask. If the edge is a little jagged and blocky, adjust the Blur amount. For best results, do as little of all it as possible.
✓ When you’ve perfected the mask, uncheck the Show Mask Only checkbox and unmute the video track with the puffy clouds. Your subject is now cleanly keyed against the puffy clouds background.
What is Garbage Matte? You may have some tricky parts in the green background, like the edges of the green screen which are lit darker than the area of the screen around your subject and they don’t key out. Or you may have places where the green screen ends, revealing the studio walls, or where lights or other objects in the studio intrude into the green screen. A garbage matte gets rid of problems in your image that you can’t chroma key out.
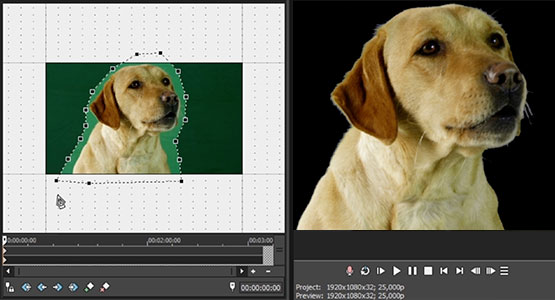
✓ Click the Event Pan/Crop button. The Video Event FX window opens with the Pan/Crop tool visible. In the lower left corner, click the Mask checkbox.
✓ Click the Anchor Creation Tool button, the pen tip icon. Move the mouse cursor to the image, and the cursor changes to a pen tip.
✓ Click around the area you want to keep, creating points as you go. To close the mask, click the original point.
In Pan/Crop, the area around the mask darkens while the area inside the mask stays the same.
In the Video Preview window, note that everything outside the mask area has disappeared. You now have a clean key of only your subject.
✓ Edit the mask if it’s not quite right. Click the Normal Edit Tool. Click on the image outside of the mask to deselect the mask. Move the cursor to the mask. It turns into a small arrow.
✓ Point the arrow at a corner of the mask and click to select an individual point of the mask. Hold and drag the point to a new location.
Compositing artists often apply a garbage matte before keying rather than after so that they only have to key out a smaller portion of the background. They create a mask as close to the edges of the subject as possible, making the background as small as possible, making a clean key even easier.

What is Luminance Mask? A Luminance Mask or luminance key removes parts of an image based on brightness rather than color. Let’s create a Luminance Mask from the chroma key image we just created, so we can remove the background without using the Chroma Keyer.
Mute the track containing the puffy clouds background image. As before, the background turns to pure black in the Video Preview window.
✓ Click the Video FX button on the green screen video event. The Video Event FX window opens. Click Chroma Keyer to open the Chroma Keyer controls.
✓ Click the Show Mask Only checkbox. Your subject now appears as a white silhouette against the black background.
For the purposes of this lesson, we’ll make a mask from a single frame. Click the left edge of the media event to set the cursor to the first frame.
✓ In the Video Preview window, set the Preview Quality to Best (Full). Click the Save Snapshot To File button. The Save Snapshot To File window opens. Navigate to the folder where you want to save the image. Type in a file name. Set the Save As Type to .jpg, not .png. Setting it to .png would preserve transparency and defeat the purpose of this lesson. You want an opaque image of a white silhouette against a black background, so choose .jpg. Click Save.
The saved image appears in the Project Media window. We’ll use the image to create a matte with the Luminance Mask.
✓ In the Video Event FX window, uncheck Chroma Keyer to deactivate it. The original image appears without the green screen removed.
✓ Click Pan/Crop, then uncheck the Mask box to deactivate the garbage mask. Now the entire original image is visible.
Unmute the track with the puffy clouds. You won’t be able to see it under the green screen clip, but that’s OK for now.
✓ Go to Insert>Video Track in the toolbar. A new video track appears above the track containing your original green screen event.
✓ Drag the new image to the new track, snapping its left edge to the left edge of the video event, so it begins over the first frame of the video event. In the Video Preview window, only the black and white matte image is visible.
✓ In the Video FX window, click Mask Generator. Drag the Luminance Mask preset thumbnail and drop it on the photo. The Video Event FX window opens with the VEGAS Mask Generator controls visible.
Your subject now appears as a white silhouette against the green screen and background, because the Luminance Mask removed the black portion of the mask.
✓ In the track containing the mask, click the Compositing Mode button in the track header. Choose Multiply (Mask). Now the green screen background disappears, and your subject appears against a black background.
✓ In the track containing the green screen clip, click the Make Compositing Child button in the track header. The puffy cloud background appears behind your subject.
Making a Luminance Mask is very similar to the process used for decades in film when compositing images shot against a blue screen or green screen. You may even see a colored matte line around the object, just like you may have seen in older movies, so it could be a great way to simulate that old-style feel.
For an animated mask rather than just a still, render a full-quality movie of the video when you have the black and white mask displayed, instead of just saving a snapshot to file. Then follow the same process of applying the mask.
Useful Tips: Remove Spill and Blocky Artifacts from Green Screen Footage
Using the Luminance Mask this way, you can cut anything you want out of an image or video and place it against another background, using any black and white silhouette image. For example, you can use white text on a black background as your mask and cut text out of your image, placing the text filled with your image against any background you want. You can also use the Media Generator to create animated masks, or some media companies offer pre-generated animated masks for download, some free, some paid. These masks are ideal for creating exciting animated sequences or even matte transitions.


What's the difference between VEGAS Pro and VEGAS Pro Suite?