What you’ll learn:
Understanding planar motion tracking
With Planar Motion Tracking, you can track objects that are not necessarily square to the camera, like the side of the building seen from perspective or a moving video screen, and pin other video or images to that object to follow along with the tracking, changing shape as needed to maintain the changing perspective of the object it’s pinned to.
The process of Planar Motion Tracking is split up over two different effects in VEGAS Pro, the Bézier Masking effect and the Picture In Picture effect. Combining these effects, we can add posters to moving walls, create “living” paintings like you might see in magical worlds, replace what’s happening in windows passing by with anything we like, or, as in this example, replace a video device’s screen with new video, all while everything is in motion!
It’s a multi-layered approach, but in this tutorial, we break the process down into easy steps.
Using the Bézier Masking effect, we’ll follow these steps:
STEP 1: Add the Video You Want to Track
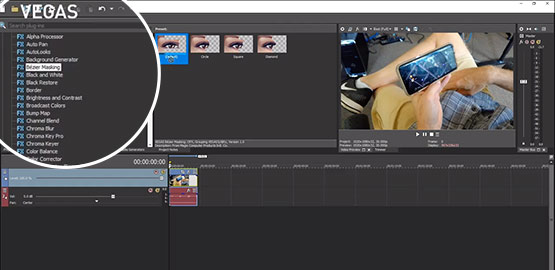
STEP 2: Apply the Bézier Masking Effect
STEP 3: Create Your Mask
STEP 4: Apply Motion Tracking
Then, using the Picture In Picture effect, we’ll:
STEP 5: Add the Video You Want to Pin
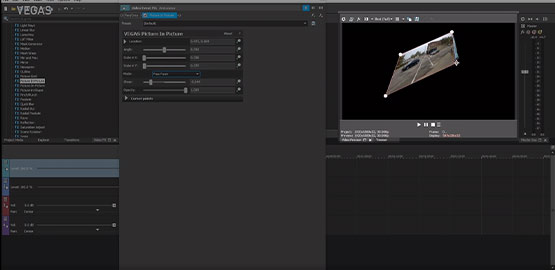
STEP 6: Apply Picture In Picture Effect
STEP 7: Pin Your Video
STEP 8: Reorder Video Tracks and Check Your Pin
STEP 9: Copy Motion Tracking to PiP
STEP 10: Manually Adjust for More Precision
Read on and follow along as we dive into Planar Motion Tracking!
We’ll use the Bézier Masking effect for the first half of pinning and tracking objects to your moving video. In it, we’ll define the area which we’ll replace with the new image, and do the actual motion tracking, which we’ll apply to the new video later with the Picture In Picture effect.
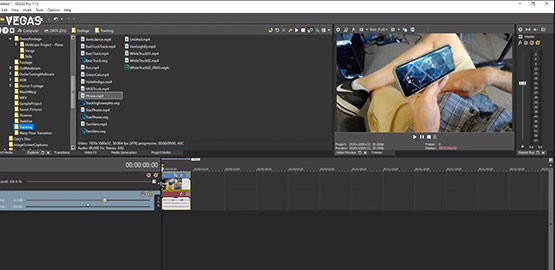
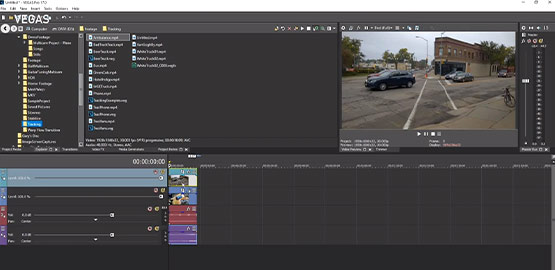
First, add the video with the object you want to track to the project.
✓ Click to place your cursor at the beginning of the event.
Play your project. If there is a lot of motion in your clip, the camera will likely change perspective, causing a perspective change in objects in the image. For our example, the clip includes a man holding a tablet or phone or mobile device, and you want to lay another image onto the screen. To do so, you will need to track these perspective changes.
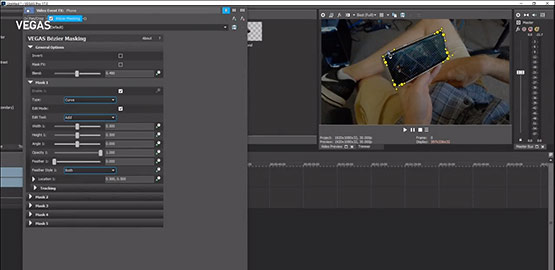
Now we’ll use the controls to cut the screen out of the device in the video. We don’t necessarily have to cut the screen out to achieve the effect, but in this example, it will help the overall result look more realistic.
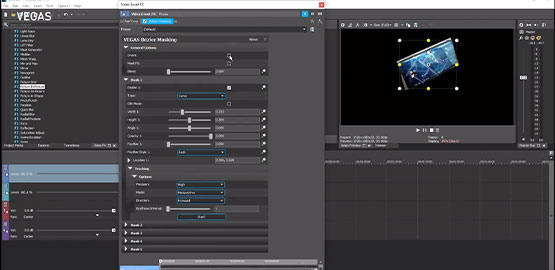
✓ Next to Mask 1, click the arrow to open the Mask 1 controls. In the Type drop-down list, choose Curve. You may not necessarily need the Curve tool in your video, but if you have non-square corners you want to cut out, as we do in this example, you’ll want the Curve to get the most exact mask.
✓ Click the arrow next to General Options. Adjust the Blend slider to .500 or nearby, so that you can see the entire video at least partially as you create your mask.
✓ Move your mouse cursor to the Video Preview window. The cursor becomes a pen tool and you can add points to create the shape you want. Use the handles on every point to adjust your curves to match rounded corners precisely.
✓ Once you’ve created your mask, set the Blend slider back to 0. In the Mask 1 controls, uncheck the Edit Mode box.
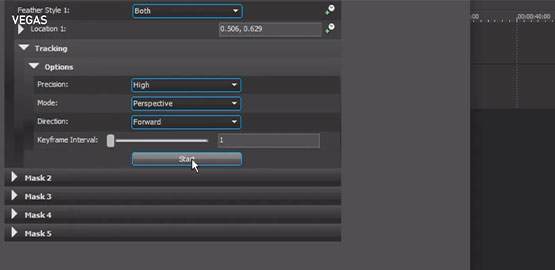
✓ In the Mask 1 controls, click the Tracking arrow and then the Options arrow.
✓ Under the Precision drop-down menu, choose Normal if there’s not a lot of movement in the video, but choose High if there is.
✓ Click the Mode drop-down list and choose Perspective.
✓ Change the Keyframe Interval setting to 1 so that the tracking creates a keyframe for every frame, giving you the most precise tracking. You could leave at a higher value for video with little or very slow motion and save processing power, but for video with dynamic motion, it’s best to create keyframes for every frame.
✓ Click Start. The tool starts to track the motion, recording keyframes in the animation timeline in the effects controls.
✓ When the tracking completes, click to place your timeline cursor back the beginning of the event. Play the project. If you’re happy with the mask results, close the Video Event FX window.

✓ Drag the video you want from the Explorer window or the Project Media window and place it directly under the first video event.
✓ Trim the new video event to match the length of the original.
✓ Drag the lower video track above the original video track so that the new video event sits on top of the original video.
✓ Click to place your timeline cursor at the beginning of both events.
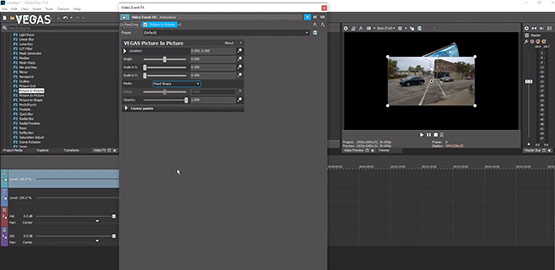
Go back to the Video FX window and choose Picture In Picture.
✓ Drag the default preset and drop it on the top video event. The Video FX window opens, and the Picture In Picture controls appear.
In the Video Preview window, the upper video now appears as a smaller rectangle in the middle of the screen. The rectangle has white control points at each corner. If you drag a control point, it changes the size of the video, but you need to be able to place the control points individually.
Close the Video Event FX window. Reorder the video tracks again, placing the overlay video track underneath the original video. You should now see your original, masked video laying on top of the Picture In Picture video.
✓ Click the Event Video FX button on the mask video event to open the Bézier Masking controls again.
✓ In General Options, click the Invert checkbox. When you do, the mask inverts, making everything in the masked video visible except the masked area. Now you should see the whole video with the device screen replaced with your new, pinned video. If you made the pinned video slightly larger than the mask area, you should see complete coverage of the mask area with the new video. If not, you can adjust the Picture In Picture effect to make sure the entire area is covered.
Now let’s match the tracking of the pinned video to the Bézier mask. If you play your video right now, the pinned video does not move with the motion of the device screen.
✓ Click to place the timeline cursor back the beginning of the video events.
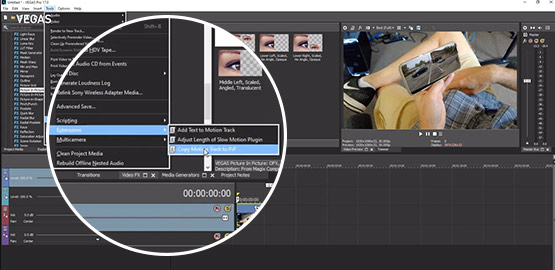
✓ Click the upper event to select it, then hold the CTRL key and click the lower event. Both events are now selected.
✓ Go to Tools>Extensions>Copy Motion Track To PiP. When the copy is complete, an alert box opens to inform you that the motion track has been successfully copied. Click OK.
Now, play your project. The pinned video now moves and changes perspective to match the device screen in the original video.
Often when there are large movements or a lot of movement, it can be difficult to track and pin precisely. You can make manual adjustments to the keyframes.
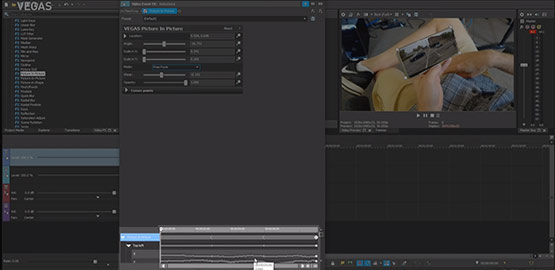
✓ Click the Event Video FX button on the PiP event. Find the motion tracking keyframes in the animation timeline at the bottom of the effect controls. Click on any keyframe and adjust the pinned video position manually to get the exact results you need.
With some patience and some practice, you’ll soon be on your way to creating amazing composites with Planar Motion tracking!


What's the difference between VEGAS Pro and VEGAS Pro Suite?