
Have you ever wanted to stop your video and hold on a single frame, to draw attention to a point or for dramatic flair? Good news! VEGAS Pro makes it easy to do just that. In this tutorial, we’ll look at creating a freeze frame with the Velocity Envelope, and also by saving a frame of video as a discrete photo image to use in your project.
We’ll follow these easy steps:
Using a Velocity Envelope
STEP 1: Create Freeze Frame Automatically
STEP 2: Set a Freeze Frame Manually
Saving a discrete freeze frame
STEP 3: Choose Your Freeze Frame
STEP 4: Save a Snapshot to File
It’s really fast and easy, so read on to discover more!
A velocity envelope lets you control the playback speed of your video. You can create slow motion, fast motion, or even no motion from any video. You can even ramp your speed up or down to ease into or out of normal motion. But for this tutorial, let’s use a velocity envelope to create a freeze frame, stopping your video cold at the frame of your choice.

✓ Drag and drop the video you want into your timeline, creating an event.
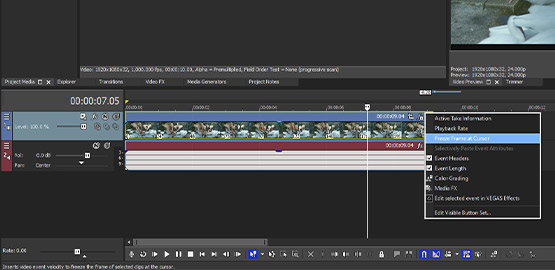
✓ Set the timeline cursor to the frame where you want to create the freeze-frame. Choose Freeze Frame at Cursor from the event hamburger menu.
VEGAS Pro then inserts a velocity envelope with a point at the cursor. The point is automatically set to 0% velocity, freezing the video at that frame.
Keep in mind a few things, though. The audio will not freeze along with the video, so you may have to separate and remove the audio stream.
✓ In the timeline toolbar, click Ignore Event Group, which allows you to edit the video and audio streams separately. Now, you have several options.
✓ Click the audio event and press Delete to delete the entire audio stream. If you would like to keep some of the audio stream, perhaps up to the point of the freeze frame, click the frame where you want the audio to end, and then press S to split the audio stream.
✓ Click the audio event segment to the right of the cursor and press Delete.
✓ Or, without splitting the audio event, drag the right-side end of the audio event inward to the point where you want the audio to end. Once you have removed the unwanted audio, click Ignore Event Group once more so you can again move and edit event groups as one.
You can also set a velocity point manually.
✓ Add another clip to your project.
✓ Right-click the video event and choose Insert/Remove Envelope.
✓ This time, choose Velocity. VEGAS Pro inserts a velocity envelope, but with no preset points.
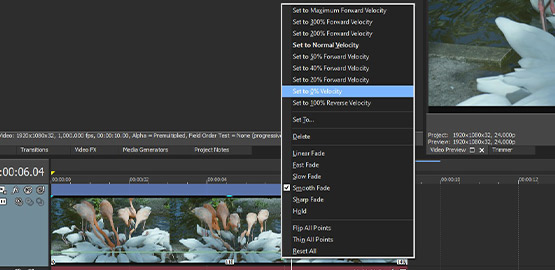
✓ Right-click the velocity envelope at the frame you want to freeze.
✓ Choose Add Point. A point appears on the velocity envelope. Add another point just to the right of the one you just added.
✓ Drag the second point so that it is directly below the first point.
✓ Finally, right-click the second point and choose Set To 0% Velocity.
Either way you set the 0% velocity, you can move the point to change the frame which is frozen. Be careful, though; moving the point up or down moves it away from 0% velocity, which can make it difficult to find the exact frame you want to freeze.
✓ To avoid moving the point up or down as you drag it left and right, hold the Ctrl key while you drag it. This constrains your motion to strictly horizontal and you run no risk of dragging up or down.
Keep in mind, changing the length of the event can also change the position of the point, so the frozen frame will change and you may have unexpected results. If you drag the right-side edge of the event, there’s no problem; the freeze frame remains in place, and however long you extend the event to the right, the freeze frame continues. But if you change the left-side edge of the event, either shortening or lengthening the event, you may change or even lose your freeze frame.

There’s also a third way to create a freeze frame. Using the velocity envelope is the quickest way, but there are some drawbacks.
Using a velocity envelope is more processor-intensive, so it takes some juice to play back your sequence at full frame rate, especially if you’ve added text or other effects, or if you have a crossfade or transition into or out of another event.
Also, as we said, editing the length of the event can lead to unexpected changes in the freeze frame.
There’s a way to create a permanent freeze frame which will not only be easier on the processor, it will also be unaffected by any changes in length, whether you extend the event to the left or to the right.
✓ Add one more clip to the timeline, and set the timeline cursor to the frame you want to freeze.
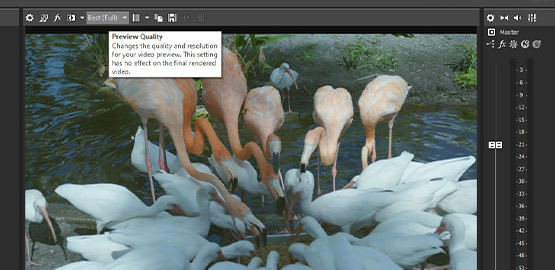
✓ In the Video Preview window, set the Preview Quality to Best (Full) if it isn’t already. Make sure the Split Screen View is turned off so that all FX are active throughout the entire image.
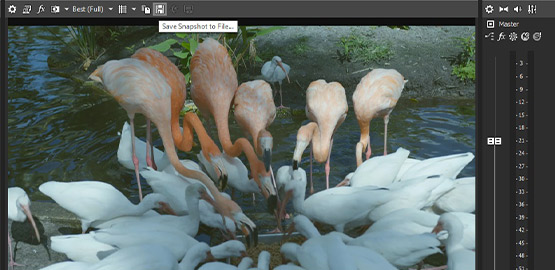
✓ Click the Save Snapshot To File button. Choose the location where you want to save the snapshot. In the Save As Type dropdown menu, choose either .jpg or .png. Either one will give you a full-quality snapshot, but .png will preserve any transparency in the image. Including transparency in the snapshot may give you unexpected results, so to avoid transparency you don’t want, choose .jpg.
✓ Specify your file name and click Save. At Best (Full) Preview Quality, VEGAS Pro saves a full-quality snapshot at the Project resolution. If you have the Preview Quality set to something else, the resulting snapshot will be at a lower quality and possibly a quarter or half of the Project resolution.
So, always keep the Preview Quality at Best (Full) to make a freeze-frame.
The snapshot will then appear in the Project Media window under the file name you specified. It is now a single-frame photo which you can drag to the timeline and edit like any other photo. You can use it as a standalone event, or you can cut the original event at the freeze frame and replace that frame with the photo.
As a photo, and because any effects you may have applied to the event containing the frame you made the snapshot from will be “baked into” the snapshot, it takes less processing power to play back at full frame rate. If you have text or picture in picture overlays added, or if you transition between the photo and another event, you’ll get closer to real-time, smooth playback.
Also, you can extend or reduce the length of the event in either direction, and the frozen frame will never change.
Now that you know how easy it is to create a freeze frame in VEGAS Pro, the only limit is your imagination!


What's the difference between VEGAS Pro and VEGAS Pro Suite?