
What you’ll learn:
What motion blur is, why you want it, and how to apply it!
Though it seems counterintuitive, natural-looking motion needs a certain amount of blur. It comes from how we perceive motion in the real world. Our eyes see continual movement, and if something moves quickly, it looks to us like a blur.
Moving video doesn’t always have the right amount of blur, though, especially in elements that we create ourselves, like moving text or graphics. When that happens, the motion might not always look natural.
So what do we do about it? We add motion blur. Motion blur provides the natural blurring we see in the real world every day, but isn’t there when we keyframe text or graphics, or even if we shoot video with a high shutter speed. Don’t worry; we’ll explain all that, but first, let us assure you that VEGAS Pro has you covered with its built-in motion blur tools.
In this tutorial, we’ll explore motion blur and why we need to add it to certain footage or graphic elements.
Then, in VEGAS Pro, we’ll follow these steps for adding the motion blur we need:
STEP 1: Set Up Your Project
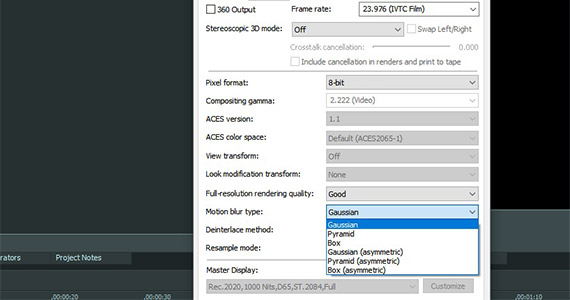
STEP 2: Set Motion Blur Type
STEP 3: Open Video Bus Track
STEP 4: Insert Motion Blur Amount Envelope
STEP 5: Set Motion Blur Amount
STEP 6: Supersampling
Let’s get right to it and explore what motion blur is, why you want it, and how to apply it in VEGAS Pro!

As we said above, motion blur is essential for natural-looking movement. It comes down to how we see in nature. Our eyes see motion blur whenever any object moves. We see movement as a continuous process, and as such, we naturally see some blur when things move.
Motion picture, though, including video, doesn’t work that way. Motion picture is a succession of still images which go by quickly enough that our eyes are tricked into seeing motion when there really isn’t any.
For natural-looking movement, then, motion picture needs some blur. Footage with no motion blur can look staccato or choppy. Moving objects seem to jerk from place to place rather than move smoothly between them.
The effect can be obvious, like watching a flip book or a video game with dropped frames, or it can be almost imperceptible, but you can still see there’s something unnatural about the movement.
Normally, motion blur can be achieved in motion picture through shutter speed. The shutter speed is how long each frame in a motion picture stream is exposed. In film, the shutter speed is usually expressed by a degree measurement, denoting how much of a wedge is cut out of the film camera’s circular, rotating shutter. But in video, it’s expressed as a fraction of a second, the amount of time of exposure.
The cinematic motion we’re used to seeing in movies comes from a frame of video being exposed for half of the duration of the frame. This came about because film cameras often used a 180-degree shutter, which meant that half of the shutter was cut out, exposing the frame for half of the time. If we want motion which feels cinematic, we often want the same amount of motion blur.
In video, expressed as a fraction, if the frame rate is 24 frames per second, then each frame lasts for 1/24th of a second. So, half of the duration of the frame is 1/48th of a second. A comparable shutter speed for video, then, is 1/48. Shooting 24 fps video with a shutter speed of 1/48 should give you the same cinematic motion blur as a 24 fps film with a standard 180-degree shutter.
At other frame rates, such as 30 or 60 fps, the motion blur would be attained at shutter speeds of 1/60 or 1/120, respectively. This matters if you want to slow down 30 fps or 60 fps footage to 24 fps for slow motion.
These shutter speeds yield the correct motion blur for 24 fps slow motion and will match the motion blur of the rest of the full-speed 24 fps footage.
Faster shutter speeds, like 1/250, 1/500, or faster, reduce motion blur, to the point where there is no blur at all. As we said, this can make footage look choppy and unnatural, but it may be ideal if you want to pull crisp still images out of footage. Be aware that the faster the shutter speed, the more light is required for a proper exposure.
Slower shutter speeds yield more motion blur, because the longer a frame is exposed, the more objects move during the exposure. While too little motion blur can lead to choppy-looking footage, too much can make objects appear “streaky” or “ghostly.” That’s not what you want for natural-looking motion, but it could be useful as a visual effect.

VEGAS Pro lets you add motion blur to footage which has no motion blur, or too little. So, you can fix choppy-looking footage which has no motion blur, such as that shot with a high shutter speed. Movie companies add motion blur to special effects sequences like stop motion, which at one time looked very choppy, because it was made up of a series of still photographs of posed objects, with small changes between each photo. Modern stop motion, utilizing motion blur added in post, looks much smoother and more natural.
It’s also useful when you use animated transitions, text, or graphics animations within VEGAS. If you create moving text, each frame of text will be crisp and clean with no blur. Depending on the frame rate, that can make unnatural-looking motion, and it’s especially noticeable when the text is overlayed on footage which has a motion blur.
Similarly, if you keyframe the motion of moving graphics, such as with 2D or 3D Track Motion, or panning across photos using the Event Pan/Crop tool, each frame will be crisp unless you add motion blur. You may decide that’s OK, but if you want to add motion blur, you have that option.
Adding motion blur also lets you increase motion blur for artistic effect, if you want the streaks, if you want the ghostly-appearing motion.
Now, let’s go through how to apply motion blur in VEGAS Pro!
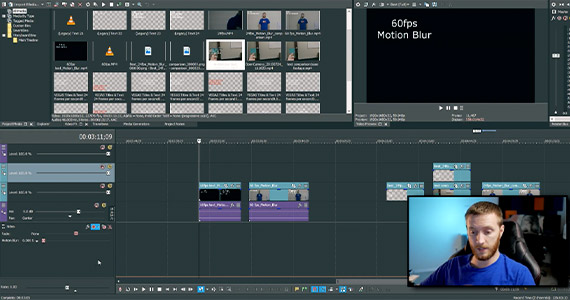
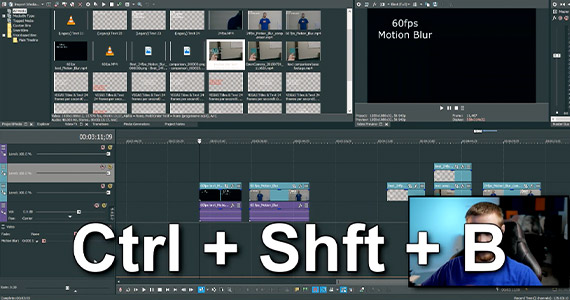
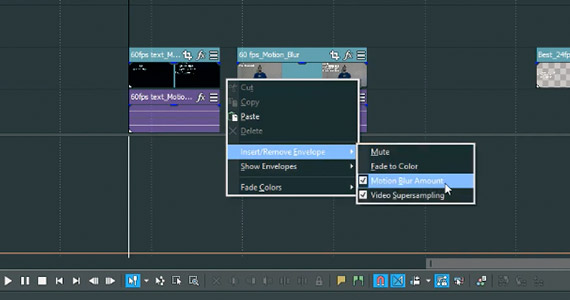
You apply motion blur with the Motion Blur Amount envelope. The envelope is a feature of the Video Bus Track.
✓ Go to View>Video Bus Track to make the Video Bus Track visible, or press CTRL+SHFT+B.
The Video Bus Track affects all video in the project, so any motion blur you apply will affect all of the video, but you can bypass the motion blur for any video on an entire track.
✓ In the video track’s header, click the hamburger menu. Select Bypass Motion Blur. The motion blur will then not apply to any video in that track, so you can separate out any video which you don’t want
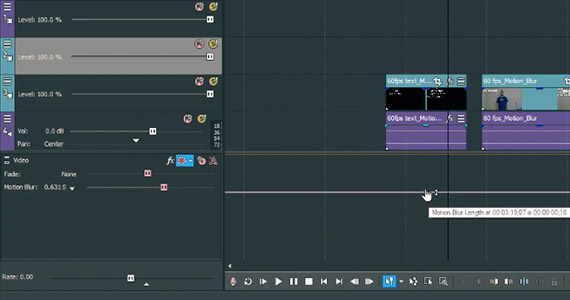
✓ Hover the mouse cursor over the point at the beginning of the envelope until its details appear. The motion blur amount is expressed as a length in timecode, starting at 00:00:00.00.
✓ Drag the point to raise it, and the length increases by a number of frames, from .00 to 1.00. At 1.00, a length of a full second, the motion blur is extreme. Often, your motion blur is best achieved at values of only a few frames, like 00.04.
If you drag the entire envelope, or change only the point at the beginning the envelope, the motion blur amount stays the same throughout the entire program.
✓ If you want it to vary, right-click the envelope to add points along it, then raise or lower those points as needed. You can also automate the motion blur effect, recording your changes as the timeline plays.
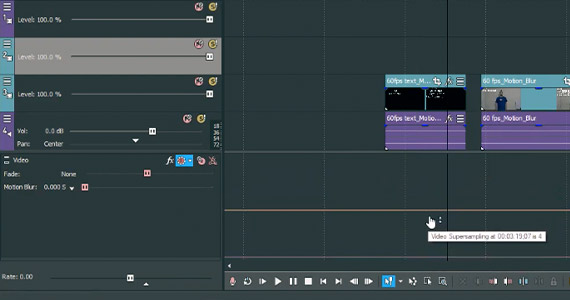
Sometimes, motion blur will produce unwanted results, like repeated or ghosted images within frames. You can alleviate this somewhat using supersampling, which interpolates and creates extra frames between the project’s frame rate, reducing ghosted images. Sometimes, supersampling by itself can achieve a desired motion blur effect.
Like motion blur, supersampling is a function of the Video Bus Track.
✓ Right-click the track header, and choose Insert/Remove Envelope>Video Supersampling. An orange line appears in the track. Like the motion blur envelope, you can left-click on the envelope and drag the entire line up and down to set supersampling for the entire project, or you can right-click the envelope and add points for changes throughout the program. Supersampling values range from 1 to 8, with 8 having the highest effect.
Experiment with motion blur and supersampling and see what results you like, but keep in mind, the faster the motion, the less effective supersampling will be.


What's the difference between VEGAS Pro and VEGAS Pro Suite?