What you’ll learn:
Stabilize shaky video footage in minutes
Experienced editors know the familiar story – when reviewing clips, they find great footage ruined by a case of the shakes. In a perfect world, no one would shoot shaky or wobbly footage when they don’t want to. But to deal with the world we live in, where sometimes shaky footage is the reality, VEGAS Pro offers an incredibly powerful image stabilization tool: the Video Stabilization plug-in. Read on to find out how you can salvage wobbly footage you thought you couldn’t use!
Because the stabilizer is an OpenFX plug-in, you can apply it to the four different levels that VEGAS Pro offers. In the case of stabilization, though, only two of those levels actually make sense: the media level and the event level. Each approach has its advantages, so let's take a look at those two levels first so that you can decide which makes the most sense for your project.
When you apply the effect to the event level, the stabilization will only operate on the portion of the footage contained within the event. For example, say you have a video file that's five minutes long, but in your project you have an event that uses only a 15-second section of that footage. It will take much less time to analyze 15 seconds worth of that shaky video than the full five minutes, so it might make the most sense to add the stabilization plug-in at the event level in this case.
However, there’s an important factor to keep in mind beyond analysis time. Once you've analyzed and stabilized the footage in the event, you cannot change the length of the event or otherwise alter the contents of the event because the analysis would no longer be valid.
It’s not a disaster, because you can always clear the analysis and do it over, but it does take time to reanalyze. For that reason, best practice is to make sure you've completed all of your edits on the event before you apply video stabilization to it.
To apply stabilization at the event level, click the Video Effects tab to bring that window to the front. Select Video Stabilization from the list of plug-ins, and drag the default plug-in onto your target event.
We'll talk about the procedures for stabilizing the footage in a few moments.
You can also apply stabilization at the media level, and there are some advantages to doing it this way as well. When you apply the effect at the media level, you don’t have to re-apply the stabilization every time you bring the footage into your timeline as you would if you apply it at the event level. Remember, media is your video file, and events are objects on the timeline which contain the media. So if you're using the same media in multiple events in your project timeline, it might be more efficient to stabilize the media itself so that whenever you add it to your timeline, it's already stabilized.
Also an advantage to stabilizing at the media level, if you change the length of the event on the timeline, the effect won’t have to re-analyze the footage.
Finally, if you adjust the stabilization at any point during the project (which you'll learn how to do shortly), every event which contains that footage updates immediately and automatically. That saves you time and effort. However, there is another slight downside to stabilizing at the media level. Remember that all of your edits in VEGAS Pro are non-destructive, which means they don't permanently affect the original media.
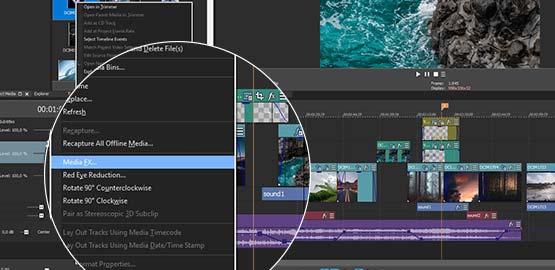
To apply the effect at the media level, right-click the clip in the Project Media window and choose Media FX from the context menu. In the Plug-in Chooser, select VEGAS Video Stabilization from the list of effects. Click the Add button, and then click OK. We'll use the media level for the rest of this article.
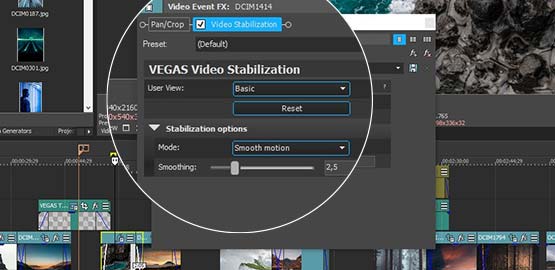
For most footage, Basic is all you need. When you click the Stabilize button, VEGAS Pro analyzes the clip and applies automatic stabilization. In most cases, you’re set! You’ll find smooth motion where once you had shakes. If you're not completely happy with the results, adjust the Smoothing slider to see if you can get better results.
For more challenging stabilization tasks, the Video Stabilization plug-in provides an array of controls for advanced users who want to fine-tune their results. For the remainder of this article, we'll work in Professional mode. Once you understand the settings there, you'll be able to understand expert mode on your own.
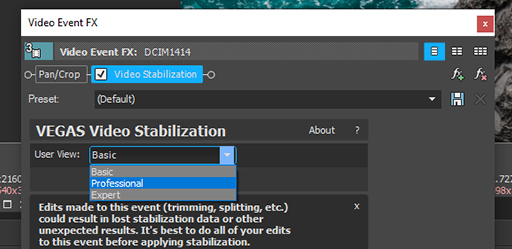
1. Click the User View drop-down list and choose Professional. (If you’re working with the same media you just stabilized using Basic, you’ll notice that at the moment, the Method drop-down list is unavailable. To change the method, you'll have to reanalyze the clip. Click the Clear Motion Data button to discard your previous analysis.)
Professional gives you control over the method of stabilization, and also over which kind of movement the FX stabilizes
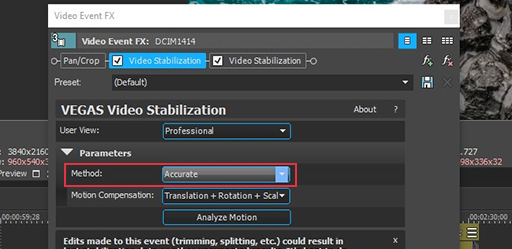
2. Now click the Method drop-down list and choose between Fast stabilization, which lets you do quick stabilization to keep your edit moving, or Accurate stabilization, which closely analyzes the motion for better stabilization, but takes longer.
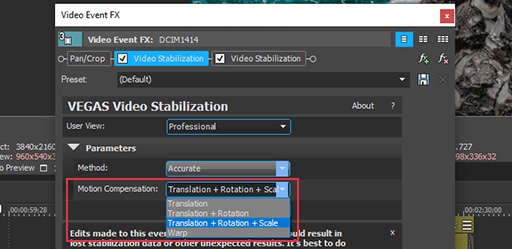
3. Next choose the type of motion compensation that makes most sense for the motion you're dealing with. Footage can wobble over different axes of movement like up-down or side-to-side (known as translation). But unsteady footage can also happen because the camera rotates, and because the camera may tilt forwards and backwards. Finally, the camera might move slightly closer to and farther away from the subject of the shot. Any or all of this movement can add up to shaky footage. You can direct the stabilization to compensate for one, some, or all of these motions. Often you can compensate just on the axes you need and thus save processing time. Start with the least motion compensation necessary and then add more if you need to for the results you want.
4. Most footage shot on a tripod wobbles only up-down or side-to-side, such as if the floor vibrates when people walk by. The tripodkeeps the camera from rotating, tilting, or moving forward or backwards. For the occasional wobble, you may only need to choose Translation.
A bump of the camera on a tripod may introduce rotation, so choosing Translation + Rotation may take care of the problem.
Full-handheld shooting can introduce wobbles over all the axes, so choosing Translation + Rotation + Scale applies stabilization to everything – up-down/side-to-side motion, rotation, and back-forth motion.
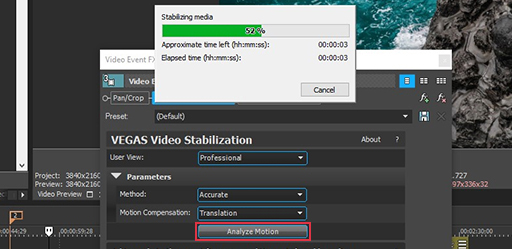
5. Warp compensates for warp distortions. Choose your method and click Analyze Motion.

Once stabilization finishes, more controls appear. These enable you to fine-tune the stabilization.
To stabilize footage, the effect zooms in slightly and repositions the video in an attempt to keep a specific point in the same position within the video frame as the clip plays, so it moves and rotates the image in individual frames as needed. Often, greater zoom means better stabilization, so increasing the zoom with the Smoothing or Additional Zoom sliders can help stabilize the footage even more. However, keep in mind that at some point additional zoom could compromise the quality of the video image, so make sure your video does not become overly fuzzy or pixelated as a result of your zoom setting.
As we mentioned, footage shot on a tripod ideally has no wobble at all, so choosing Freeze Frame in the Mode drop-down allows you to pick an individual frame for reference and “freeze” every other frame to match the positioning of that reference frame. This results in stationary footage.
But if you have a lot of motion, such as with handheld footage, or if there should be camera movement, such as a pan or dolly shot, then leave the mode set to Smooth Motion. This mode won't attempt to completely stop all motion, but instead will make the motion smoother and less shaky.
Because the effect repositions the clip to stabilize it, occasionally the video image may move so much that it moves away from one edge or another of the video frame. You can add additional zoom to compensate for this, but as mentioned, sometimes you can't, or don't want to, zoom far enough.
In those cases, you may have to accept the space between the video image and the edge. In those cases, specify how the effect handles those spaces with the Edge Filling drop-down list. Transparent lets layers (or the black background) under the clip show through. Mirror Padding creates mirrored images along the edges. Repeat repeats the image in a kind of tic-tac-toe pattern. Finally, Clamp to Edge stretches and blurs the edges of the image.
You can also add additional manual rotation compensation or motion blur.
Expert mode offers even more options which let you control analysis of movement and fine tune the result at a much more granular level. We won't discuss all of those options here, but you now know enough to experiment on your own.
As you can see, video stabilization can be as simple or as detailed as you want to make it. Many times simple is all you need, but when your project requires that extra control, VEGAS Pro provides all the power you need.


What's the difference between VEGAS Pro and VEGAS Pro Suite?