What you’ll learn:
How to use highly accurate video scopes including Waveforms, Vectorscope & Histogram.
Color grading and color correction require accurate information and you can't always trust your eyes or monitoring hardware. Highly accurate video scopes including Waveforms, Vectorscope, and Histogram are essential to the process because they can confirm the truth and help assure you that you're making the correct adjustments.
VEGAS Pro gives you a world-class set of color correction tools in the new unified Color Grading panel, with powerful color wheels, exposure controls, color curves, and LUT integration all in one centralized location. But VEGAS Pro also provides another powerful and indispensable set of tools to guide your color correction work – the video scopes. Read on to find out how video scopes help you perfect your color grading work!

Editors often initially approach color grading entirely visually, correcting or grading color until it “looks good” to their eyes. Unfortunately, a few factors could mean that what looks good to you on your monitor may not translate to looking good to everyone on their own screens. Video scopes provide a tool you can use to make sure you've got the colors right. You can’t help how other people view your work, but you can be sure you’ve done it correctly. If you do it right and it doesn’t look good on someone else’s screen, then it’s a matter of proper screen calibration on their end, not yours. If you give them colors that you know are right because they're verified by highly accurate video scopes, then at least the chance exists for viewers to see the colors properly as long as they calibrate their viewing monitors.
Scopes provide reliable verification. Without scopes, you have to rely on two things which may lead you astray – your monitor and your eyes. In short, everyone’s perception is a little different, so what you think looks good may not technically be accurate. That’s also true of the monitor you’re using for the work. While it’s best to work on a professional, well-calibrated monitor, those are very expensive, and the monitor you’re using may not show you true colors or exposure, even if you run calibration checks. It won't matter how excellent your eyes are if your monitor doesn't show you what you need to see.
But the scopes never lie. The scopes show you the true picture – the exposure, the color, the levels, everything. You don’t have to rely on the subjectivity of your eyes or worry about your monitor being slightly off. If your work is correct according to the scopes, it’s correct. That doesn't mean there isn't room for creative interpretation and expression, but strictly speaking, the scopes will not steer you wrong. If you go wrong, it's because you choose to go wrong. As long as you make that decision consciously, that's creativity in action!
While scopes give you reliability within the shot you’re working on, you can also rely on them to match your work between different shots.
In theory, if everything did match from shot to shot, you could do your color work on one clip, export your look as a LUT or save the effects chain as a preset, and then apply it to the other shots, and everything would match. But it’s often not the case in practice. Sometimes different shots in the same scene need different color treatment in order to match. They may have been shot on different cameras, or from different angles, or on different days when the lighting didn’t exactly match.
The color and exposure may be slightly different between them, and there could be a number of other reasons they don't match. So simply applying a LUT or color preset will not always give you matching results. You may need to do extra work on the different shots to get them to match. When you apply color grading so that the scopes match between shots, you can have high confidence that the shots match visually too – the same exposure levels, the same color balance, the same saturation. Your eyes may not get it exactly right, but the scopes will. Normally, that's the goal, and video scopes ensure that you don’t have to guess or hope.

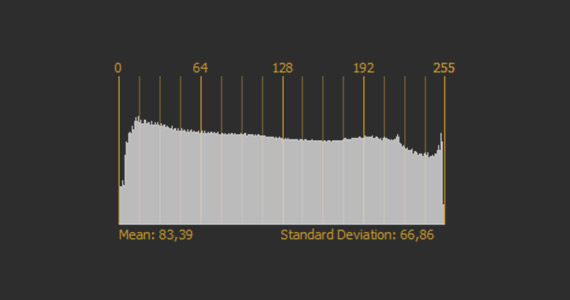
The histogram shows the distribution of luminance – lightness and darkness – within an image. It shows you how much of the image occupies each shade of brightness, with darkest shades registered to the left and brightest shades to the right. As a rule of thumb, if the histogram bunches up to the left, the exposure in the shot may be too low and the image too dark. If it bunches up to the right, the exposure may be too high and the image too bright. A well-distributed histogram may indicate a well-exposed shot.
But while the histogram shows you the image's distribution across the brightness scale, it doesn’t show you the brightness' distribution within the image. In other words, it doesn't show you where the bright areas appear within the image, so its usefulness for video is limited to a quick glance just to see if you're generally in line.

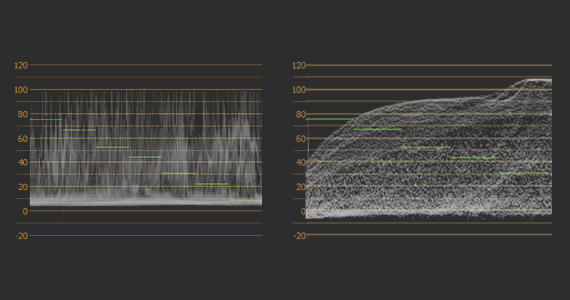
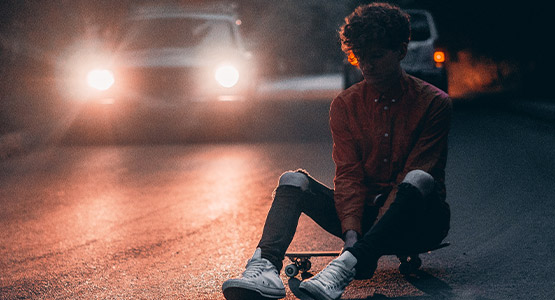
Unlike the historgram, the waveform shows you the luminance distribution throughout the image and lets you easily identify the bright elements and dark elements. The waveform plots luminance values from left to right corresponding directly to the image. For instance, if the image contains bright spots like car headlights or candles, you will see their brightness plotted on the waveform in the same place from left to right that you see it in the image. This way you see exactly how bright those individual elements are, and that makes the waveform your most powerful tool for setting exposure.
A waveform’s scale depends on whether you set it for standard video or for HDR. Set for standard video, the waveform scale generally shows luminance values between 0 and 100, in units called “IRE.” Set for HDR, the scale becomes logarithmic, with values from 0 to 10,000. It’s much easier to understand the 0-100 scale, so we’ll discuss it in those terms. Still, remember that the VEGAS Pro scopes also work for accurate HDR color evaluation, so they work beautifully in conjunction with the HDR-aware Color Grading panel.
On the standard scale, 100 represents pure white, the brightest luminance possible, and 0 represents the darkest dark, pure black.
Areas of the image flattened down to 0 or flattened up to 100 represent “clipped” areas where no detail can exist, just total black or white. A robust, well-exposed image should have very little clipping and instead have brightness distributed nicely between the limits.
You may have significant areas of dark, such as in a night scene, or of bright, such as a bright daytime sky or white backdrop, which will show on the waveform as bands in the lower or higher areas of the scale. Details, such as people, will break up those bands, corresponding to their left/right position in the image.

Different editors do it different ways, but often, setting proper skin tones puts you on your way to correct exposure. Human skin tones range from about 55 IRE for the darkest tones to about 75 IRE for the brightest tones. A Caucasian face ranges from about 60-70 IRE, with bright highlights at about 75. As skin tones get generally darker, the readings lower. The darkest skin tones generally fall at about 55 to 60 IRE.
In a properly lit shot, setting the skin tone often sets the entire image, but you still may have some detail work to do. For instance, windows that let bright light in can “blow out” which means the light causes your video to clips up at 100 IRE. If it does, you’ve lost all detail. If the clipping was caused by some other color grading you added, you might be able to use color curves to bring down the light from the windows, and restore the detail, without affecting the rest of the image. However, if the clipping was captured in the camera, there may be little you can do to bring back that detail, so be careful in setting your exposure properly on set.
Similarly, the dark areas may have clipped down to 0 IRE, which means you've lost detail in the shadows.
If this happens because of your own work in post, you can use color curves to bring up the shadows and restore that detail. The waveform shows you exactly where these trouble spots appear.
Or you can push the “noise floor” down. Video noise shows up mostly in the lower IRE levels. If you have a lot of noise, you might be able to lower the darks into total black or near-total black and help eliminate it. The more you push those blacks, the more detail you lose in the shadows, but it may be preferable to the noise.
Once you have exposure set, your waveform should be well-distributed. You can compare it to the waveform on other shots to confirm that their exposures match.

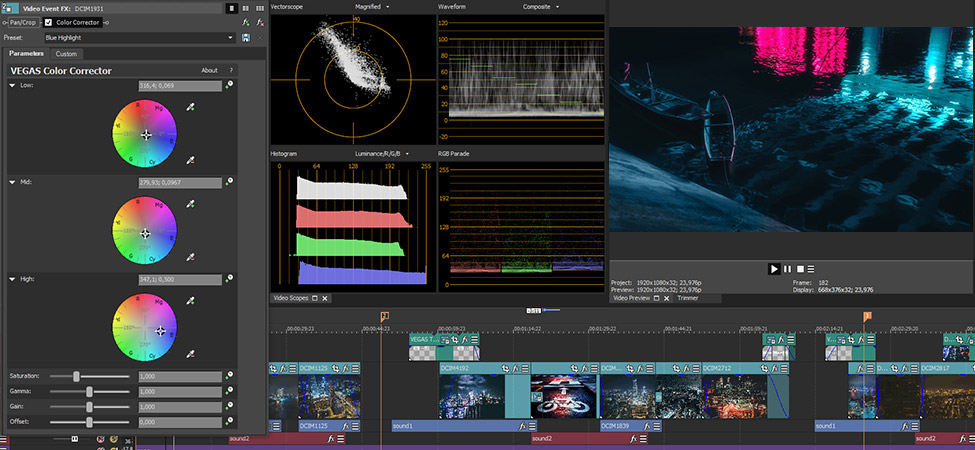
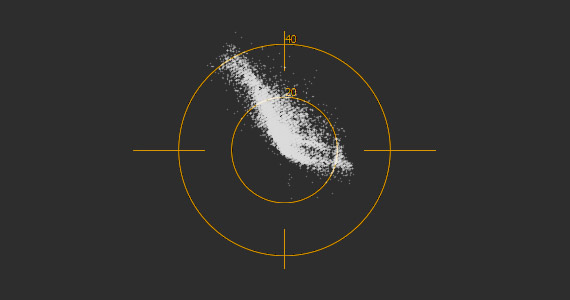
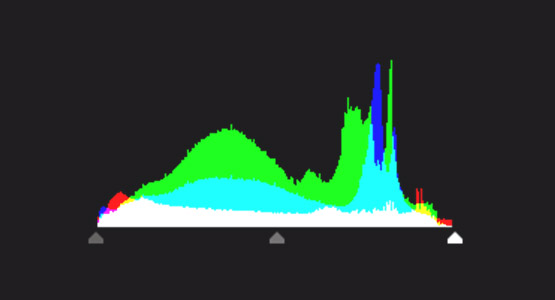
The points on the scope show which colors appear in the image and their saturation level. Low saturation appears close to the center. White, gray, or black with no color all appear as a dot in the center, because no color exists -- in other words, saturation equals zero. An image with predominant reds might show a fuzzy line extending from the center out along the “R” vector. As you lower the saturation, the end of that line moves more toward the center of the scope. Increase the saturation and you drive it more toward the outer edge.
You can thus use the scope to determine your color balance and for clues on how to correct imbalance. If everything leans towards the blue in an image which shouldn’t have that much blue, you’ll know that to correct it, you should shift colors more toward yellow (the opposite color on the scope, known as the complementary color). When you do, you’ll see the plots on the scope shift toward the center of the scope.
Or, if you use secondary color correction to change a single color into a different one, you’ll see the plots change on the scope accordingly.
The vectorscope enables you to see if your colors are true. If you have a red fire truck which hits properly red on the vectorscope, you can be sure it’s red even if your screen shows it more orange or more magenta. And when matching shots, if the same colors read the same on the vectorscope, then you can be sure your colors match between shots, and that's more reliable than your eyes.


What's the difference between VEGAS Pro and VEGAS Pro Suite?