
What you’ll learn:
Make your own split screen videos quickly and easily
Whether it’s for dramatic effect, for providing examples of a point, for showing what two or more people are doing at the same time, or for countless other possibilities, a split screen effect can be a powerful tool for telling a story. VEGAS Pro offers a great way to make your own split screen videos quickly and easily and customize them to perfection with the Crop effect.
Useful Tips: Create a "Living" Poster Like in Fantasy Movie
We’ll follow these steps:
STEP 1: Create a New Video Track
STEP 2: Add Video to Tracks
STEP 3: Apply Crop Effect
STEP 4: Adjust Crop Parameters
And show you how easy it is to make split screen videos in VEGAS Pro.
Read on to find out more!
Let’s go step by step through the process of creating split-screen videos! We’ll not only be able to make videos where the screen is split half-and-half, we’ll also redefine the parameters for all kinds of different combinations.
Useful Tips: Create Image Overlay With Ken Burns / Pan and Scan Effect


A split screen video is really made up of at least two different videos, with one visible in one portion of the screen and the other visible in another (often left-side/right-side or top/bottom). To create that effect, you need two separate videos on the screen at the same time. A video track can only hold one video at a specific time, so you need more than one track to have both videos visible simultaneously.
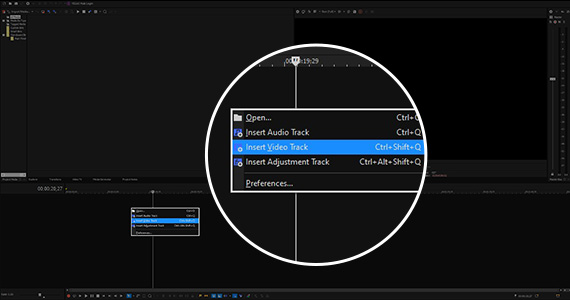
When you open VEGAS Pro, the timeline is empty, so we first need to create some tracks.
✓ You can drag a clip to the timeline, and a new video track with a corresponding audio track is created automatically.
✓ Or you can right-click on the timeline and choose Insert Video Track. Dragging a clip to this new track will automatically create an audio track for the clip’s audio.
You can create more tracks the same way – right-click and choose Insert Video Track, or drag another video clip to the timeline.
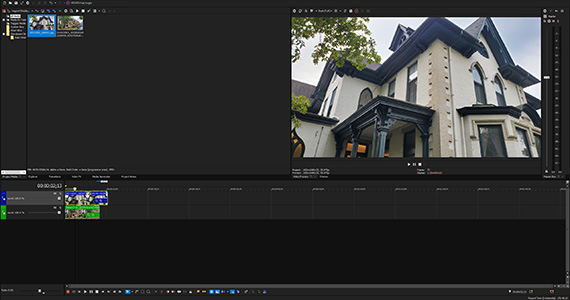
If you haven’t already dragged video to the timeline, choose the video clips you want to display in the split screen.
✓ Drag one to the Video track, and drag the other one to the track underneath it. Whether you’ve done it this way or dragged video to create the video tracks, make sure the video events take up the same place on the timeline so one is directly above the other.
Right now, in the Video Preview window, you can only see the video from the upper track, because VEGAS Pro handles tracks like a stack of photos, with you looking straight down over them. At this point, you can only see the top “photo.”
To achieve a split screen effect, you need to be able to see the video underneath, too, so now we need to apply the Crop effect.

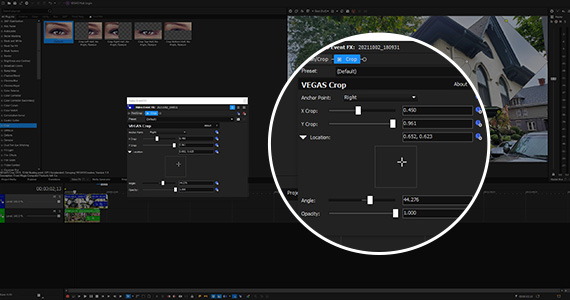
✓ Select the upper event on your timeline. Find the Crop effect in the Video FX window. Double-click on the Crop effect. (You can also drag the Crop effect to the event.) VEGAS applies the default effect to the event. The Video Event FX window opens and the Crop effect controls appear.
You’ll also see in the Video Preview window that the image now has yellow dots at the center of the top, bottom, left, and right edges of the image. Those are control points indicating that the effect is active and you can now adjust it to make your split screen.
✓ First, drag one of the yellow control points toward the center of the Video Preview window. As you do, you trim off part of the upper video and reveal the video below. In that respect, you’ve already created a split screen video.
But the controls in the Video Event FX window offer more precision than just freehand dragging.
✓ Click the Preset drop-down menu. At Default, the entire image from the video in the upper track is visible, so there is no split screen. The options in the drop-down menu let you make quick half-and-half split screens.
✓ Choose which half of the upper video to crop out – the left half, right half, upper half, or lower half.
If you just want a half-and-half split screen video, you’re set! But the controls let you define custom arrangements, too.
The X Crop slider defines how much of the image you trim off the screen on the left-right axis. The Y Crop slider does the same on the up-down axis. The Angle slider lets you control the rotation of the crop. If you’d like to make the top image partially transparent, use the Opacity slider.
In the Anchor Point drop-down menu, choose the edge of the image you want to keep in place. For example, if you choose Left, the left edge of the image is anchored. Move the X Crop slider to trim the right edge of the image toward the left edge, revealing the video below from the right side. Move the Y Crop slider to trim both the top and bottom edges of the image toward the center simultaneously, because the anchor point is at the center of the left edge of the screen.
Using different anchor points and slider combinations, you create boxes of your upper video of various sizes of shapes. You can also always drag the anchor points directly in the Video Preview window, or even grab and drag the dot on the center circle to rotate the crop to any angle!
✓ Click the Location triangle. A small window appears with a cross. Move the cross to move the location of the crop in the Preview Window.
You can also enter exact values into any parameter.
✓ Click the clock icon next to any parameter to animate it over time.
Experiment with sizes and shapes, bring in more layers and videos, or add animation on your PIP and find the perfect split screen video effect for your project!


What's the difference between VEGAS Pro and VEGAS Pro Suite?