
What you’ll learn:
What is keyframe and how to keyframe animation?
VEGAS Pro is capable of astounding animated effects, from simple zooms and pans to incredible, complex visuals worthy of blockbuster dreams. These animations have a very important common element – they all use keyframes. In this tutorial, we’ll explore how keyframes unleash incredible power to create stunning visual effects limited only by your creativity and imagination.
First, we’ll cover what exactly keyframes are. Then, we’ll take you through the process of keyframing in VEGAS Pro.
We’ll follow these steps:
STEP 1: Basic Keyframes
STEP 2: Add Another Step
STEP 3: Keyframe Interpolation
STEP 4: Create Keyframes on the Fly
STEP 5: Add Parameters
STEP 6: Sync Cursor
STEP 7: Hold a State
STEP 8: Keyframe Effects
STEP 9: Changing Media Length
STEP 10: Track Keyframes
When we’re done, you’ll have a working understanding of how keyframing can unlock limitless creative potential in your video work.
Read on to find out more!

Keyframes contain states of how you want things to be, whether it’s a zoom amount, a specific color, or any of hundreds of possible parameters and thousands of possible combinations of parameters. At its most basic, the first keyframe defines your initial state. Then, some point later in the timeline, you define another state and set a keyframe for that. As the project plays in between the keyframes, VEGAS calculates steps in between the two states. It then interpolates intermediate frames between the keyframes and creates a natural flow between one state to the next.
A state is a combination of parameters. In a simple example, a state may be simply the size and position of an image. The next state may only be a different position, but the same size. As the timeline progresses from one keyframe to the next, VEGAS interpolates the positions between the keyframes, and the image moves between the first position and the second position.
States can be very complex and involve many parameters, like size, shape, color, rotation, brightness, and many more, any of which can change between keyframes. With so many independent parameters under your control, you can create amazingly sophisticated animations and effects with keyframing.
Let’s start with a simple zoom in/zoom out on someone’s face. Drag a video clip with a medium shot of a person to the timeline.
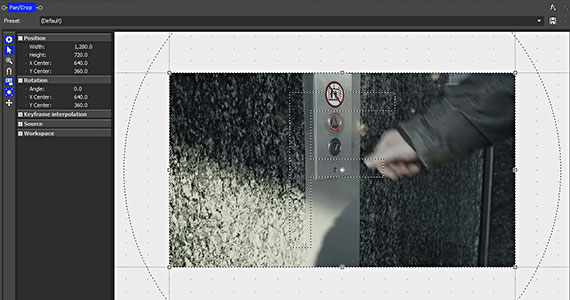
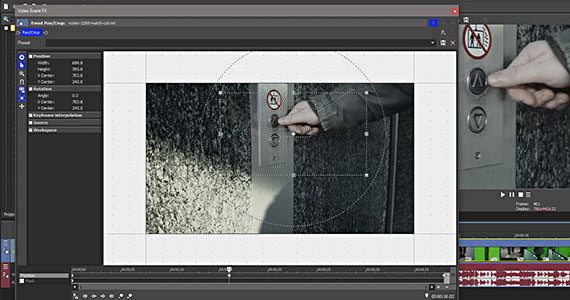
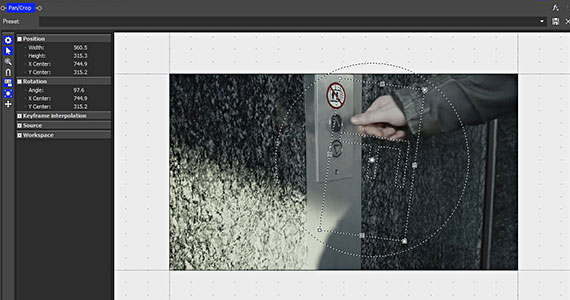
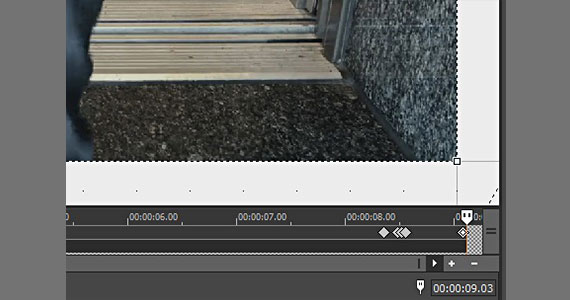
✓ Click the Event Pan/Crop button. The Video Event FX window opens with the Event Pan/Crop tool controls active. At the bottom of the controls, under the pane containing the image, there’s an animation timeline. The timeline contains two lanes, Position and Mask. The box next to Mask is unchecked, indicating there’s no active mask. We won’t be using the Mask lane for this example, but be very careful that you don’t accidentally click the Mask lane instead of the Position lane, because you will create keyframes on the Mask lane. We want all keyframes on the Position lane.
Now let’s zoom the frame into the person’s face and zoom back out again. We’ll do it over the full duration of the clip, so if it’s a short clip, it will be a fast zoom in and out. If it’s a longer clip, the effect will be slower and more subtle.
By default, when you open the Event Pan/Crop tool, the animation timeline covers the full duration of the event. The timeline slider at the bottom is stretched over the entire timeline.
✓ If you want to change the view to a smaller portion of the timeline, click and drag the small vertical line on either end of the slider. Making the timeline view a shorter portion of the timeline allows more frame-accurate placement. But for this example, we want the entire timeline, so leave the slider as-is.
On both lanes, a keyframe already exists at the very first frame. If you don’t change any parameter at the first frame, it remains in its default state.
✓ Click a point about halfway on the animation timeline. It doesn’t have to be exact for this example. The animation timeline cursor moves to that frame.
✓ Click Create Keyframe. A keyframe appears at the frame you clicked.
✓ Drag a corner of the Frame box inward so that the box is smaller than the image. The Frame box is the visible frame, so in the Video Preview window, you’ll see that as you drag the box, you zoom into the image. When you’ve zoomed in far enough, drag the Frame box to reposition it around the person’s face in a natural composition. The keyframe is now set.
✓ On the timeline, click the left edge of the media event to set the cursor at the beginning. Play the project. The image starts zooming in immediately and stops around the person’s face, then holds that position for the rest of the event’s duration. The keyframe you set with the zoom is the last keyframe, so the image framing holds at that point.
Let’s zoom back out.
✓ Click the keyframe you created. Click Last Keyframe. The animation timeline cursor moves to the last frame on the timeline, even though is there is no keyframe. If the cursor had been in a position before the keyframe you set, the cursor would have jumped to that keyframe. We placed the cursor on that keyframe, so the cursor jumped to the last frame.
✓ Click Create Keyframe. A new keyframe appears on the last frame.
✓ Right-click the Frame box. Choose Restore. The Frame box now goes back to its original position and the full zoomed-out image is restored.
✓ You can also copy keyframes to do this. Right-click the very first keyframe, select Copy, then right-click the last keyframe, and paste. The new keyframe takes on the properties of the first keyframe.
✓ Click the left edge of the media event and play the project. The video zooms into the person’s face and then immediately zooms back out again. You’ve created a complete animation with keyframes!
✓ Click, hold, and slide the center keyframe left or right to adjust the exact timing of the zoom.
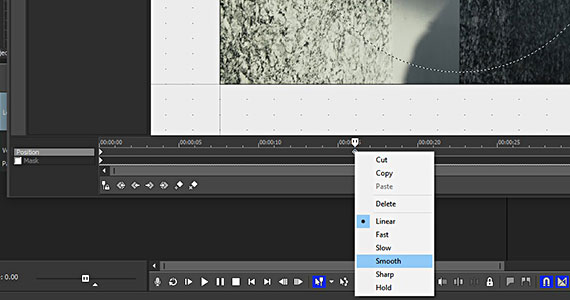
Now let’s refine the animation a little and change how VEGAS interpolates keyframes.
✓ Right-click a keyframe to choose an interpolation from the context menu.
The interpolation defines how aggressive the change between keyframes is. By default, keyframe interpolation is Linear, meaning every step between keyframes is exactly the same degree. Changing the interpolation changes the steps. In our zoom in/zoom out example, a linear progression might seem harsh, because the zoom won’t hold on the person’s face. It zooms in, reach its closest point, then zooms right back out, which can be jarring.
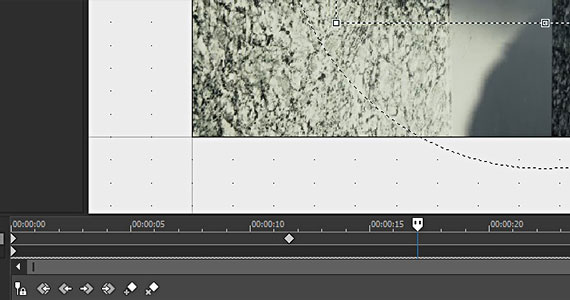
✓ Choose the Smooth keyframe interpolation. Now the zoom slows down as it approaches the persons’ face, seems to hold briefly on the face, and then starts to zoom out slowly and gradually get faster. Instead of a sharp angular zoom in/zoom out it, it’s curved and smoother, and probably more pleasing to watch.
Other keyframe interpolations produce other effects. Experiment and see which one works best for your needs.
Set the cursor to a point on the animation timeline with no keyframe.
✓ Drag the frame outline a little bit in any direction. A keyframe is automatically created at the frame where the cursor lies. Thus, you can create keyframes on the fly instead of manually creating each one if that suits your workflow.
✓ For now, press CTRL-Z to undo the move and keyframe.
Let’s add more parameters to our keyframes.
✓ Click the keyframe at the midpoint. Grab the circle surrounding the Frame box and rotate the box clockwise. As you do, watch the Angle value under Rotation to the left of the image pane. Stop rotating when it reaches a value past 90 degrees. If the Frame box is small enough, it should stay within the image and not stick out over the edge, but if it does, it doesn’t matter for this example.
✓ Left-click the edge of the media event and play the project. Now, the image zooms in, but it also rotates as it does. When it zooms back out, it rotates back to the default position.
✓ Click the last keyframe. Type 180 into the Angle value under Rotation. The image now appears upside-down in the Video Preview window.
✓ Click the left edge of the media event and play the project again. Now, the image zooms and rotates, but as it zooms back out, it continues rotating until the image is upside down.
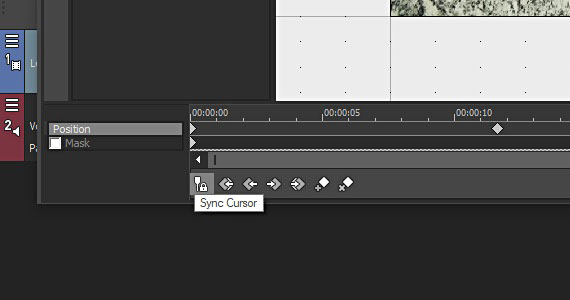
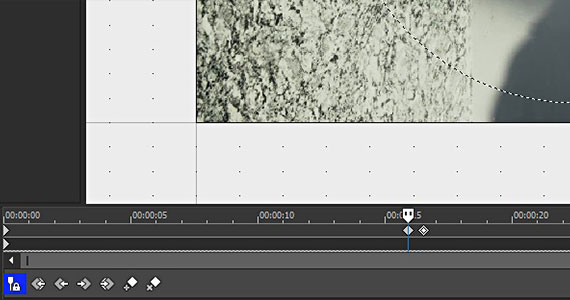
✓ Click the Sync Cursor button. The cursors on the main timeline and the animation timeline are now synced.
✓ Click a point on the animation timeline. The animation timeline cursor jumps to that point, but the main timeline cursor jumps to the corresponding point within the media event on the main timeline.
✓ Click a point on the main timeline within the area of the video event. The timeline cursor jumps to that point, and the animation timeline cursor jumps to the corresponding frame within the media event. You can use this sync to choose exact points for keyframes in relation to other media events on the main timeline.
✓ For example, if a media event in a track above the media event you’re editing overlaps your media event, click the edge of the overlapping event to set both the timeline and animation cursors to that exact point.
✓ Or click within the animation timeline to see the exact result of your keyframe in the main project Video Preview window. Be careful, though. If you leave the cursors synced, you may inadvertently create keyframes in places you don’t want them.
To hold a state for a length of time, define the frame where you want the hold to end before moving on to the next keyframe.
✓ Create a keyframe at that frame. Right-click the original keyframe and choose Copy.
✓ Right-click the new keyframe and choose Paste. The two keyframes now contain the exact same state, so the parameters don’t change at between those keyframes. Only after the second keyframe does the state start changing into the next keyframe’s state.
✓ To hold the initial state for a period of time, slide the first keyframe along the animation timeline to the point where you want the change to start.
You can keyframe the parameters of most effects in VEGAS.
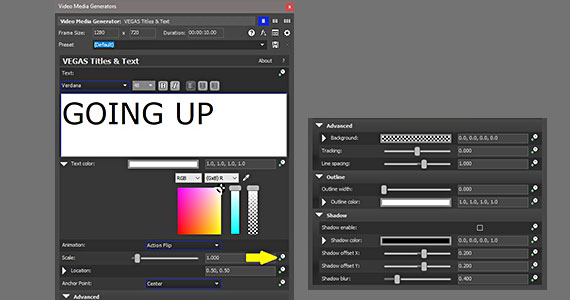
✓ Click the Animate button – the little clock icon – next to a parameter. The animation timeline appears at the bottom of the effect control box. You can now keyframe the parameter just like keyframing in the Event Pan/Cop tool.
For example, you can start with a solid color from the Media Generator and fade it into another color. Or, the Text generator contains many different parameters for text, like font type, font size, background color, outlines, drop shadows, and much more. You can keyframe any or all of those parameters and create amazingly sophisticated text animations.
Changing the length of your media event affects your keyframes.
✓ If you trim the right edge of an event to the right to make it longer, and you had a keyframe on the last frame of the event, the keyframe will stay on the same frame, and the state defined in the keyframe will hold for the extended duration.
✓ If you trim the clip inward making it shorter, the keyframes will compress inward and there will be less time between them. Trimming the clip inward significantly may result in lost keyframes or keyframes stacked on the same frame, with possible unexpected results.
Tracks can contain keyframes as well. The states defined in track keyframes will apply to any media events in that track at the keyframes. If you move media events away from keyframes or out of areas defined by the keyframes, the keyframed effects will no longer apply to those events. If you swap media in the affected area, the keyframed effects will apply to the new media automatically.
✓ Click Lock Envelopes to Events in the timeline toolbar. This locks envelope points to media events so that they move with the events, but it also locks track keyframes to the events. If you slide a media event on the timeline, the keyframes touching the event slide with it.
✓ Add any effect to a track, or open Track Motion and define a change. A narrow keyframe lane appears at the bottom of the track.
✓ Click the Expand Track Keyframes button at the lower left of the track header. The keyframe lane expands into larger, multiple lanes, each labeled with either its Track Motion function or the track effect applied.
If you have already added keyframes to Track Motion or Track Effects, you can create and move new keyframes for the effects or Track Motion directly the track timeline.
✓ Right-click the frame in the effect or Track Motion lane where you want the keyframe and choose Add Point.
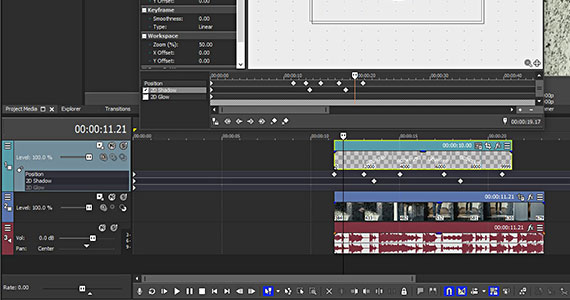
✓ Double-click the keyframe to open the control window for the effect or Track Motion.
✓ Right-click to delete it or assign its interpolation. Any keyframes you create on the timeline also appear in the animation timeline of the effect or Track Motion window.


What's the difference between VEGAS Pro and VEGAS Pro Suite?