
What you’ll learn:
Take a look at the HDR workflow and learn how to preview, edit, and deliver your footage in full HDR.
These days, the latest video format and display technology all take advantage of High Dynamic Range, or HDR. HDR video lets you see amazing detail in both the darkest shadows and in the brightest highlights, bringing your viewing experience that much closer to how your own eyes see the real world. VEGAS Pro unleashes your HDR post-production, not only for incredibly-detailed imagery, but also for astounding color grading possibilities you just can’t attain in non-HDR footage. VEGAS Pro has the tools and the power you need for amazing HDR work.
Useful Tips: What's the Difference Between Color Grading and Color Correction?
In this tutorial, we’ll explore how to edit and color grade in HDR with VEGAS Pro.
We’ll break it down into easy steps:
Step 1: Project Setup
Step 2: Preview Your Media in the Correct Format
Step 3: HDR Preview
Step 4: Editing HDR Footage
Step 5: Video Scopes
Step 6: Rendering in HDR
Step 7: Deliver Directly to YouTube
And when we’re done, you’ll see exactly how to take advantage of HDR in VEGAS Pro!

VEGAS Pro supports the HDR10 and HLG formats, two common recording formats for HDR, which in turn incorporate a wide variety of HDR gamuts as offered by the top camera manufacturers. VEGAS Pro also supports HDR preview and offers built-in, HDR-ready Waveform and Vectorscope monitors. For a complete HDR workflow, VEGAS Pro has you covered!
✓ To master HDR content in the HDR10 or HLG formats, add your media to the timeline. When VEGAS Pro asks if you want to set your project video settings to match your media, click Yes.
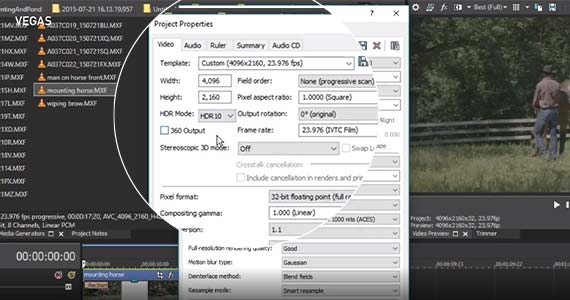
✓ Go to File>Properties. In the Video tab, click the HDR Mode drop-down button. Choose HDR10 from the list. Note below that several properties change when you make the selection. The Pixel Format changes from 8-bit to 32-bit Floating Point (Full Range). The ACES color space becomes active, and the appropriate color space is selected based on the choice you made in the HDR Mode drop-down.
Keep an eye on the View Transform settings. Go back to the HDR Mode drop-down and this time choose HLG. The View Transform selection changes to the HLG version. You always have the option to choose something else from the list as well.
Once you are in the mode you need, either HDR10 or HLG, depending on your footage, VEGAS Pro is ready for HDR mastering.
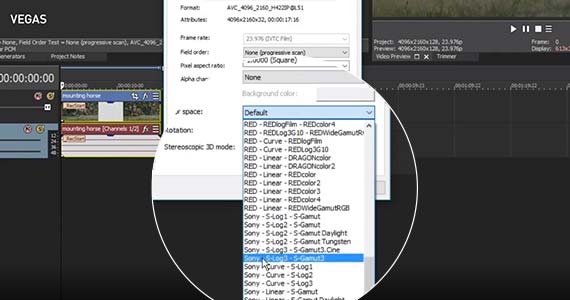
Now we need to apply an appropriate Input Device Transform (IDT) to the media.
✓ In the Project Media window, right-click your media thumbnail and select Properties from the context menu. The Properties window opens.
✓ Click the Color Space drop-down menu and choose the appropriate media color space. Select the appropriate format for your camera’s footage, or if you are working in HLG format, choose Rec. 2020 HLG (1000 nits).
✓ You may have to do a little research to know for sure exactly which selection is most appropriate for your footage. When you’ve selected it, click OK.
Useful Tips: Set Proper White Balance
VEGAS Pro supports HDR preview in the HDR10 format when in HDR mode. You can use the Video Preview window to view HDR previews if your monitor is HDR10 compatible. You can also view in full screen mode.
To view your project in HDR on an external monitor, connect an HDR monitor through a graphics card which supports HDR output.
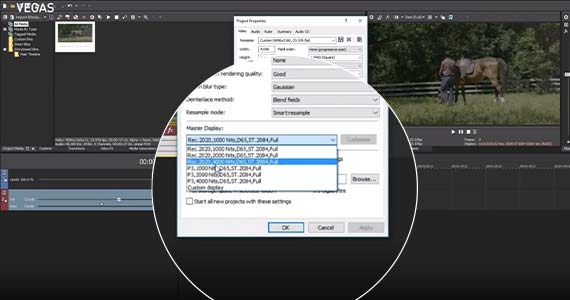
✓ To configure your HDR monitor, go to Project>Properties. In the Video tab, click the Master Display drop-down menu and choose the appropriate option.
✓ As before, you may need to do some research to find out exactly which option is best for your hardware setup. Make your choice, then click OK.
Editing HDR footage is mostly the same as editing non-HDR footage. Almost all of the same techniques and tools apply to either. Generally speaking, edit as normal.
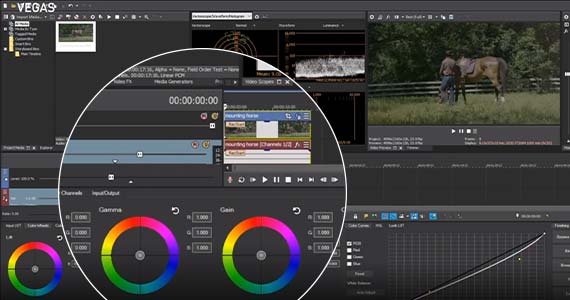
The area with the biggest difference between HDR and non-HDR footage is color grading. Not all of the color grading tools in VEGAS Pro are HDR-compatible, so for best results, only use the controls in the Color Grading panel for HDR color work. Using the Color Grading panel and the Video Scopes in HDR mode, you can be sure of precise color grading in HDR. Also, if you are connected to an HDR monitor as we described above, you can preview your color grading adjustments in real time as you work.
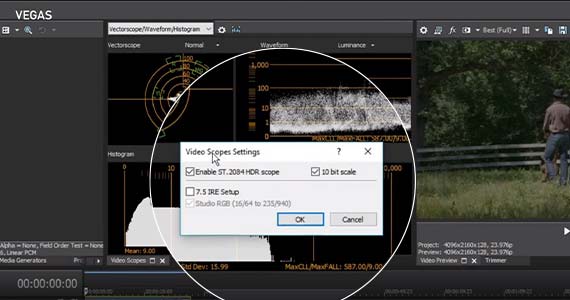
As we mentioned, the video scopes in VEGAS Pro are HDR-compatible, and you can use them to view the Waveform and Vectorscope in the nit scale. Proper monitoring through scopes enables you to make precise color adjustments and stay within the specifications required for HDR work.
✓ Click the Color Grading button. The Video Scopes window opens by default when you open the Color Grading panel, but if you have already changed your window configuration and the Video Scopes window doesn’t appear, go to View>Window>Video Scopes. The Video Scopes window then opens.
✓ In the Video Scopes window, click the Settings button. Click the checkboxes for Enable ST.2084 HDR Scope and 10-bit Scale to activate them both. These settings will be ignored if you go back to a non-HDR project. Click OK.
Now, do your color work in HDR!
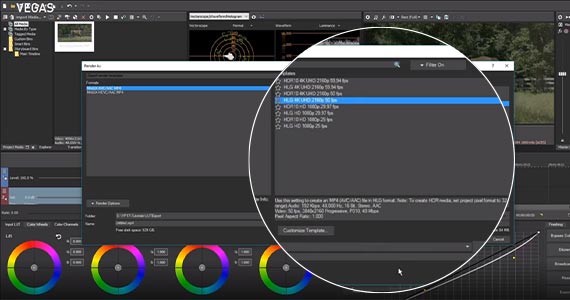
✓ When you’re ready to deliver HDR video, go to File>Render As. In the Render As window, the Formats list is filtered down to only those formats which support HDR.
✓ Select one of the formats. Then choose one of the HDR10 or HLG render templates, whichever is appropriate. Follow the normal procedure for saving your rendered file.
✓ Once you’ve made all of your choices, click Render.

YouTube supports HDR content and display, and you can render your HDR project directly to your YouTube channel.
✓ Choose File>Share Online>Upload to YouTube. The Upload to YouTube window opens.
✓ Select the HDR radio button, and then choose HDR10 or HLG in the HDR drop-down menu.
✓ Click Upload and follow the prompts. VEGAS Pro renders your video in the correct format and uploads it automatically to your account.
Viewers can now view your video in HDR on YouTube!


What's the difference between VEGAS Pro and VEGAS Pro Suite?