What you’ll learn:
Ever have a problem with exposure? Ever needed to brighten an image which was too dark, or maybe even darken one that’s too bright? If so, you’re in luck, because there are quite a few built-in effects in VEGAS Pro to help! From the simplest of solutions to very precise exposure tools, VEGAS Pro has what you need to manage brightness.
In this tutorial, we’ll look at some general concerns involved when brightening and darkening images. Then, we’ll go in-depth with the tools in VEGAS Pro which control brightness and darkness!
We’ll explore each tool one-by-one:
Step 1: Brightness and Contrast
Step 2: Input/Output Sliders
Step 3: HSL Adjust
Step 4: Offset Wheel Y Sliders
Step 5: Color Wheel Y Sliders
Step 6: Color Curves
So read on to find out more about making your images brighter or darker in VEGAS Pro!
Before we get into the tools in VEGAS Pro, let’s cover a few general concerns which apply to manipulating brightness and darkness in an image. These concerns pop up no matter the method you use for adjusting brightness, so it’s good to keep them in mind while we explore specific techniques.
A common problem with dark footage is noise. Noise is random information buzzing around in your image, and while you’ll find some at every brightness level, it’s more likely to be found in the darker areas of images because the camera sensor didn’t have much light to work with. There isn’t much picture information for the sensor and for the internal compressors to resolve. The result is noise. You generally find the most noise in the darker areas in about the bottom 40% of the brightness waveform.
There are denoisers and other ways to deal with noise built into cameras, but as an editor, you’re dealing with footage that’s already recorded, so if the noise is already in the footage, it’s there. The upshot for editors is that when they try to brighten darker footage, it ends up with excess noise, which looks bad and makes it difficult to work with the footage. Excess noise ruins many effects, and if you add sharpening to the image, you’ll make the noise worse.
One way to deal with noise is to make the darker areas as dark as possible while still brightening the rest of the image. You generally don’t find noise in pure black or close to pure black, because that’s easy to resolve. Making the dark areas darker does help cut noise.
There are tradeoffs, however. Increasing contrast darkens the darker areas, but it also brightens the brighter areas, so it’s a delicate balance. There are a few ways to darken the darker areas directly. You can lower the Y value in the lows or flatten the lower left of the color curves for more precision. But whichever way you do it, you lose detail in the darker areas, and some of the details may be lost entirely to pure black.
There are software noise reduction programs, and some of them are very effective, but there is always a cost. Eliminating noise always means eliminating detail, and you’ll lose detail throughout your image, even details you want to keep. The results can include soft-looking focus, plastic-looking skin, and smudged colors.
Darkening a brighter, cleaner image produces less noise than brightening a darker, noisier image, so filmmakers often shoot scenes intended to be dark with a lot of light, producing an image much brighter than they intend the final product to be. Then, in post, editors can darken the image precisely to the levels intended for the shot, and there’s far less problem with noise.
Brightening an image almost always desaturates colors. Darker areas are obviously darker because there isn’t as much light, but as we said, less light means less information, including color information. It may seem counterintuitive, because colors seem more saturated in darker areas, but it’s only because there’s more black the colors, and more black in colors does make them look richer. Brightening the image adds white, and when the white mixes with the black in the colors, the result is gray. The gray information overwhelms the color information, resulting in washed-out, desaturated color.
You can always add saturation. But there’s only so much color information there, so getting a good color grade on images that are significantly brightened will be difficult.
Conversely, darkening an image often means you need to desaturate the image somewhat, but that’s easier than adding color information which isn’t there.
Now, let’s look at the superb set of tools available in VEGAS Pro for adjusting brightness and darkness. We’ll start with the simplest method and then move on to more detailed and precise tools as we go. Along the way, we’ll utilize tools from the powerful Color Grading panel in VEGAS Pro!
The Brightness and Contrast effect offers the simplest way to brighten or darken an image. Exactly as it says, this effect lets you control the brightness and contrast of the image. It’s a great effect to start with because what you do with it is basically the same as what you’ll do with every other method of brightening or darkening images, only simplified.
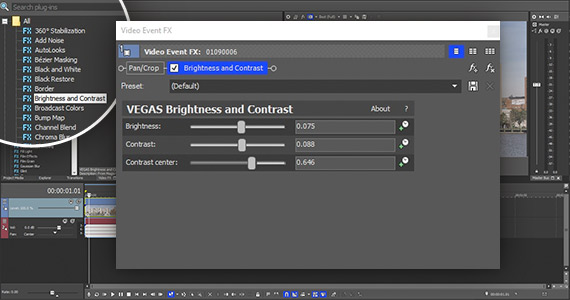
✓ In the Video FX window, click Brightness and Contrast. Drag the default preset thumbnail and drop it on your video event.
The Video Event FX window opens, and the Brightness and Contrast controls appear.
✓ Slide the Brightness slider to the right to brighten the image. The entire image gets brighter the further to the right you go. Don’t go too high or the image will wash out.
The entire image gets brighter, so lower the brightness of the darker elements of the image, not just to manage noise as we said above, but because the darker areas won’t be dark enough for a correct image.
✓ Slide the Contrast slider to the right to increase contrast. The darker parts of your image get darker while the brightest parts get a little brighter. If you find your whites starting to clip, slide the Contrast Center slider to the right.
This process of brightening the image and lowering the darks to increase contrast is basically the same process employed using the other tools. The other tools give you greater precision, but the underlying concept is the same.
The Color Grading panel in VEGAS Pro offers an array of tools for brightening and darkening images. Like Brightness and Contrast, versions of these tools are also available as individual effects in the Video FX window, but we’ll only cover them in the Color Grading panel. The process is the same using the individual tools. But with the Color Grading panel, you’ve got all the tools at your fingertips at once, instead of adding them invidually!
Useful Tips: Use LUTs While Working with Color
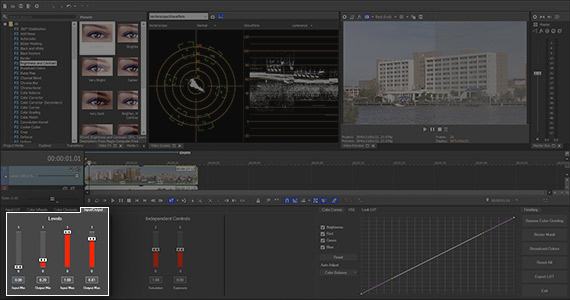
On the Input/Output tab, several sliders affect brightness and darkness.
✓ To the left are the Levels sliders. The two Input sliders, Input Min and Input Max, darken and brighten the image respectively while increasing contrast. The two Output sliders, Min and Max, brighten and darken the image respectively while decreasing contrast.
In the Independent Controls, the Exposure slider brightens or darkens the entire image without changing contrast. If you brighten or darken the image with this slider, you will need to adjust contrast with another control.
The Saturation slider increases or decreases color saturation, which as we said above, will likely be necessary when you change brightness.
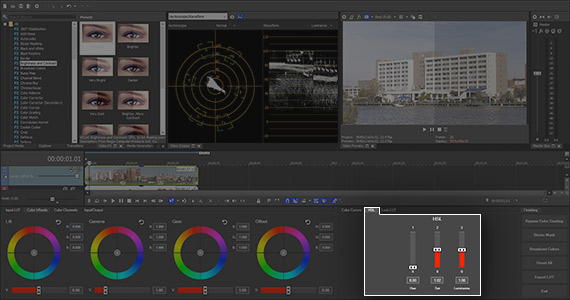
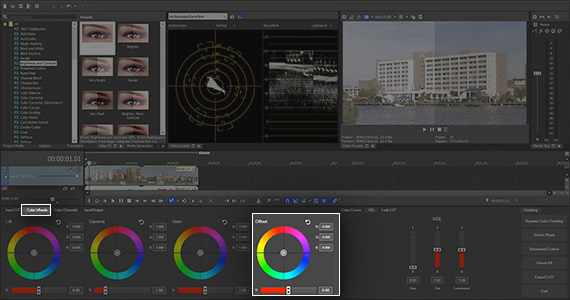
✓ On the Color Wheels tab, you’ll find four Color Wheels. Under each color wheel is a Y slider. Y sliders control luminance.
The Offset wheel controls the entire picture. Slide the Offset Y slider to the left to darken the entire image. Slide it to the right to brighten the image.
As with the Exposure slider, you’ll have to adjust contrast in another way, such as using the other Y sliders under the other color wheels on the tab.
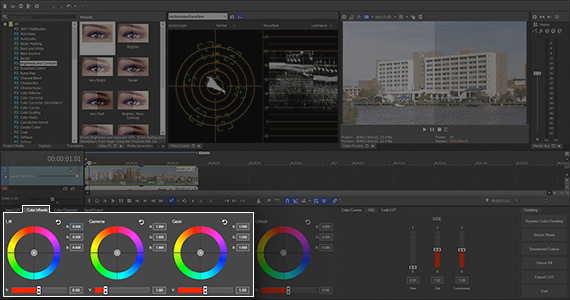
The other color wheels are Lift, which controls the darker areas of the image, Gamma, which controls the middle area of the image, and Gain, which controls the brightest/highlights area of the image.
Under each wheel is its own Y slider. Controlling separate areas of brightness lets you darken and lighten an area independently, so you have more precise control and can more carefully manage both brightness and contrast.
✓ The Gamma slider does most of the work. For brightening an image, slide the Gamma Y slider to the right. The dark areas don’t increase in brightness as much, and neither do the highlights. You can make more subtle adjustments to contrast as needed. Slide the Lift Y slider to the left, darkening the darker areas. If needed, slide the Gain Y slider slightly to the right to raise the highlights for greater contrast.
Use a Saturation slider on one of the other tabs to manage color saturation as needed.
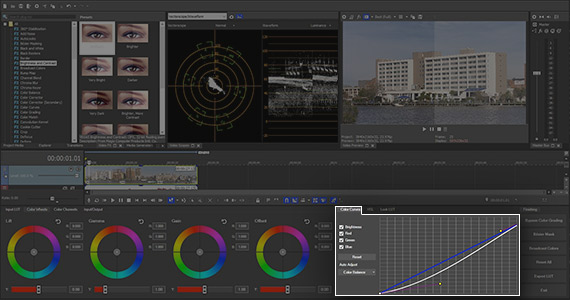
The Color Curves on the Color Curves tab are by far the most precise way to manage exposure and brighten or darken images. Color Curves give you very detailed control over the entire range of darkness and lightness.
✓ Click the Brightness checkbox next to the Color Curves if it isn’t already active. Uncheck the Red, Green, and Blue boxes. You’ll now see only a white diagonal line on the Color Curves graph.
Using the Color Curves to brighten and darken an image is similar to using the color wheel sliders, only incredibly detailed and much more precise. As with the Color Wheel sliders, the mid portion of the curve does most of the work. Raise the mid portion to brighten or lower it to darken.
Once you’ve done that, flatten down the lower left of the curve to darken the darker areas and increase contrast. Flatten up the upper right to raise the highlights, if necessary, and increase contrast. You may also find that if you’ve brightened the image, you may need to lower the upper right portion to fix highlights which have clipped to white.
As with the Color Wheels, use a Saturation slider on one of the other tabs if you need to manage color saturation.


What's the difference between VEGAS Pro and VEGAS Pro Suite?