
What you’ll learn:
Efficiently apply video effects in a timeline to improve your workflow
The real power of any editing software lies in the ability to add video effects to your footage, whether it’s simple blurs or color correction, or wild and zany combinations of effects to wow and amaze your viewers.
Most users know you can add effects to any event on the VEGAS Pro timeline, but did you know there are multiple levels where you can also add effects? Adding effects to various levels has a number of advantages, and we’ll take you through them in this tutorial.
We’ll start with the simplest way to add effects, and then work through the levels:
Adding FX at the Event Level
Adding FX at the Media Level
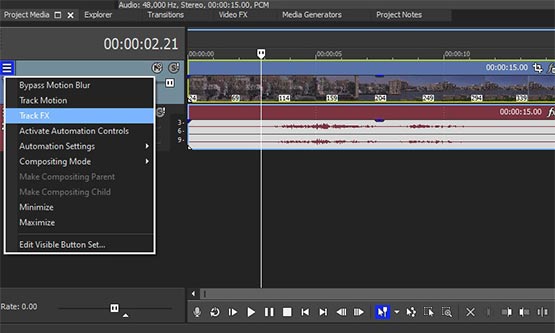
Adding FX at the Track Level
Adding FX at the Bus Level
And then we’ll explore Effects Chains, and how you can apply your effects combos across different levels.
Read on to find out more!


The simplest, easiest, and most intuitive way to add effects is at the event level. It makes the most sense at first because you’re directly adjusting the exact event on the timeline you want to add effects to.
In the Video FX plug in window, click the desired effect.
✓ Drag the preset thumbnail which best fits your needs and drop it directly on the event. The Video Event FX window opens and the effect controls appear. Make your adjustments, and see the adjustments take effect in the Video Preview window.
You can also access and add effects in two other ways.
✓ Click the Event FX icon on the event, or right-click the event and choose Video Event FX from the context menu. Either way, the Plug In Chooser – Video Event FX window opens.
✓ Click the effect you want and click Add. You can also double-click an effect to add it. When you’re done adding effects, click OK. The Video Event FX window opens, and your effect plug ins appear in a chain at the top of the window. Click the effect you want. The effect is in its Default preset state. Click the preset drop-down to choose a preset.
Dragging and dropping presets directly from the Video FX window instead of manually adding effects and choosing a preset from the drop-down menu is obviously the quickest way to add effects, but you do have the other options if you wish.
You can add up to 32 effects in the event effects chain, so you can have a vast and complex combination of effects.
An advantage to adding effects at the event level is that you can copy and paste effects from event to event, so if you want to add the same effects and adjustments to another event or multiple events, you can.
✓ Right-click the first event and choose Copy. Select another event or multiple events.
✓ Right-click on the event or one of the selected events, and you have two options for pasting.
✓ Choose Paste Event Attributes and all attributes of the first event will be pasted to the selected events. This will include envelopes, crop/pan adjustments, playback rate, and other attributes, so if you only want to paste the effects, choose Selectively Paste Event Attributes. A dialog box opens and you can click which attributes you want to paste.

If you add effects at the event level, you affect only that specific event. If you have multiple events containing the same video on the timeline, you must copy the first event and paste the effects on the other event(s) if you want those events to have the same effects applied.
However, there’s a different way to add effects which can save you time if you use multiple instances of the same media on the timeline.
✓ In the Project Media window, select the desired media clip. Click the Media FX button at the top of the window. The Plug In Chooser – Media Event FX window opens.
✓ Choose your effect(s) and click Add. Make your desired adjustments in the effects controls. Now, any time you add the media to the timeline, the effects will already be applied.
✓ Drag a few instances of the media to the timeline. On the first one, click the Media FX button, or right-click and choose Media FX from the context menu. The Video Media FX window opens with the effects controls. Make adjustments. Now place the timeline cursor on the other instances of the media on the timeline. In the Preview Window, you’ll see that the same adjustments have been made to all of the instances of the media.
As with effects chains at the event level, you can add up to 32 plug ins to the effects chain at the media level. If you add effects at the event level to an event containing media with effects applied at the media level, the effects at the event level are layered on top of the effects at the media level. As such, you can have up to 64 effects applied any given media event if you add effects at both levels.
If you have multiple events on a track, you can apply video effects to all of them at the same time. It should be noted that the effects aren’t actually applied to the events, but to the track. The effects will appear on the events, but if you move an event to another track, the effects will no longer apply to it.
Applying events at the track level can be useful for applying effects to many different clips or to have effects ready which you can easily switch events in and out of.
✓ Drag the desired video effects preset and drop it on the track header or on an open area of the track itself. Or, click the track hamburger menu and choose Track FX.
The Plug In Chooser – Video Track FX window opens, and you can choose your desired FX from the list. As with effects at the event level, the Video Track FX window opens and your effects controls appear.
Effects added at the track level are layered on top of effects at both the event and media levels, and you can also have up to 32 effects in that effects chain.
With the three levels combined, you can apply up to 96 effects to a media clip, but it’s unlikely you will ever do so, and your computer will likely struggle under the load if you tried anyway.

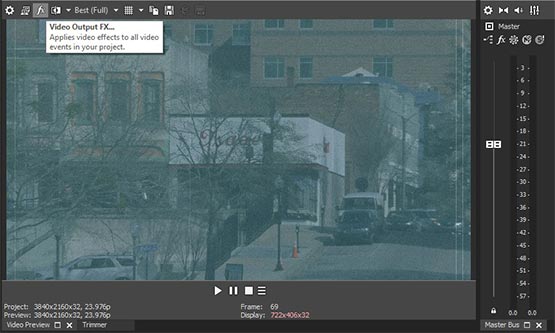
To add effects which apply to the entire project, drag the desired effects preset and drop it on the Video Preview window. Additionally, like events and tracks, you can click the Output FX button above the preview to open the Plug In Chooser - Video Output FX window. Add effects as with the other levels.
These effects will be layered on top of any effects at the track, event, or media level. This effects chain can also contain up to 32 effects, so it’s theoretically possible to apply 128 effects to a single event if you max out the effects chains at every level. It is very unlikely you will ever do it, though, and the limits of computing power would make it practically impossible.
✓ In VEGAS Pro, go to View>Video Bus Track. The Video Bus track appears in a sub-window at the bottom of the timeline. It’s not a video track; you can’t add video events to it. But what you do in this track applies to the entire project, every track, every event. Click the Output FX button. If you’ve added effects to the Video Preview window, the Video Output FX window opens with the effects controls visible. If you haven’t, then the Plug In Chooser – Video Output FX window opens and you can choose effects to add.
You control the entire video output from this bus track. If you click Mute, the entire project video is muted. You can add envelopes like fadesand motion blur. The Video Bus track is a great tool for precise control your video at the master level.
Let’s say you applied a combination of effects to an event, but now want to apply that same combination of effects at another level, such as applying it to a track or multiple tracks, or even to an entire project. You can’t copy/paste event attributes to other levels, but you can save the effects as an effects chain.
✓ Click the Event FX icon on the event. The Video Event FX window opens.
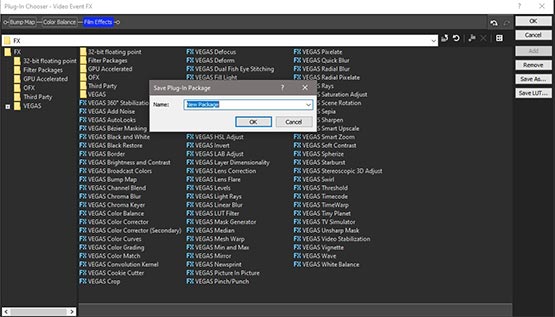
✓ Click the Effects Chain button, and the Plug In Chooser – Video Event FX window opens. Your effects chain appears at the top of the window. On the right side of the window, click Save As. Name your effects chain in the dialog box, and click OK.
✓ Open the Plug In Chooser at another level, such as the media, track, or bus level. Click the Filter Packages folder. Inside it, you will find the effects chain you saved. Double-click to add it, then click OK. The effects chain is now applied to the other level.


What's the difference between VEGAS Pro and VEGAS Pro Suite?