Ever have two (or more) video clips you wish you could combine into a single video, so you can treat them as a single video in editing, or to share with other people? Relax, it’s really very simple. In VEGAS Pro and VEGAS Movie Studio, it’s a quick and easy four-step process:
We’ll follow these steps:
Step 1: Import Your Videos
Step 2: Drag Videos to the Timeline
Step 3: Align Videos
Step 4: Render Video
Read on as we take you through the steps, explaining the process in detail along the way!
Combining two different videos into a single video is simple and straightforward. The process works best with videos of the same format, resolution, and frame rate, but you can combine any two (or more) videos. You may notice a difference in quality between the different videos in the final combined video, though.
Let’s look at the steps in depth. These steps describe combining only two videos, but you can combine as many videos as you want. Just continue adding video as we describe it below!

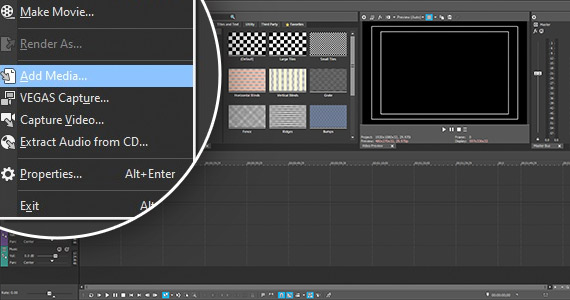
✓ First, import the videos you want to combine. In VEGAS Pro, go to File>Import>Media. In the Import Media window, navigate to the folder which contains the video files you want to combine. Click on the first video to select it. CTRL-Click on the second video to select both. Click Open.
If the files you want are in different folders, import the first file, then follow the same steps to import the second.
✓ In VEGAS Movie Studio, go to Project>Add Media, and the Add Media window opens. Follow the same process as with VEGAS Pro above.
After you’ve clicked Open in either program, the file or files appear in the Project Media window.

Next, we’ll add the videos to the timeline.
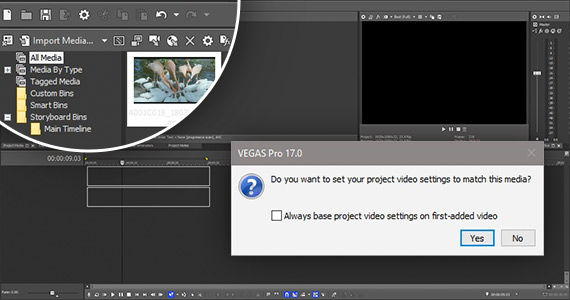
✓ Drag the first video directly to the timeline. In VEGAS Pro, a new video and audio track will be created. In VEGAS Movie Studio, pre-selected tracks already exist, so drag the video to the Video track. In both cases, a pop-box will ask if you want to make the project settings match the video properties. Click Yes.
✓ Now, drag the next video to the same video track. Both videos now appear on the same track as events.

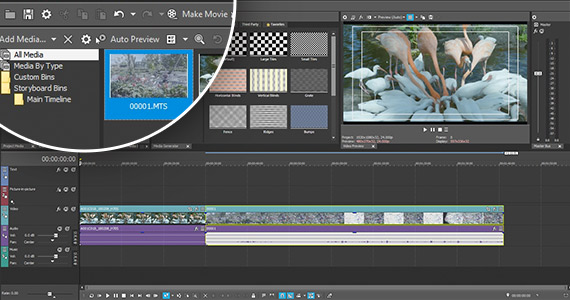
✓ Trim the events if you want to. Once you’ve trimmed, drag the second video event so the beginning touches the end of the first event.
✓ If you prefer to have a transition between the two instead a hard jump, drag the second event’s beginning into the first event’s ending to create an overlap between the clips.
VEGAS creates a crossfade between the clips automatically. If you want a different transition, such as an animated transition, drag the transition you want from the Transitions window and drop it into the crossfade between the events.


Now we can make the two videos into a single video.
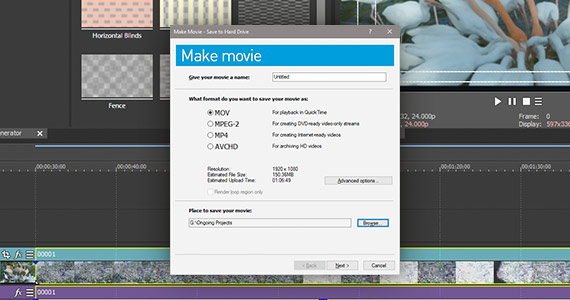
✓ In VEGAS Pro, click Render As in the toolbar. In VEGAS Movie Studio, click Make Movie in the toolbar.
✓ In VEGAS Pro, the Render As window appears.
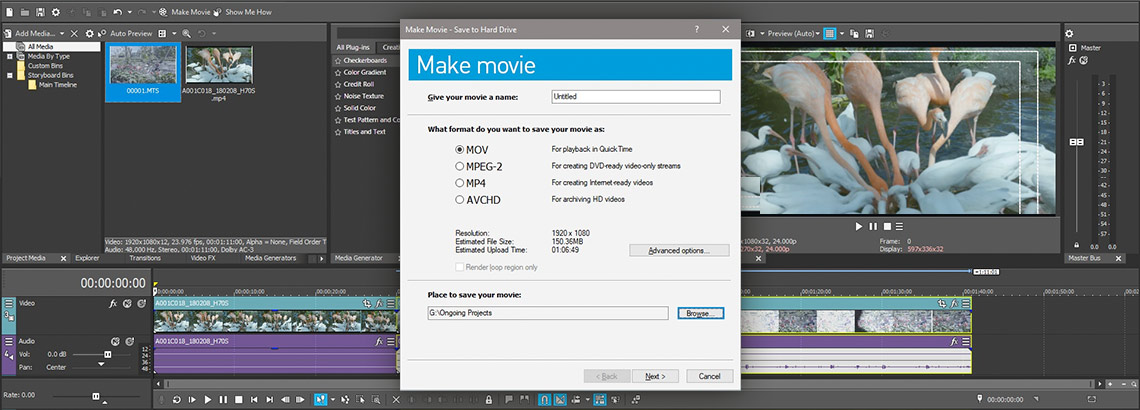
✓ Choose the format for the final video from the Formats list. It’s best to choose the same format as the videos, if possible. Then choose the template which matches the original videos from the Templates list.
✓ Click Browse. Navigate to the folder where you want to save the new video. Type in a file name. Click Save. You’re now returned to the Render As window.
✓ Click Render. VEGAS Pro renders the video and saves it to your destination folder.
In VEGAS Movie Studio, the Make Movie window appears.
✓ Choose Save It To My Hard Drive. In the next window, type a file name into the Give Your Movie A Name box. Next, choose the format which matches the original videos. For MP4 video, you can choose MP4 or AVCHD. If you plan to stream the new video without doing any more editing with it, choose MP4. If you plan to use the new video in an editing project, choose AVCHD.
✓ Click Next. VEGAS Movie Studio now renders the new video and it will appear in the location you chose.
In VEGAS Movie Studio, you can also follow a process more like that in VEGAS Pro, allowing you to specify the exact format and template for your render.
✓ In the Make Movie – Save to Hard Drive window, click Advanced Options. The Render As window appears, much like the window in VEGAS Pro. Follow the same steps as in VEGAS Pro above.
Whichever way you do it, you now have a single, combined video, which can use in editing projects, share with others, or upload for streaming!


- 12% discount
- Only now for free in this offer:
- ✔ NEW! NewBlue Titler Pro 7 Express (C$139 value)
- C$37 discount
- Only now for free in this offer:
- ✔ NEW! NewBlue Titler Pro 7 Express (C$139 value)


- Only now for free in this offer:
- ✔ Boris FX Sapphire 2020 Render Unit (C$389 value)
- ✔ wizardFX Suite (C$53.99 value)
- Quality & Performance
- Why is Non-Linear Editing the Standard Today?
- Why is VEGAS Pro Faster than any other NLE?
- Best PC Hardware for Your Editing Needs
- Best Codecs for Exporting Your Project
- Choose the Right Video Format for You
- What's Good Bit Rate and Its Effect on Video
- How Proxy File Benefits You When Editing Hi-Res Video
- Color Grading & Correction
- Understanding Color Grading vs. Color Correction
- Guide for Professional Color Grading
- Video Scopes for Accurate Color Correction
- Color Grading Panel for a Powerful Workflow
- Easy and Quick Color Correction & Color Grading with LUT
- Build Atmosphere with Filter & Effect
- How to Fix Image That's Too Dark or Bright
- Get More Details with HDR Color Grading
- Set Your White Balance Right for Effective Color Correction
- Special Effects & Image Editing
- Must-know Video Effects to Add Your Videos
- Guide to Chroma Key & Green Screen
- Types of Transitions & When to Use Them
- How to Add Motion Blur in Video
- Blurry Image Is Not Always Bad. Here's Why!
- 3 Techniques to Help You Have a Clean Key
- Remove Spill and Blocky Artifacts from Green Screen Footage
- Slow Down or Speed Up Video Footage
- 5 Advanced VFX Edit You See in Superhero Movies
- Make a Smooth Slo-Mo Effect with Optical Flow Slow Motion
- Powerful Tools for Compositing
- Video Editing & Workflow
- Get Inspired with Creative Cuts & Transitions
- Video Editing Tips to Edit like a Pro
- Flexible Storyboards for Efficient Workflow
- Motion Tracking and Video Stabilization
- Rescue Unusable Video Footage with Stabilization
- Make & Edit a Killer YouTube Video
- Storyboards: Make it Easy to Build Your Story
- Pro Audio Effects for Pro-level Sound Editing
- Fundamentals of Video Editing for Beginners
- How to Make Your Own Movie in Easy Steps
- How & When to Use Jump Cut Editing
- Record Your Screen for YouTube Video Tutorials
- Make Video Collage and Animate with Track Motion Tool
- Create 3D Moving Poster with Mesh Warp
- Split Screen Video with Crop Effect Tool
- Overlay Image on Video — News-Style
- How to Reverse a Video - It’s Easy, Fast, and Simple
- How Keyframe Helps Creating Stunning VFX
- Combine Multiple Clips Together Into One Video
- Creative Match Cut Examples for Better Storytelling
- Create Fun, Effective Text, Titles & Roll Credits
- Change Video Orientation (Rotate or Flip)
- Convert MOV to MP4
- 25 New Cool Text Animations
- Freeze Part of Your Footage for Dramatic Flair
- Learn Motion Tracking for Endless Possibilities
- Bézier Mask to Create Seamless Composites
- J-Cut vs. L-Cut Editing | How-To with Example
- How Nested Timeline Helps You Keep Organized
- Make Holiday Photos More Lively with Slideshow Creator
- Slideshow Creator Tool for Easy Video Montage
- Advanced Tips & Tricks in VEGAS Pro & Movie Studio — with Videos
- Combine Footages from Different Angles (Multicam)
- Fastest and Easiest Way to Make Edits
- Working with Timeline — Places You Can Add Effects To
- Is It different To Edit Normal Footage or 360° footage?
- Let's Get Familiar with Trimmer Tool
- Record High-Quality Voiceover & Add It in Video
- Remove Noise in Video and Audio & How to Avoid It
- Post-Production Editing
- Essential Post-Production Steps for Beginners
- Key to Pro-Quality Post Production
- Audio Compression for Professional Sound
- A True Alternative: Complete Post Production
- Cut your Video Footage to the Beat of Music
- All the Things You Need in a VFX Software — Tutorial Included
- 3D Animation Pipelines for Efficient Animation Production
- 3D Compositing — Explained
- The VFX Stage of the 3D Animation Pipeline
- Choosing your Software
- Find the Best Professional Video Software
- Best Video Editing Solution for Windows
- Best Solutions for Home Users & Aspiring Pros
- The Right Video Software from Beginner to Pro
- Video Editing Software for Beginners & Intermediates
- Video Editing Software for Professionals
- Video Editing & Post-Production Software
- Video Effects Software with Pro Effects
- Video Editor Comparison: VEGAS Movie Studio VS. Filmora9
- Video Editor Comparison: VEGAS Pro VS. Adobe Premiere Pro
- Video Editor Comparison: VEGAS Pro VS. DaVinci Resolve