
What you’ll learn:
Understanding the Event Pan/Crop and Track Motion tools
These days, video you shoot may come in different shapes and sizes. Phone cameras allow you to shoot either vertically or horizontally, and some allow for different frame shapes. Sometimes, though, the camera may not “flag” video you shot vertically as vertical video, so you have to rotate it in post to get the right orientation. Or, the phone may record the video as a “mirror image,” and everything might be backwards. If you want it to look right, you have to flip the video in post.
Or maybe you just want to rotate or flip video for exciting effect! Whatever your reasons, VEGAS Pro offers two powerful tools which make rotating or flipping your video fast and easy – the Event Pan/Crop tool and Track Motion.
In this tutorial, we’ll follow these steps:
In the Pan/Crop tool:
STEP 1: Open Pan/Crop Event
STEP 2: Resize the Image
STEP 3: Rotate the Image
STEP 4: Flip the Image
In Track Motion:
STEP 5: Open Track Motion Window
STEP 6: Resize the Image
STEP 7: Rotate the Image
STEP 8: Flip the Image
Read on to find out more!
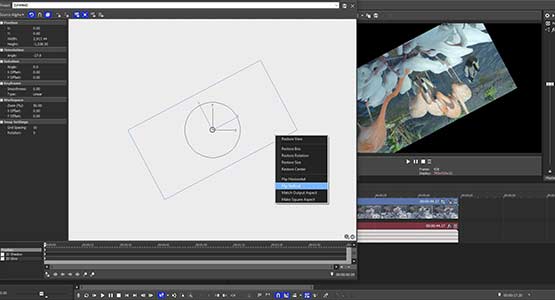
The Event Pan/Crop tool is designed to do what its name says, to crop your images and pan around them, letting you produce a “Ken Burns” style of animating still photos, or a “pan and scan” style of video display when you have video that’s shaped differently from your screen. It can do a lot more than that, though, such as change the aspect ratio of your video, creating “letterbox” black bars, or even what we’re demonstrating in this tutorial – rotate and flip your video.
To use the Pan/Crop tool,
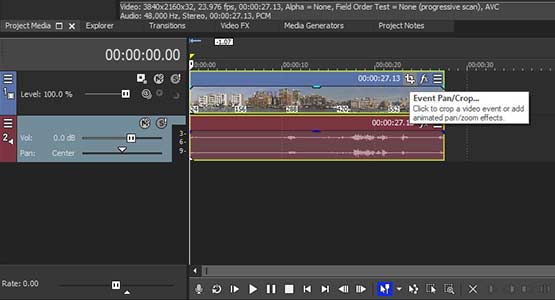
✓ drag the media of your choice to the VEGAS timeline.
✓ On the timeline event, click the Event Pan/Crop icon.
The Video Event FX window opens, and the Pan/Crop tool is active. Resize the window to display all of the controls if necessary.
In the large white area of the window, your image is displayed inside a dotted circle, with dotted rectangle around its edge. The rectangle represents the frame of your image. Adjusting the rectangle affects the frame of the image relative to the image itself.
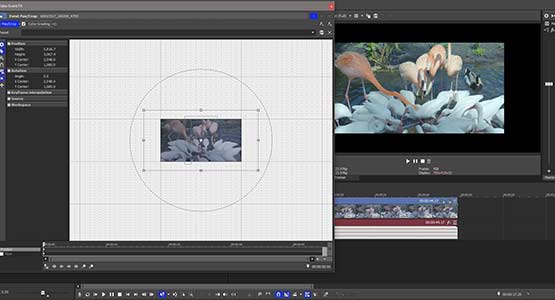
✓ Grab a control point on any corner of the frame and drag it outward to enlarge the frame.
Note that the image itself gets smaller in the Video Preview window. That’s because you’re enlarging the frame, not the image, and as the frame gets bigger, the size of the image relative to the frame gets smaller. Thus, visually, the image itself gets smaller.
✓ With the frame enlarged, move the frame around.
Because you’re moving the frame and not the image, the image appears to move in the Video Preview window in the opposite direction from the movement of the frame.
✓ Release the frame and look at the Video Preview window. You will see that the position of the image in the Video Preview window corresponds to the position of your image within the frame in the Pan/Crop control. With a little practice, you’ll understand exactly how this relationship works and you’ll know exactly what to do to adjust your image as desired.
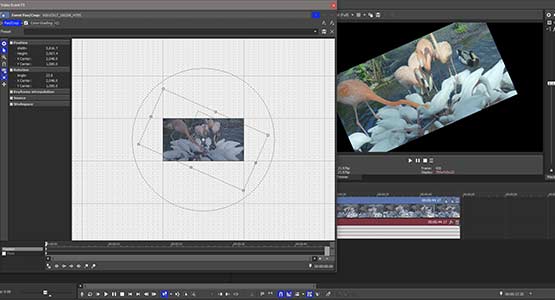
Rotating the image is quick and easy in the Event Pan/Crop tool.
✓ Simply grab the dotted circle around the frame and rotate it to the position you desire.
Notice, though, that the same relationship exists between the frame and the image. The circle rotates the frame, so in the Video Preview window, the image appears to rotate in the opposite direction from the turn you make with the dotted circle. If you want to rotate the image clockwise, move the circle counter-clockwise.
✓ For precise rotations, enter the angle you want into the Angle value under Rotation, on the left side of the tool.
For example, to rotate the image 90 degrees counter-clockwise, enter 90. To rotate it 90 degrees clockwise, enter -90. Values higher than 180 or -180 will rotate the image past upside-down and back toward right-side up, which matters if you want to animate a rotation. We’ll explore animation in a bit.
Notice the positive values rotate the image counter-clockwise, which is a bit counter-intuitive. Keep in mind, as we’ve said, the value does not actually rotate the image, it rotates the frame relative to the image. So, rotating the frame clockwise appears to rotate the image counter-clockwise.
Notice also that if your frame is at the original size, rotating the frame cuts off part of the image because the shape of the rotated frame and the shape of the image do not match.
✓ In order to keep the entire image visible when it rotates, drag a corner of the frame to enlarge it.
The image becomes smaller in the Video Preview window because you are enlarging the frame relative to the image. Once the image is small enough within the frame, you can rotate it without cutting off any of the image.
You can create animated rotations, too.
✓ In the Position lane of the animation timeline at the bottom of the Pan/Crop tool, click a frame a few seconds from the start.
✓ Click Create Keyframe. Now, grab and turn to the circle to rotate the image, or enter a precise Angle value under Rotation.
✓ On the main timeline, click the left edge of the event to bring the cursor to the beginning of the event.
✓ Play the sequence. The image rotates from its original position to the position you chose. If you want a continual spin, enter a larger value for rotation in multiples of -360 for a clockwise rotation, and multiples of 360 for a counter-clockwise rotation.
✓ Drag the keyframe along the animation timeline to adjust the speed of the rotation.

✓ If you just want to flip the image, right-click on the frame.
Choose “Flip Horizontal” to flip the image left to right, making a mirror image. Choose “Flip Vertical” to flip the image top to bottom. Note that the flipped image is also a mirror image, and not just the image upside down.
✓ If you want the image to be upside-down but not mirrored, right-click and choose “Flip Horizontal, and then right-click and choose “Flip Vertical.” Or, grab the circle and rotate the image until it is upside down. For a quick and precise inversion, type “180” into the rotation value.
Track Motion is a powerful tool for moving, rotating, resizing, flipping, and animating images in your VEGAS project. With it, you can reshape and move images around in 2D or even along 3D planes. But for our purposes here, you can also use it to flip and rotate your video.
The Track Motion controls behave similarly to the controls in the Pan/Crop tool, but instead of applying only to the event in question, they apply to the entire video track.
In that respect, you’re really manipulating the track rather than just the image itself, and the image contained in your timeline event “goes along for the ride.” Whatever the track does, it does.
Using Track Motion instead of Pan/Crop has a few advantages. There’s no counter-intuitive “opposite” relationship between the image and the controls; the controls affect the image directly instead of the frame around the image.
Further, you can use Track Motion to apply a 2D Shadow under the image to set it apart from whatever background the image appears on top of. Or, you can create a 2D Glow around the image.
Also, some effects in VEGAS, such as Border, apply to the entire frame of the image. If you place a border around an image and then reduce the size of the image using Pan/Crop, only the edges of the image which still line up with the edges of the frame will display the border. If no edge of the image lines up with the edge of the frame, then you won’t see any border. So, when you reduce the size of the image with the Pan/Crop tool, you often lose the border effect.
Track Motion affects the entire frame of the track, so it’s not relative to the image like with the Pan/Crop tool. When you reduce the image size in Track Motion, you reduce the frame and image at the same time, so the edges of the image remain lined up with the edges of the frame, preserving the border effect.
That said, the process of rotating and flipping images is very similar between the tools.
To use Track Motion, place the media you want to work with in a track on the timeline.
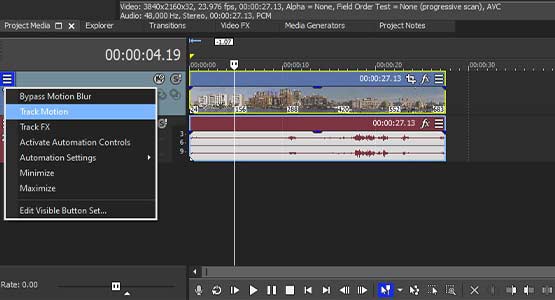
✓ Click the Track Motion button if it is visible in the track control panel.
✓ If not, click the hamburger menu in the upper left corner of the track control panel. Choose “Track Motion.”
The Track Motion window appears; resize it if necessary to display the full set of controls.
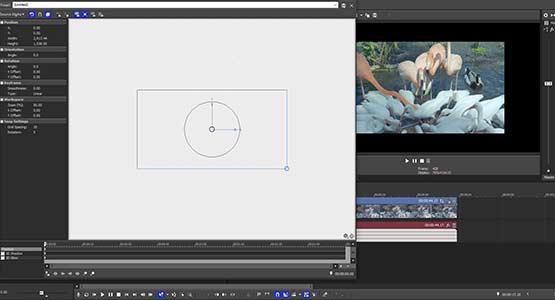
The box in the white pane of the of the Track Motion window represents your track’s frame.
✓ Click on and move a corner of the box to resize the image. Unlike in the Pan/Crop tool, you’re adjusting both the frame and image simultaneously, so the image gets bigger in the Video Preview window if you enlarge the box, and it gets smaller if you reduce the size of the box. In effect, you directly control the size of the image, not just the frame around the image, so the process is intuitive.
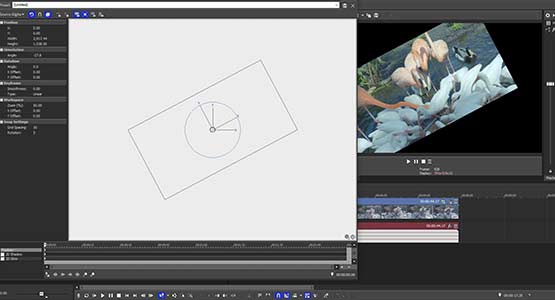
As with the Pan/Crop tool, grab and turn the circle in the control box to rotate the image. Note the differences, though – the circle is inside the image box and not outside of the frame. Also, when you rotate, you are rotating the frame and the image at the same time, not just the image frame, so if you rotate clockwise, the image turns clockwise, and if you rotate counter-clockwise, the image turns counter-clockwise.
Similarly, if you enter values into Angle under Rotation, positive values turn the image clockwise and negative values turn the image counter-clockwise.
In this respect, Track Motion is more intuitive and a little easier to use than Pan/Crop.
However, Track Motion affects any event which is in the track, so what you do in Track Motion can affect the entire timeline of your project, and not just a single event. If you want to rotate or flip a only a single event, often Pan/Crop may be the better choice.
For animated rotations, you can again keyframe.
✓ As with Pan/Crop, create a keyframe on the Position lane of the animation timeline in the Track Motion window.
The keyframe will also appear at the corresponding frame on the track. You can access and move keyframes either within the Track Motion window, or you can move keyframes directly on the track.
✓ Double-click a keyframe on the track to open the Track Motion window to edit any keyframe.
But again, like with Pan/Crop, if you rotate the image at its original size, part of the image will be cut off by the edges of the Video Preview window. To keep the entire image visible while rotating it, reduce its size.
Flipping an image using Track Motion is functionally the same as using the Pan/Crop tool.
✓ Right-click on the box and choose “Flip Horizontal” or “Flip Vertical,” depending on how you want to flip the image.
✓ To invert the image without mirroring it, right-click and choose “Flip Horizontal” and then right-click again and choose “Flip Vertical.” Or, grab and turn the rotation wheel.
✓ Or finally, as with the Pan/Crop tool, enter 180 as the Angle value under Rotation on the left side of the controls.
Whether you rotated or flipped the image, or both, once the track keyframes are set, you can substitute any event for your original event.
✓ Turn OFF Lock Envelopes to Events in the timeline toolbar. Move or delete the original event, then drag the new media to the same location on the track to create a new event. Because the rotation or flip is applied to the track and not the original event, the new event rotates or flips just as the original did.
Now you know two different ways to rotate or flip your video in VEGAS Pro!


What's the difference between VEGAS Pro and VEGAS Pro Suite?