
What you’ll learn:
Understand of how to slow or speed up footage
Sometimes you just need a change. In this case, we mean a change in speed! Many movies utilize slow motion for dramatic effect or to make action sequences cooler and more intense. Others use fast motion to give the impression of time passing or for goofy comedy like old-style Keystone Kops movies. Whatever the reason you want to change your playback speed, VEGAS Pro has you covered with a robust toolset for slowing or speeding up video. You can go even further by making time runs backwards for playful and dramatic effect.
In this tutorial, we’ll first cover some general concerns about changing playback speed. Then, we’ll get into the tools available in VEGAS Pro. We’ll follow these steps:
Method 1: Change Playback Rate
Method 2: CTRL-Trim
Method 3: Insert Velocity Envelope
Method 4: Slow Motion Effect
When we’re done, you’ll have a great understanding of how to slow or speed up footage in VEGAS Pro.
Read on to find out more!
When slowing or speeding up footage, it’s always a good idea to remember what video is. Video is a group of still pictures played back in rapid succession to give the illusion of movement. When slowing or speeding up footage, you change the rate at which the pictures are played back, so it can have big consequences on the smoothness of the motion.
When you slow footage, you’re slowing the rate of pictures running past your eyes. Each individual picture stays there longer, so the slower you go, the more of a chance that the lingering pictures might start to look staggered and choppy. This is especially true of slower frame rate footage like 24 or 25 fps (and to a lesser extent, 30 fps). It’s often difficult to get good, smooth slow motion from lower frame footage. Higher frame rate footage like 50 or 60 fps or higher has less of a chance of seeming choppy, depending on how much you slow it, but it also has the potential for the same thing.
Speeding up footage is much less of a concern. Many professional-level cameras offer variable frame rates, meaning you can create slow motion or fast motion directly in the camera and there’s no need to slow it down or speed it up in post. If you’re dealing with it in post, you’re most likely dealing with normal footage of a standard frame rate, like 24p or 30p or 60p, and you’ll have to keep the above concerns in mind.
The best way to achieve a speed change, especially slow motion, is to fit the new effective frame rate of the footage evenly within the frame rate of the project. In short, you want the new speed of the footage to result in whole frames being displayed. A standard method of achieving good, smooth slow motion in a 24 fps project is to shoot 60 fps and then slow it down to 24 fps in post. This works well because if you slow 60 fps 2.5x, or 40%, the effective frame rate is 24p. So each 60 fps frame matches a 24 fps frame on the timeline, and there’s no need to drop frames, interpolate frames, or resample frames. Each frame is used whole, so the result is glass-smooth slow motion. The same is true if you slow 30 fps down to 80% playback in a 24 fps project. The result is milder slow motion, but it’s also perfectly smooth. It’s definitely much smoother than you would be able to get slowing 24 fps footage.
Most of the methods for changing speed in VEGAS Pro involve resampling frames. Simply put, VEGAS Pro analyzes and blends existing frames for intermediate steps between frames. It makes new frames by blending old ones together. This can result in double-images or ghosting in frames, but it’s necessary to achieve changing playback speeds.
If you use the method above of slowing 60 fps or 30 fps footage in a 24 fps project, you don’t want resampling, you want whole frames. So in that instance, disable resampling. More on that in a bit.
Interpolating frames means creating whole new intermediate frames as if they were recorded by the camera in the first place. There’s no blending of frames, so there’s no double image or ghosting, and each frame is crisp. As we’ll see later, the Slow Motion effect utilizes this technique for smooth slow motion.
VEGAS Pro offers a number of ways to speed up or slow down footage. We’ll take them in order of sophistication.

The simplest and most precise way to speed up or slow down motion is to change its playback rate in the Media Properties. This method makes it especially the kind of smooth slow-motion we described above, as we’ll see in a moment.
✓ Drag a video clip to the timeline. When the pop-up box asks if you want to conform the project properties to the media properties, click Yes.
✓ Right-click the video event. Choose Properties. In the Properties box, note the Playback Rate toward the bottom. At default, the Playback Rate is 1.000, or normal speed.
✓ Click the up or down arrows next to the Playback Rate value. The playback rate changes in increments of .001. This is useful if you want to make very subtle changes in speed, such as when you’re using PAL-framerate footage in an NTSC-framerate timeline, and need to conform the footage just enough to fit. For noticeable speed changes, an increment that small could take all day, so just type in a number. For example, 2.500 speeds up footage 2.5x, while .250 cuts the playback to one quarter speed, or a 4x slowdown. The maximum speed value allowed is 4.000, or a speedup of 4x, and the slowest value allowed is .250.
Changing the Playback Rate, you can speed up or slow down the footage by as much as 4x.
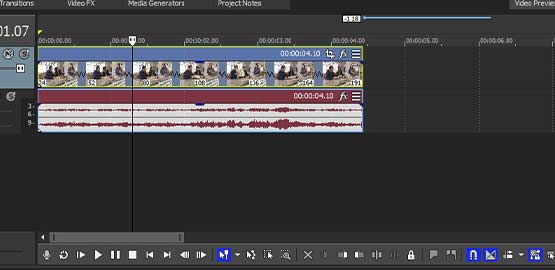
Choose 4.000, speeding up the Playback Rate 4x. On the timeline, note three things about the video event.
The video event has not changed length, but it now has three loop points. The 4x speed increase means the duration of the video is now ¼ of what it was, but because the video event did not change length on the timeline, VEGAS Pro looped the media back to the beginning. It did it three times, and as a result, the video plays four times in the span of the video event.
Within the video event, there’s a wavy line, indicating that the speed has changed. The more you increase the playback rate, the tighter the wave becomes. If you slow the playback rate, the wave becomes much wider.
✓ Note also that the audio event is unaffected. The audio did not increase speed and VEGAS Pro did not loop it. Click the left edge of the video event and press Play. The video plays back at 4x speed, but the audio plays back at normal speed and is not synced to the video. Click Ignore Event Grouping.
You can simply delete the audio event. Select the audio event and press delete.
Or you can conform the audio to the video. First, trim the video so it no longer repeats. Select the video event and trim the right edge inward until it snaps at the first loop point. Then, holding CTRL, trim the right edge of the audio event until it snaps at the right edge of the video event. As you trim, the audio waveform compresses, and when it’s snapped into place, the audio is sped up and is now synced with the video event. We’ll explore a bit more about CTRL-Trim in a later step.
✓ The process works for slowing video as well, just in reverse. Drag another instance of the same video clip to a later point on the timeline. Right-click and choose Properties. Type a value of 0.500 into the Playback Rate, cutting the playback speed in half. On the timeline, the video event has not changed length, but a wider wavy line is displayed on the video event. Again, the audio event has not changed. With Ignore Event Grouping still activated, trim the right edge of the video event to the right until it snaps at the loop point. The length of the video event is now doubled, but the entire video clip is now displayed. CTRL-trim the right edge of the audio event and drag it to the right until it snaps with the end of the video event. The audio waveform stretches out, and the audio is now slowed and synced with the video.
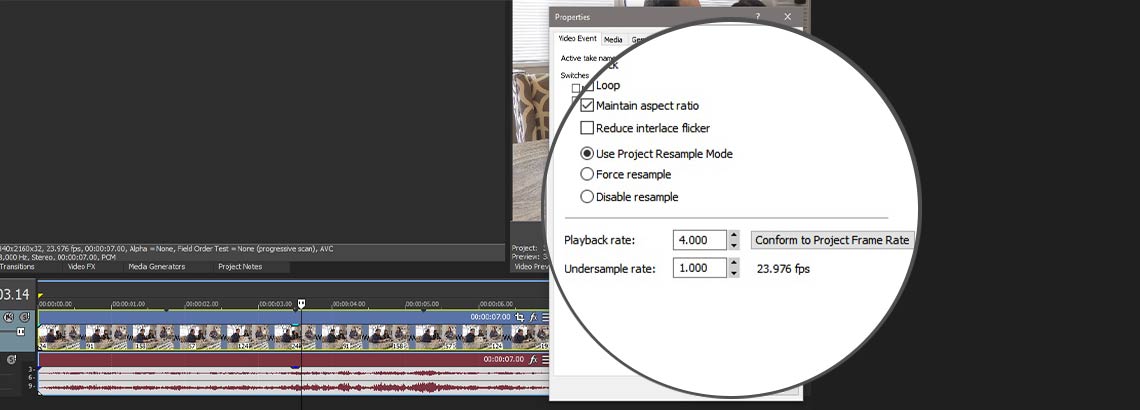
Now let’s look at slowing 60 fps in a 24 fps timeline. Create a new project. This time, set the project properties to a 24p project, using a template or just changing the project frame rate to 23.976 and the Field Order to None (Progressive). Drag a 60p clip to the timeline. When the pop-up box asks if you want to conform the project properties to the media properties, click No.
✓ Right-click the media event and choose Properties. Next to the playback rate, a box appears which says Conform to Project Frame Rate. Click the box.
The Playback Rate automatically changes to 0.400, or 40% speed, bringing each frame of the media event in line with the project frames, creating the glass-smooth slow motion we discussed above. Click Disable Resample so the original frames are preserved and not resampled.
✓ Click the left edge of the video event and press play. The 60p footage now plays back at 40% and each frame is preserved whole, conforming each 60p frame to each 24p frame of the timeline, and the result is glass-smooth slow motion.
We used CTRL-Trim above to conform the audio to the video speed change, but we can also use it to change the speed of the video and audio events at the same time.
✓ Start a new project and drag the same clip to the timeline as in our first example. Make sure Ignore Event Grouping is deactivated.
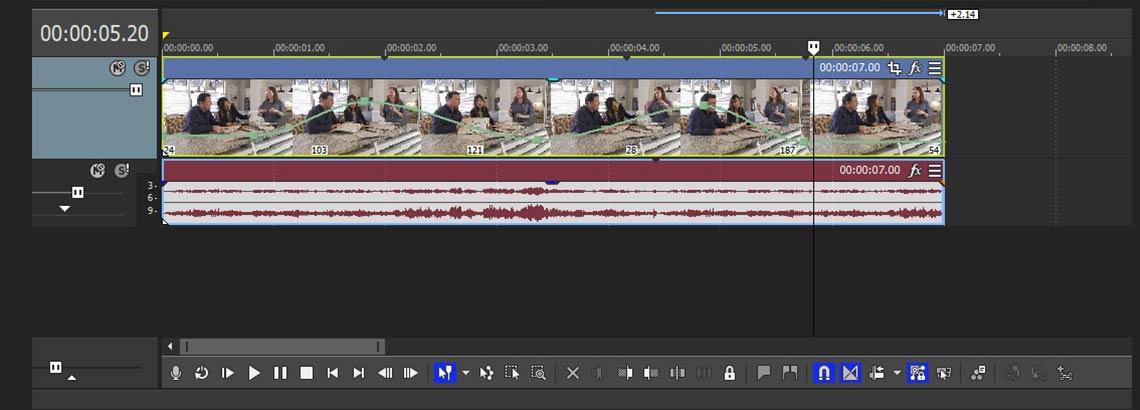
Find the halfway point of the video event. Place the timeline cursor at that point and press M. An orange Marker appears on the timeline.
✓ CTRL-Trim the right edge of the video event inward toward the Marker. While you trim, note that the audio event trims with the video event and the waveform compresses. The audio playback rate changes and stays in sync with the video event. Note also that the wavy line appears immediately in the video event, and it compresses as you trim inward. CTRL-Trim until the event edge snaps at the Marker.
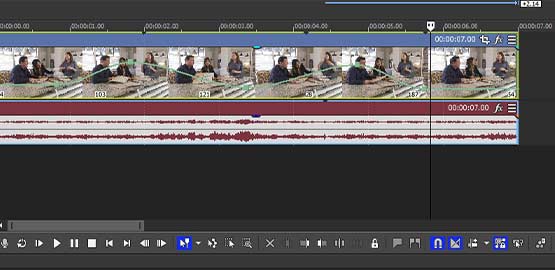
✓ Right-click the video event and choose Properties. The Playback Rate value is now 2.000, because you have compressed the entire media clip into half the time.
✓ CTRL-Trim the right edge of the video event to the right to slow playback. As with speeding up playback, the audio event stays synced with the video event.
✓ CTRL-Trim is a quick and easy way to change playback speed, though it is difficult to know exactly how much you’ve changed speed while dragging. Once you’ve reached the limits of the Playback Rate change, 4x in either direction, trimming stops, and you can’t move the edge of the event any further.
Velocity Envelopes offer an even greater range of speed change than changing the Playback Rate or CTRL-Trim. You can use a Velocity Envelope to increase speed to 1,000%, or 10x, or slow speed to as little as 1%. You can also change playback speeds within the same event, so you can ramp up speed and slow back down as many times as the length of the event allows.
✓ Drag a new clip to the timeline. Right-click the video event and choose Insert/Remove Envelope>Velocity.
A green line appears near the bottom of the video event, with a point on the left edge of the event. This is the Velocity Envelope. Hover the mouse cursor over the point. It turns into a hand with the index finger pointing to the point. A pop-up displays the timecode where the point is, and the playback speed assigned to the point. Right now, the playback is 100%, normal speed.
✓ Move the index finger to the envelope. An up/down arrow appears next to it. Click the line and drag it up.
As you do, the display appears and displays the playback speed, increasing as you move. You can increase the playback speed up to 1,000%. Drag the envelope back down. You can decrease the playback speed to 0%, which is no movement, and the frame at the point (in this case the first frame) repeats for the duration of the event, making a freeze frame. You can lower it further than 0%, but negative numbers reverse playback of the footage.
✓ Right-click the point. A context menu appears, giving you many quick choices for playback speeds, including several fast-motion speeds, several slow-motion speeds, normal (100%) velocity, and 0% velocity. Choose Set To . . . to enter a custom value.
The flat Velocity Envelope means the playback rate is uniform for the whole duration of the clip, but we can set variable speeds. Set the original point back to Normal Velocity.
✓ Right click the envelope somewhere to the right of the point. Choose Add Point. A new point appears on the envelope. Hover the cursor, and the display tells you the timecode value for the new point and also its playback velocity, which is 100% at default. Drag the point up and down and the playback rate changes. Hold CTRL as you drag to prevent the point from moving left or right. Holding CTRL also slows the rate of drag, letting you see more precise increments as you drag, allowing to you stop on a very precise value. Stop at 300%, or 3x playback.
✓ Note that the Velocity Envelope now curves between the first point and the new point. Hold ALT as you click the first point and drag it slightly to the right, but not too close to the second point. Holding ALT prevents the point from moving up or down as you slide it to the left or right.
✓ Click the left edge of the video event and press Play. The clip starts at normal velocity, but as the timeline cursor runs through the enveloped, playback speed ramps up until it reaches 300% at the second point. The rest of the clip plays back at 300%.
Add more points and assign different values. The video playback speed ramps up and down according to the playback speeds you set.
The audio event is not affected by the Velocity Envelope, so it will play back as normal, out of sync with the video. Most of the time, simply delete the audio.
You can insert a Velocity Envelope on a clip where you’ve changed the Playback Rate for even faster or slower speeds. For example, if you’ve increased the Playback Rate to its maximum of 4.000 or 4x fast motion, adding a Velocity Envelope set to 400% works as a multiplier, and the playback rate becomes 16x.
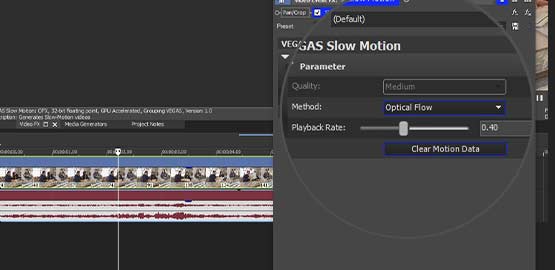
The Slow Motion effect in VEGAS Pro utilizes Optical Flow for smooth slow motion even with lower frame rate footage like 24 fps. As we mentioned above, it’s often hard to get smooth slow motion with frame rates like 24 fps because there aren’t enough frames for slow motion to work well, resulting in choppy-looking playback, and you may find the same problem with higher frame rate footage like 60 fps if you slow it down a lot.
Unlike the other methods of slowing footage, which repeat frames or blend existing frames, the Slow Motion effect generates new frames. It interpolates the positions of moving objects and creates whole new intermediate frames. The result is better, smoother slow motion.
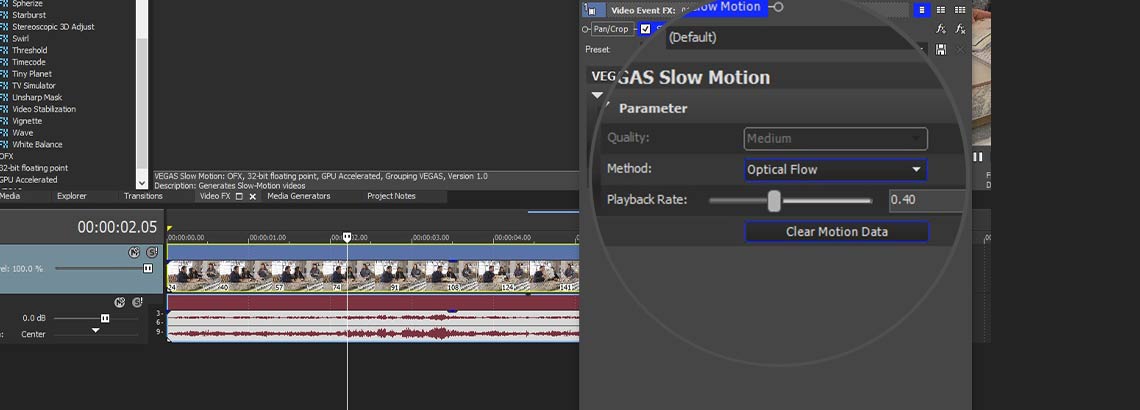
✓ Create a 24 fps project and drag a 24p clip to the timeline. Click Slow Motion in the Video FX window. Drag the Default preset thumbnail and drop it on the video event. The Video Event FX window opens and the Slow Motion controls appear.
✓ Click the Quality drop-down menu. Choose Coarse, Medium, or Fine, depending on how much movement is in the clip and how much you want to slow it down. Click Analyze Motion. The effect analyzes the motion in the clip. It could take some time if you chose Medium or Fine quality, depending on the length of the clip.
✓ When it completes the analysis, more controls open. Choose the Method from the drop-down menu, either Optical Flow or Morph. Optical Flow is the standard choice, but depending on the footage, you may find better results with Morph.
Slide the Playback Rate slider to the left to slow motion to the desired value. A .60 value means 60% playback, and so on. You can also type in the value directly.
You can also speed up footage. Enter a value greater than 1. If you applied the effect at the event level, as we did here, you will receive a warning that if you enter a value greater than 1, you may have unexpected results if you change the length of the event. If you apply the effect at the Media level, no such limitations apply.
As with the Playback Rate and CTRL-trim, the audio event is unaffected and still plays back at the normal rate. In most cases, delete the audio.
If you like the results, great! If not, click Clear Motion Data and start the process again.


What's the difference between VEGAS Pro and VEGAS Pro Suite?