
What you’ll learn:
Chroma Key & green screen essentials
Make your first chroma Key video
Ever wondered how a news studio looks like in reality – and wanted to play around with the green screen? Try it yourself! Everyone can reproduce green screens and use chroma keying for home-made special effects. Learn more with this step-by-step guide.

One of the most-used and time-honored visual effects techniques is chroma key. Simply put, chroma key involves shooting a subject against a solid-color background, and then removing that background in post-production, replacing it with transparency. Then, the subject can be placed in front of any new background.
In other words, chroma key is a method to replace a predefined color, the socalled key color, in filmed material – and insert (digital) content such as graphs, maps and animations or combine it with material from another shot.
The most common key colors used are green and blue. Why these two colors? They are in opposite contrast to the color of the human skin.

Chroma key helps you to combine two different shots in the same frame. It replaces all the pixels with the defined green or blue key color with content from other film material or with digital content. With that technique, Hollywood puts people in magical worlds, unimaginably dangerous situations, lets them fly through outer space, and so much more! This means: Your imagination is the limit!
Some examples:
- For instance, dress your actor entirely in green and remove the green with a chroma key. Now you've got an invisible man wandering through your film!
- In the days of film, a chemical process removed a single color and created transparency. In the digital age, software removes the background color and replaces it with an alpha channel, or transparency channel.


Choose your key color according to the colors in your shot: If there is blue in it, use green and vice versa. Plants will partly disappear in greenscreens, as will a person wearing blue trousers in bluescreens. However, be aware of the effects of the colors: Green is twice as reflective as blue, so it tends to contaminate your shot more than blue.
There are rare settings where both colors are needed at the same time – Spiderman with his partly blue costume fighting against the Green Goblin is one example you might (or might not) encounter. In this rare case, you will be forced to shoot the protagonists separately.

With VEGAS Pro Post, you can key “green screen” or “blue screen” footage like the pros -- VEGAS Pro comes equipped with an excellent Chroma key effect, while VEGAS Effects and VEGAS Image offer even more powerful chroma key tools with pro features.
How can you make your first chroma key video? Read on for a step-by-step guide!

If you have green elements you want to keep, like clothing or plants, use a blue screen, and if you have blue elements, use a green screen. Pre-made green screens and blue screen come in “chroma green” or “chroma blue,” standardized colors for chroma key use.
Either way, it’s vitally important to light the background well. It should be evenly-lit so that all parts of the background are the same brightness, and it should be free of shadows, or anything which may cause shadows or bright spots, like wrinkles. Ideally, you want a perfectly flat, perfectly even background of true color. Make sure not to use lights which conflict with the color of the screen. For instance, orange-hued tungsten-colored lights will turn green or blue into brown or gray. Instead, use lights balanced to the color of the screen, like daylight-colored fluorescents or LEDs.
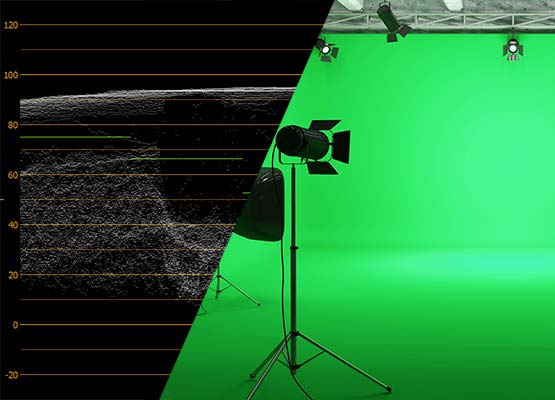
To help you know you’ve achieved good, even lighting on your background, use a waveform monitor. A good, well-lit background should show a straight, tight, horizontal band on the waveform. The line should rest at the proper level of brightness. For chroma green, the line should be at about 40-45 IRE on the waveform. For chroma blue, it should read at about 25-30 IRE. If the line it isn’t straight, then you have a bright spot or spots on your background. If it isn’t horizontal -- if it’s diagonal -- then one side is brighter than the other. If it’s too thick of a band, then your brightness is uneven for the entire width of the background, probably with the top or bottom darker than the other.


Keep your subjects away from your background to avoid casting shadows or unwanted light on it, and also to minimize the amount of green or blue spill coming from the background and showing up on your subjects. The chroma key effect will remove any spill on your subject just like the background, so parts of your subject will disappear if you're not careful.
Lighting the subject well can help with spill control – light your subject brightly enough, and you’ll minimize spill. You can also use a back light colored to negate the spill. There’s a standard magenta lighting gel called “minus green,” and it’s engineered specifically to control green casts from green screens or from fluorescent lighting.
Keep in mind your intended background, and light the subject to match it. For example, if you intend to key in a background with a sunset, light your subject in warmer tones, with the direction of the sun in mind, or if your background has elements like street lights, try to simulate those lights shining on your subject.


For these purposes, shoot the highest quality you can in all respects. Shoot progressive, not interlaced, and shoot the highest resolution at the highest bit rate for a good, solid picture and the most color information you can get. Choose the highest color sampling available to you, at least 4:2:2. While it’s still possible to key using 4:2:0 sampling, use the best color resolution you can get for the cleanest keys. If you can, shoot in LOG or RAW formats for preservation of the most color information.
If possible, use a shallow depth of field with your subject in sharp focus, while the background is slightly blurred. You want a solid, continuous color for your background, so a slight blur can help even out slight shadows or wrinkles in the background. With your subject in good focus, you should have sharp edge lines against the background.


First, especially if you shot LOG or RAW, do your color-correcting, so that you get your colors to the correct balance and saturation.
Use secondary color correction to punch up and even out the background color before applying chroma key effect, adjusting the saturation of the background separate from the subject. Smooth out any unevenness in the lighting and bring the saturation and brightness to optimal levels. Use the waveform scope to guide you.
Often, FX artists will apply a garbage matte – cutting away all of the image except the area right around the subject. Using a garbage matte gives you less to key, making the key easier, and it also takes care of problems like the edge of the green or blue screen being visible in the shot, or visible equipment like lights or microphones. Create a garbage matte using the Cookie Cutter FX, the Bézier Mask FX, or the Bézier mask in the Pan/Crop tool.

Now, apply the chroma key effect. Use the eyedropper tool to select the exact color of your background. Then use threshold sliders as needed to adjust the parameters of the key. You can also apply a blur to the edges.
The standard Chroma key effect in VEGAS Pro is very good, but the chroma key tools in VEGAS Effects and VEGAS Image are even better, with extra tools like spill suppression and light wrapping giving you even more detailed control to achieve perfect keys and seamless composites.
Once you’ve achieved the perfect key, put any background you choose in a track or layer under your keyed footage. You’ve now created a composite, and you’ve made your first chroma key video!


The ultimate tools for chromakey are here and at your fingertips! With VEGAS Pro Post, you have the combined power of VEGAS Pro, VEGAS Effects, and VEGAS Image. Take advantage of the most powerful built-in effects capabilities of any non-linear editor in VEGAS Pro. For even more excellent and realistic chromakey, leverage the power of VEGAS Effects and VEGAS Image, offering automatic green screen removal, eliminating the need to spend hours cleaning up fine elements like hair. Get a seamless key that no one will ever know is an effect with spill suppression and light wrap, and use edge softening to take hard edges off your keyed subjects. If professional-level keying is what you’re after, VEGAS Pro Post is your go-to solution!

- 2-for-1 deal: Buy one and get one for free!
- Buy a VEGAS product today and get the new version of the same product for free!
- 2-for-1 deal: Buy one and get one for free!
- Buy a VEGAS product today and get the new version of the same product for free!
What's the difference between VEGAS Pro Edit, VEGAS Pro Suite and VEGAS Pro Post?