
What you’ll learn:
How to remove background noise from video & audio files
Got video or audio with unwanted noise? Don’t worry; VEGAS Pro has ways to help! In this tutorial, we’ll discuss what noise is and how to avoid it, and then explore some tools and techniques offered in VEGAS Pro which can mitigate or even eliminate noise from your audio and video.
First, we’ll cover some general concerns regarding audio and video noise, looking at the best ways to avoid and manage it before you ever get to post production.
Then, we’ll follow these steps in VEGAS Pro for removing noise from audio:
STEP 1: Lower Volume
STEP 2: Noise Gate
STEP 3: Equalizer
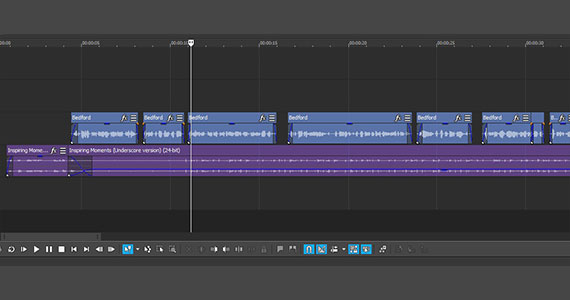
STEP 4: Cover Noise with Music or Other Sounds
Finally, we’ll go through the following steps for removing video noise in VEGAS Pro:
STEP 5: Denoise FX
STEP 6: Darkening Lows
There’s a lot to cover, so let’s get right to it. Read on to find out more!

The best way to deal with noise in your video or audio is not to have any, or if it can’t be avoided, to record it in a way that it’s easy to mitigate. This may seem obvious, but many times, productions leave problems like this to be “fixed in post,” expecting there to be some magic button or killer technique which will solve the problem. Most of the time, there isn’t. There are ways to mitigate noise, and some of them do a very good job, but it always comes at some cost to quality.
Noise happens most prominently in the darker areas of video. The best way to avoid it? Use plenty of light and give your video proper exposure. Video that’s not lit well enough ends up dark and noisy with muddy colors, and the darker it is, the worse the noise problem. Lots of light helps alleviate it. You may think, for example, a nighttime scene should be dark, so you may be tempted to shoot it dark, but keep in mind what professionals do. They light the scene much more brightly than the final image will be so that they obtain a clean image. They place shadows where they should be in a dark scene, but overall, the image is a stop or two brighter. Then, working with a clean image in post, they bring the exposure down and get the dark look for the final image. You can always darken a brighter, clean image, but if you try to brighten a dark image, the result will always be more video noise. Plan ahead and manage your noise.
The same is true for audio. Don’t record in a location which gives you lots of background noise. Stay away from locations outside noisy streets or near trains or construction. Turn off household items which produce noise, like fans, refrigerators, and air conditioning. Most importantly, keep your microphones as close to your voices as possible. Don’t mount your microphone on your camera. Use a boom and get your microphone inches from your talent or use lavalier microphones planted on them. The closer the microphone, the louder the voice will be compared to any background noise, sometimes overpowering it completely. And if it doesn’t, the difference in volume between the voice and the background noise will often be enough that you can eliminate background sounds without eliminating the voice, as we’ll see a bit later.
But if you can’t avoid noise, or need to edit footage you didn’t record which has noise, there are some tools and techniques in VEGAS Pro which will help you to mitigate it, and sometimes remove it entirely.

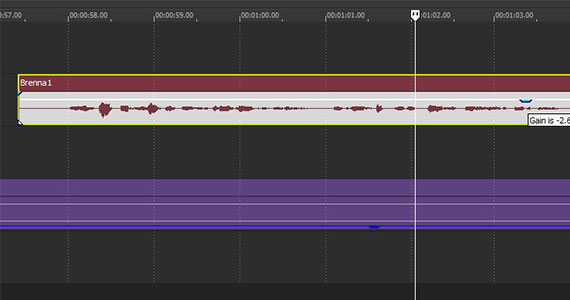
Sometimes the most effective method to get rid of background noise is to lower the volume. Low-level noise often sits at the “floor” of the audio, at the lowest volume levels. Lowering the overall volume pushes the volume of the noise below the floor. If you’ve recorded a good, strong voice signal which is much louder than any background noise, like we mentioned above, you may end up with a clean voice and no noise.
In VEGAS Pro, you can lower the volume of an audio event in a few different ways.
✓ Slide the volume slider in the track header to the left to lower the volume of all audio events in that track. To lower the volume of a single event, click the top of the event and drag the Gain level down.
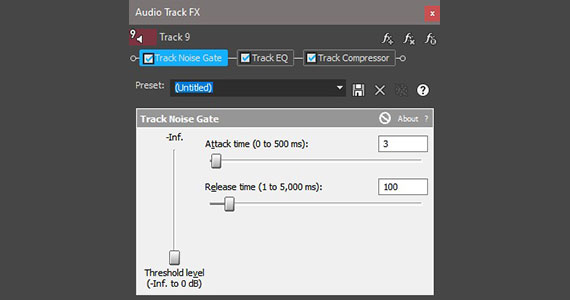
But sometimes simply lowering the volume doesn’t work, because the volume of the noise is too close to the volume of the voice and the voice volume becomes too low. If your background noise is something like a constant hiss, it may be a job for the Noise Gate. The Noise Gate eliminates any sound below a certain volume level, so if the noise volume is always lower than the sound you want to keep, the Noise Gate solves the problem.
✓ Click the Track FX button in the track header. The Audio Track FX window opens.
✓ Click Noise Gate. The Noise Gate controls appear.
✓ Raise the Threshold level slider, which sets a threshold volume level. The Noise Gate eliminates all sound below that volume level.
The drawback is that the sounds you want to keep, especially the human voice, vary in volume, so there may be parts of sounds you want which get caught in the Noise Gate and are eliminated along with the noise.
✓ Play the clip. If you hear bits and pieces of the audio cutting out, then adjust the Attack Time and Release Time sliders. These sliders control how aggressive the Noise Gate is, so increasing the Attack Time and Release Time may help restore some of the wanted sound.
✓ Adjust to find a balance between eliminating the noise and restoring the sounds you want.
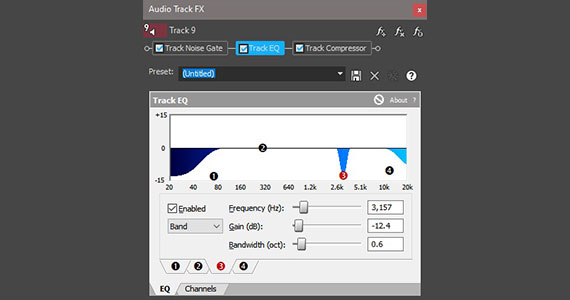
An Equalizer (EQ) lets you control the volume of specific frequencies or ranges of frequencies in sound. If your background noise is at a particular frequency, like a constant hum or hiss may be, then you can use the EQ to lower the volume of that particular frequency and hopefully eliminate the sound altogether.
✓ Click the Track FX button in the track header. The Audio Track FX window opens.
✓ Click Track EQ. The Track EQ controls appear.
In the white pane, there’s a flat line with four control points, each containing a number. Each point controls a range of frequencies.
The points furthest left and furthest right –1 and 4, respectively – control shelves, meaning all frequencies from a certain point all the way to the lowest (1) or highest (4). The other two points, 2, and 3, control a narrower range of frequencies within a hyperbole.
✓ Click point 4 and drag it down. A blue area forms between the point and the line, representing all the frequencies lowered to the volume to which to drag the point. Point 4 is the Low Shelf at default, so you lower the volume of all the lowest frequencies. If you have a constant low hum or rumble in your audio, such as a distant train rolling by, this may help eliminate it. Slide the point to the right to increase the range of frequencies affected, or to the left to decrease the range.
✓ If there’s a low hum or rumble that’s not quite at the lowest frequency, click point 3 and drag it down. A blue hyperbole forms, indicating the range of frequencies and how much the volume is lowered.
✓ Slide the point left or right to change the location on the spectrum until you find the frequency of your unwanted sound.
✓ Slide the Bandwidth slider to increase or decrease the frequency range.
Do the same with higher-pitched sounds like hisses.
✓ Use point 1 to control the High Shelf for sounds at the highest frequencies or use point 2 to pinpoint and eliminate a sound a particular frequency.
Always keep in mind, the less you do, the better the result. You can lower the volume of a range of frequencies to silence, but when you do, you eliminate every sound in that range. A robust recording of a human voice covers nearly the entire frequency spectrum, so part of the voice will be eliminated along with the unwanted sound. Lowering the volume of too many frequencies can, and usually will, have undesirable effects on the sounds you want to keep.
✓ Double-click the event to create a loop region.
✓ Click Loop Playback in the timeline toolbar. Click Play. The clip now loops back and repeats over and over until you click Stop or Pause.
✓ Adjust frequencies while the loop plays for real-time results.

Video noise is often harder to deal with than audio noise, because you can’t just remove whole sections of video like you often can with audio. You also can’t usually bury video noise in other video or video effects. But if you’ve got video noise, you have a few tools at your disposal. Keep in mind, as with the solutions for removing audio noise, these tools and techniques are a compromise between eliminating noise and preserving image quality.
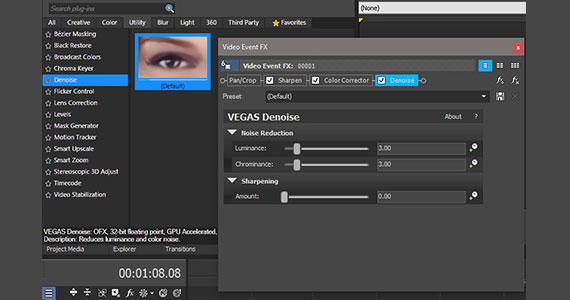
VEGAS Pro comes equipped with a brand new FX plug in, Denoise. Denoise analyzes the video and mitigates noise as best as it can while trying to preserve detail.
✓ Drag the Default Denoise preset from the Video FX window and drop it on your video event. The Video Event FX window opens, and the Denoise controls appear.
✓ Under Noise Reduction, adjust the Chrominance and Luminance sliders until you eliminate the noise to your satisfaction. Keep in mind, noise changes as the image changes, so it sometimes helps to loop your video and play it back over and over while you work.
✓ Double-click the event and click Loop Playback, then click Play. Adjust Chrominance and Luminance on the fly. You can also keyframe the effect to make fine adjustments to different sections of the video.
The cost of denoising video is usually sharpness. When you denoise, you basically blur the picture to take the edge enhancement off your noise. But when you do, you blur everything else in the image, too. While you won’t end up with a blurred image like you’d have if you added a blur effect, you may see unnatural skin or facial features which look somewhat like an oil painting. In any case, you’ll lose detail.
You can bring back some of that detail.
✓ Under Sharpening, adjust the Amount slider to the right to apply sharpening. Too much will bring back some noise or have other unwanted effects, so use only as much as you need.
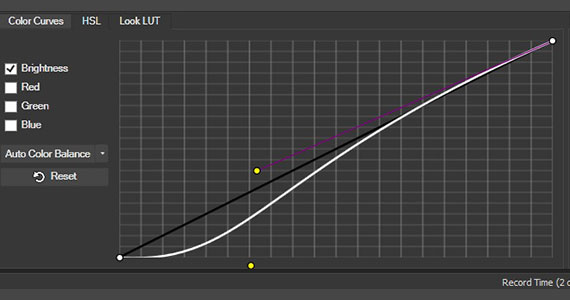
As we said above, most video noise comes about because there’s not enough light. Naturally, most noise is found in the darker areas of video, but not in the blackest areas, because black noise against a black image isn’t visible. Darken those areas even further, making those areas all black or close to all black, and you can eliminate a lot of the noise.
✓ Click the video event. Click the Color Grading button in the timeline toolbar. The Color Grading panel opens.
✓ On the Color Curves tab, enable Brightness and disable Red, Green, and Blue.
✓ Grab the handle at the lower left of the white line in the Color Curves graph and drag it down, lowering the brightness of the darkest areas of the image.
✓ Flatten the curve down to push all of that area of brightness to black. Adjust the curve area you flatten to restore wanted detail you may have lost. As with other solutions we’ve discussed, it’s a balancing act between eliminating noise you don’t want and keeping details you do. Find a balance that’s acceptable to you.


What's the difference between VEGAS Pro and VEGAS Pro Suite?